Irresistible Layers Await in These Gorgeous Dessert Cups

Dessert cups are small, eye-catching, and surprisingly easy to make — a perfect way to serve up single portions for parties, family meals, or even a simple weeknight treat. In this article, I’ll guide you through different easy, make-ahead dessert cup recipes, from mini cannoli and tiramisu to banana pudding and Biscoff cheesecake. Plus, you’ll get useful tips and tricks that give these little cups an extra wow factor. Think simple layering advice, smart timing tips (the two-temperature trick is a game changer!), and ideas to tweak the flavors to match whatever season or crowd you’re feeding.
Dessert cups are tiny, stunning, and so practical — the perfect way to spin classic desserts into pretty-sized portions that wow at parties, taste great at family dinners, or easily finish off a busy weeknight. They look fancy but are actually pretty fuss-free: many don’t require baking, come together quickly, and travel well if you know a few simple hacks.
Here, you’ll find a mix of recipes ready to go (think mini cannoli, tiramisu, banana pudding, and Biscoff cheesecake) plus the step-by-step know-how that makes each cup shine. That includes straightforward layering methods, timing and make-ahead tips (the two-temperature trick brings a lovely contrast), supply suggestions, and small finishing touches you can add to make each dessert cup special.
- Hands-on help: clear step-by-step layering tips and assembly order to keep your layers neat and stable.
- Timing & storage advice: when to put it all together, how long to chill, and how far in advance you can prep each kind of dessert cup.
- Customization options: easy swaps for flavors, allergy-friendly ideas, and portion sizes ranging from 2-ounce shooter cups to larger 6–8 ounce shareable cups.
- Practical extras: the must-have supplies, tips for transporting safely, and quick fixes to avoid soggy bottoms or runny fillings.
Why You’ll Love These Cups
- Easy portions: one cup per person means no slicing and very little waste.
- Make-ahead friendly: most of these desserts can be prepped or assembled in phases the day before.
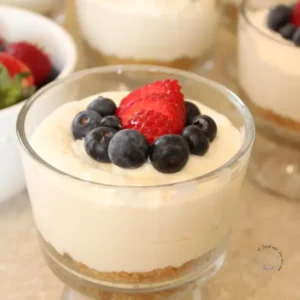
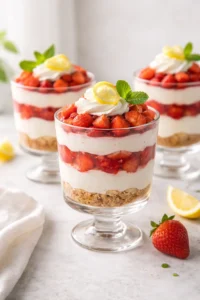
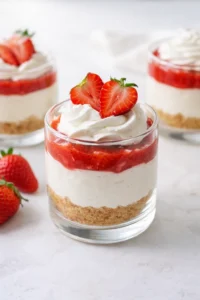
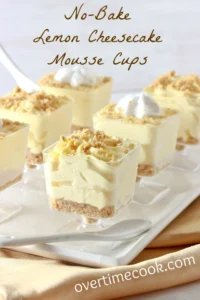
- Beautiful presentation: clear cups let you show off the layers, turning simple desserts into something special.
- Flexible flavors: mix and match cookies, cakes, fresh fruits, creamy fillings, and warm layers so you can adjust for any season or occasion.
- Kid and party approved: from fun dirt pudding to classic tiramisu, there’s a dessert cup for every taste and age group.
Pantry Basics for Layered Cups

- crushed cookies like graham crackers, Oreos, or Biscoff
- cubes of shortcake or pound cake
- mini phyllo shells
- cream cheese
- mascarpone
- well-drained ricotta
- heavy whipping cream
- instant pudding mixes
- whipped toppings
- powdered sugar
- granulated sugar
- pure vanilla extract
- cinnamon
- Biscoff spread
- cocoa powder
- fresh berries
- bananas
- chopped apples
- fruit compote
- mini chocolate chips
- chopped nuts like pistachios
- ladyfingers
- Nilla Wafers
- caramel sauce
- meltable chocolate
- gummy worms
- cookie crumbs
- melted butter
- about 1 tablespoon crumb base per 4-ounce cup
- gluten-free cookies
- crushed toasted nuts
- coconut cream (whipped)
- dairy-free cream cheese
- coffee liqueur
- rum
- fresh macerated berries
- warm apple compote
- tangy citrus curd
- granola
- toasted oats
Assemble and Layer the Cups
- Plan your layer order: base, creamy middle, finishing topping.
- Crush cookies or cube shortcake/pound cake for the base.
- Mix cookie crumbs with melted butter and pack about 1 tablespoon into each 4-ounce cup, pressing firmly but not over-compressing.
-
Chill packed crumb bases to help them set.

- Drain ricotta overnight in cheesecloth when making cannoli-style fillings.
- Beat cream cheese or mascarpone until smooth.
- Whip heavy cream to soft or firm peaks as required.
-
Fold whipped cream gently into the base filling to keep it light and airy.

- Chop fruits into small, bite-size pieces so layers stack neatly.
- Warm small components (shortcake cubes, fruit compote, or caramel) until just barely warm right before assembly.
- Use a piping bag or a zip-top bag with a small corner cut (or a spoon) to layer: base, filling, fruit or warm element, repeating if the cup is tall.
-
Add wet fruits or sauces on top or right before serving to prevent soggy layers.

- Chill assembled cups until set (generally 1–4 hours; tiramisu benefits from overnight chilling; Biscoff cheesecake at least 2 hours; dirt pudding about 1 hour).
-
Add final decorations (powdered sugar, cookie crumbs, whipped cream, or chocolate shavings) immediately before serving.

Pro Tricks for Flawless Layers
- Pick clear cups for the prettiest look — layers will pop visually, and your guests get a sneak peek of what’s inside.
- Drain ricotta overnight in cheesecloth for cannoli-style fillings to avoid watery textures that can ruin your cups.
- Press crumb bases firmly but don’t overdo it — you want some crunch left with every bite, not a brick.
- Keep wet fruits or sauces on top or add them right before serving to stop your layers from getting soggy.
- Use a piping bag when you want clean, even layers — a simple zip-top bag with a small cut corner works perfectly if you don’t have a fancy piping bag.
- Warm additions should be just a little warm, added last so they don’t soften or melt your chilled layers.
- If you’re making multiple flavors, label each cup — guests with allergies or preferences will love this thoughtful touch.
Mix-Ins and Substitution Ideas

- Gluten-free? Swap cookie crumbs and cakes for gluten-free cookies or crushed toasted nuts to keep it safe and tasty.
- Dairy-free? Use coconut cream whipped up or dairy-free cream cheese, plus dairy-free cookie options for the base.
- Adult-friendly? Add a splash of liquor like coffee liqueur in tiramisu or rum in banana pudding to give it a grown-up twist.
- Fruit-forward? Fresh macerated berries, warm apple compote, or tangy citrus curd make great fruity layers.
- Texture variations? Swap cookie crumbs for crunchy granola, or use toasted oats for a rustic, hearty base.
- Size it right: scale down to petite 2-ounce shooter cups for tasting parties or go big with 6–8 ounce cups perfect for sharing.
How to Store and Transport
- Keep dessert cups refrigerated: most no-bake cups last 2–4 days in the fridge when covered tightly with plastic wrap or stored in airtight containers.
- If you want the bases super crunchy, store crumb layers or phyllo cups separately and assemble just before serving.
- Freezing warning: creamy or whipped layers can get watery or “weep” after freezing and thawing, so avoid freezing mousse, whipped cream, or no-bake cheesecake cups.
- Transport tips: keep dessert cups flat in a shallow box or tray and chill them before traveling to prevent shifting. Bring garnish separately and add right before serving.
- Reheating warm elements: if you’re doing the two-temperature trick, gently warm only the small warm part (like compote or caramel) on the stove or microwave and spoon it into chilled cups as you serve.

Common Questions About Dessert Cups
- How far ahead can I make dessert cups? – You can usually prep 1–2 days in advance; tiramisu and some cheesecakes actually taste better after chilling overnight.
- Will cookie bottoms get soggy? – They can sometimes. To avoid this, press crumbs firmly, create a barrier with a thin chocolate layer or a dense filling, and add wet toppings at the last minute.
- Can I freeze dessert cups? – Freezing isn’t great for cups with whipped or mousse fillings; the texture changes. Fruit compotes or thick custards freeze better but may still lose some quality.
- What cup size do I need? – 4-ounce cups hit the sweet spot for portions and presentation; 2-ounce cups work for tastings, and 6–8 ounces for sharing or bigger cravings.
- How do I keep layers neat? – Chop fruits into small pieces, chill fillings well before layering, and use a piping bag or spoon with a steady hand for the cleanest layers.

More in Cupcakes