The Creamiest No-Bake Cheesecake Cups Recipe EVER!! | Rose Bakes

This No-Bake Cheesecake Cups Recipe is incredibly simple to pull together and might just be the creamiest, smoothest cheesecake I’ve ever whipped up. Honestly, it’s so light and silky I almost called it Cheesecake Mousse! Serving them in individual cups makes them a total crowd-pleaser for parties or any special occasion.
When I was recently asked to whip up dessert for 100 guests at a fundraiser, I’ll admit, I was a little overwhelmed. I seriously stared at recipe books and websites for weeks.
My amazing sister-in-law Ariel was organizing the event, and her one clear request was desserts served individually—no fuss, no extra serving utensils necessary.
Honestly, I felt stuck. Cupcakes or Rice Krispies Treats would have been fast, but honestly, I wanted something a bit more special and elegant.
I went back and forth a lot, trying to decide what would work best—changing my mind multiple times. Some days, I genuinely felt stuck.
A couple days before the big event, I finally had a little pep talk with myself and said, “Lisa, you have to pick something!” Anybody else do this? No? Okay, just me then.
In the end, after chatting with Ariel, I settled on individual no-bake cheesecake cups. Years ago, I made a Raspberry Lemon Cheesecake Trifle that was lighter on sugar and totally delicious, so I thought, why not create something along those lines—but with all the richness and sweetness we love? I mean, who can say no to cream cheese?
I made a quick run to Walmart for cream cheese, heavy cream, graham cracker crumbs, and lots of fresh raspberries. Now let’s dive into this recipe.
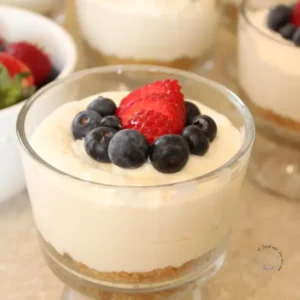
I’ve always loved how raspberries add that perfect pop of tartness to cheesecake, so popping one on top of each cup felt just right. No slicing or fuss—easy peasy.
If you want a dessert that’s ready to impress, super simple, and with a silky smooth texture, you’re in the right spot. I invented these no-bake cheesecake cups specifically for a fundraiser serving around 100 people, and let me tell you—they stole the show. The filling whips up light and fluffy like a mousse, the graham cracker base brings that classic crunch, and serving them in cute little cups means no hiding behind trays or fancy plating.
Below I break down everything you need: all the ingredients in one easy list (one batch will make about 4–6 cups), step-by-step assembly that anyone can follow, my best tips to get that ultra-creamy texture, fun topping ideas ranging from fruity to crunchy (even candied bacon if you’re feeling adventurous), plus advice on making ahead and storing so you can scale this up or down.
- What you’ll find: a full ingredient list, easy assembly instructions, helpful tips, and answers to common questions.
- Time savers: simple tricks for piping the filling, chilling efficiently, and stacking for transport.
- Variations: quick swaps to change the crust or add flavors—think chocolate, different fruits, or cookie bases.
Scroll down for detailed photos and a short video showing just how quick and easy these come together. Spoiler alert: they’re so good you can definitely enjoy them plain.
Why They Taste So Silky
The short and sweet reason is simple: these cheesecake cups are ridiculously easy to make and insanely delicious. They have a super creamy, mousse-like filling with just a handful of pantry ingredients. Plus, they look polished enough to serve at any gathering without spending hours fussing.
- Silky, melt-in-your-mouth texture: folding whipped cream into softened cream cheese creates a light, fluffy filling—almost mousse-like—that feels luxurious in every bite.
- No oven needed: this recipe is perfect for hot days, last-minute cravings, or when your oven is busy with other dishes.
- Party-friendly portions: individual cups mean no plates or cutlery to juggle, easy portion control, and quick grab-and-go for a crowd (one batch makes 4–6 cups easily scaled up).
- Totally customizable: decorate with raspberries, strawberries, cookie crumbs, toasted coconut, or even maple candied bacon. You can also mix in cocoa powder for a chocolate twist or swap crusts to match any diet.
- Make-ahead friendly: you can assemble the cups the night before, cover and stack them in the fridge, and chill for at least an hour or overnight for firmer results. Leftovers keep great for 2–3 days.
- Simple ingredients and minimal effort: cream cheese, heavy cream, sugar, vanilla, and graham crumbs—no gelatin, special gear, or complicated steps needed.
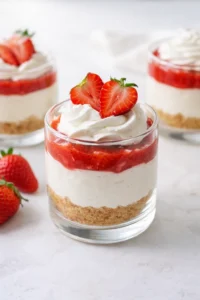
- Looks professional, with ease: pipe the filling for a clean finish or spoon it in and top with a single berry for straightforward elegance.
Whether you want a quick weeknight treat, a sweet date-night dessert, or hundreds of pretty little cups for an event, these no-bake cheesecake cups make life easy and taste incredible every time.
This no-bake cheesecake cup recipe is a dream for anyone who loves creamy desserts but wants to skip the oven. The whipped cream folding technique gives the filling a soft, airy feel—almost like mousse—while still packing all the creamy richness of traditional cheesecake. The individual cups are perfect for gatherings large or small since they come together fast and can carry any toppings your heart desires. This batch makes about 4 to 6 cups depending on cup size, and it scales beautifully.
Ingredients and Garnish Ideas

- 3/4 cup graham cracker crumbs
- 2 tbsp salted butter, melted
- 8 oz cream cheese, softened
- 1/2 cup granulated sugar
- 1 teaspoon pure vanilla extract
- 1 cup heavy whipping cream
- Optional toppings: raspberries, strawberries, whipped cream, broken cookies, extra graham cracker crumbs, toasted coconut, maple candied bacon, candied lemon slices
Assemble the Cups
- Bring the cream cheese to room temperature until softened.
- Chill the mixing bowl and heavy whipping cream before whipping to help achieve stable peaks.
- Stir melted butter and graham cracker crumbs in a small bowl until crumbs are evenly coated.
-
Spoon about 2–3 tablespoons of the crust mixture into the bottom of each cup or serving glass.

- Pour the chilled heavy whipping cream into the chilled bowl and beat on high speed until stiff peaks form (about 1 minute, depending on mixer).
- Transfer the whipped cream to a separate bowl.
- Beat the softened cream cheese with granulated sugar and vanilla extract until completely smooth and lump-free.
-
Gently fold the whipped cream into the cream cheese mixture with a spatula until well blended and light and airy.

- Spoon or fill a piping bag with the cheesecake mixture and pipe or spoon the filling evenly into each cup; smooth or swirl the tops as desired.
- Top each cup with desired toppings (fresh berries, extra crumbs, etc.) if using.
-
Cover the cups tightly with plastic wrap and chill in the refrigerator for at least 1 hour (or overnight for a firmer set).

Pro Tips for Perfect Texture
- Make sure your cream cheese is at room temperature—it mixes better and prevents lumps in your filling.
- Chill your mixing bowl and heavy cream before whipping; this helps achieve fluffy, stable peaks faster.
- Gently fold whipped cream in instead of stirring fast to keep the airy texture intact.
- For a fancy finish, pipe the filling using a large round or star tip—makes your desserts look bakery-level!
- If you’re prepping for a big crowd, assemble your cups, cover them tightly with plastic wrap, and layer trays in the fridge overnight. This saves so much time on event day.
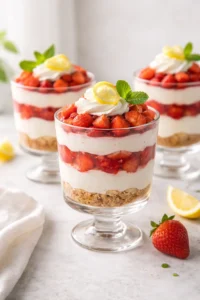
- Try swapping raspberries for strawberries if you want berries that hold up better during transport or when eaten on the go.
- If you want a twist, use crushed cookies or gluten-free graham crumbs in place of the graham cracker crust to fit dietary needs or just for flavor variety.
- Store your cheesecake cups covered in the fridge—they keep well for a few days, but top fresh for best appearance.
Flavor Mix‑Ins and Toppings
- Strawberries—classic and juicy
- Raspberries—for a tart burst
- Extra graham cracker crumbs—for added crunch
- Easy sugared berries—just toss berries with sugar for sparkle and sweetness
- Toasted coconut—for a tropical spin
- Maple candied bacon—hello, sweet and salty magic
-
Candied lemon slices—for a zesty, pretty touch
After the No-Bake Cheesecake Cups Recipe turned into a huge hit at that fundraiser (besides some debate over raspberries), I knew I had to share it. Plus, I had some raspberries left over and snapped photos with both raspberries and strawberries on top.
So, the choice is yours! Go with raspberries, strawberries, fresh whipped cream, or even enjoy them plain. What I love is a single batch makes just 4–6 cups, so it’s perfect whether you want to treat just your family, surprise someone for Valentine’s Day, or whip up a simple Easter dessert.
Or honestly, eat them just as they are. These cups are so creamy, so silky, and melt-in-your-mouth delicious that they don’t need a single topping to be absolutely perfect.
Storage, Transport, and Make‑Ahead
Whether you’re making dessert for a cozy group of 10 or a big event with 100 guests, this recipe has you covered. The plastic cups make serving a breeze—they look neat, slice out the mess, and make portion control easy.
For the fundraiser, I made sheet pans full of these cheesecake cups, then covered everything tightly with plastic wrap and stacked them in the fridge the night before. Oh! And I even made some with chocolate, which I’ll tell you about later.
Here are some quick snapshots from my phone showing how the desserts looked for the event:
Description
This No-Bake Cheesecake Cups Recipe is unbelievably easy and might just be the creamiest, smoothest cheesecake mix you’ve ever tried. It’s so light and fluffy I almost called it Cheesecake Mousse! Individually serving these in cups is perfect for parties and any fun celebrations.
Instructions
- In a small bowl, stir together the melted butter and graham cracker crumbs until it’s evenly coated. Spoon about 2-3 tablespoons of this crust mix into the bottom of each cup or serving glass.
- In a large mixing bowl or the bowl of your stand mixer, pour in the heavy whipping cream and beat on high speed until stiff peaks form, usually about one minute (but timing depends on your mixer strength).
- Transfer the whipped cream to another bowl. Then, in your mixer bowl, beat the softened cream cheese together with sugar and vanilla extract until completely smooth and creamy, no lumps.
- Gently fold the whipped cream into the cream cheese mixture, using a spatula to keep it light and fluffy without deflating.
- If you want a clean, polished look, spoon the cheesecake mixture into a piping bag and pipe it neatly into your cups. Otherwise, just spoon the filling evenly into each cup.
- Add toppings like fresh berries if you like, cover your cups tightly with plastic wrap, and chill in the refrigerator for at least an hour to let them set. For firmer results, chill overnight.

Answers to Common Questions
-
How long do the cups need to chill?
You’ll want to chill the cups for at least 1 hour so they firm up nicely. For a more solid texture and easier transport, popping them in the fridge overnight is best.
-
How many servings does this recipe yield?
A single batch typically makes about 4 to 6 cups, depending on the size of your cups and how much crust and filling you use.
-
Can I prepare these ahead of time for a party?
Absolutely! Assemble the cups, cover them tightly, and keep them refrigerated up to the night before. For big events, stacking covered trays in the fridge saves loads of time.
-
How should leftovers be stored, and how long do they last?
Keep the cheesecake cups covered in the fridge. They stay fresh and tasty for about 2–3 days. To keep toppings looking their best, enjoy them within one or two days.
-
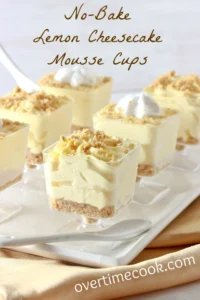
Is there a way to make a chocolate version?
Yes! Simply fold in cocoa powder or melted, cooled chocolate into the cream cheese mixture to your liking—try about 1/4 to 1/3 cup cocoa or 3–4 oz melted chocolate. You can also stir in some chocolate chips for texture.
-
Any allergy-friendly tips?
You can swap regular graham crumbs for gluten-free alternatives or use crushed gluten-free cookies to keep the crust gluten-free. For dairy-free, look for vegan cream cheese and whipping cream substitutes—though expect some differences in texture and taste.


A creamy and silky no-bake cheesecake served in individual cups, perfect for parties and gatherings. The cheesecake filling is light and mousse-like, made by folding whipped cream into cream cheese, sweetened and flavored with vanilla, over a graham cracker crust base. Comes with various optional toppings like fresh berries, toasted coconut, or candied bacon, and can be made ahead and stored refrigerated.
- Prep Time: 15 minutes
- Cook Time: 0 minutes
- Total Time: 1 hour 15 minutes (includes chilling time)
- Yield: 4-6 servings 1x
- Category: Dessert
- Cuisine: American
Ingredients
- 3/4 cup graham cracker crumbs
- 2 tablespoons salted butter, melted
- 8 ounces cream cheese, softened
- 1/2 cup granulated sugar
- 1 teaspoon pure vanilla extract
- 1 cup heavy whipping cream
- Optional toppings: raspberries, strawberries, whipped cream, broken cookies, extra graham cracker crumbs, toasted coconut, maple candied bacon, candied lemon slices
Instructions
- In a small bowl, stir together the melted butter and graham cracker crumbs until evenly coated. Spoon about 2 to 3 tablespoons of this crust mix into the bottom of each cup or serving glass.
- In a large mixing bowl or stand mixer bowl, pour in the heavy whipping cream and beat on high speed until stiff peaks form, about 1 minute.
- Transfer the whipped cream to another bowl. In the original mixer bowl, beat the softened cream cheese together with sugar and vanilla extract until smooth and lump-free.
- Gently fold the whipped cream into the cream cheese mixture using a spatula, being careful to maintain lightness and volume.
- Spoon or pipe the cheesecake mixture evenly into each cup.
- Top each cup with desired toppings like fresh berries. Cover tightly with plastic wrap and chill in the refrigerator for at least 1 hour or overnight for firmer texture.
Notes
Make sure cream cheese is at room temperature for smooth mixing., Chill the mixing bowl and heavy cream before whipping to achieve stable peaks faster., Folding whipped cream gently maintains the airy mousse-like texture., For a professional look, pipe filling using a large tip., These cheesecake cups can be assembled a day ahead and stored covered in the fridge., Try swapping raspberries for strawberries or using different cookie crumbs for crust variations., Chocolate version: Fold in 1/4 – 1/3 cup cocoa powder or 3-4 oz melted cooled chocolate into the cream cheese mixture., Gluten-free options available by substituting graham cracker crumbs with gluten-free crumbs or cookies., Dairy-free options can be created with vegan cream cheese and whipping cream substitutes, but texture and taste may differ.
Nutrition
- Serving Size: 1 cup
- Calories: Approximately 350 kcal per serving
- Fat: 28 g per serving
- Carbohydrates: 25 g per serving
- Protein: 5 g per serving
More in Cupcakes