White Chocolate Raspberry Tiramisu | Creamy No-Bake Dream Dessert
White Chocolate Raspberry Tiramisu | Creamy No-Bake Dream Dessert
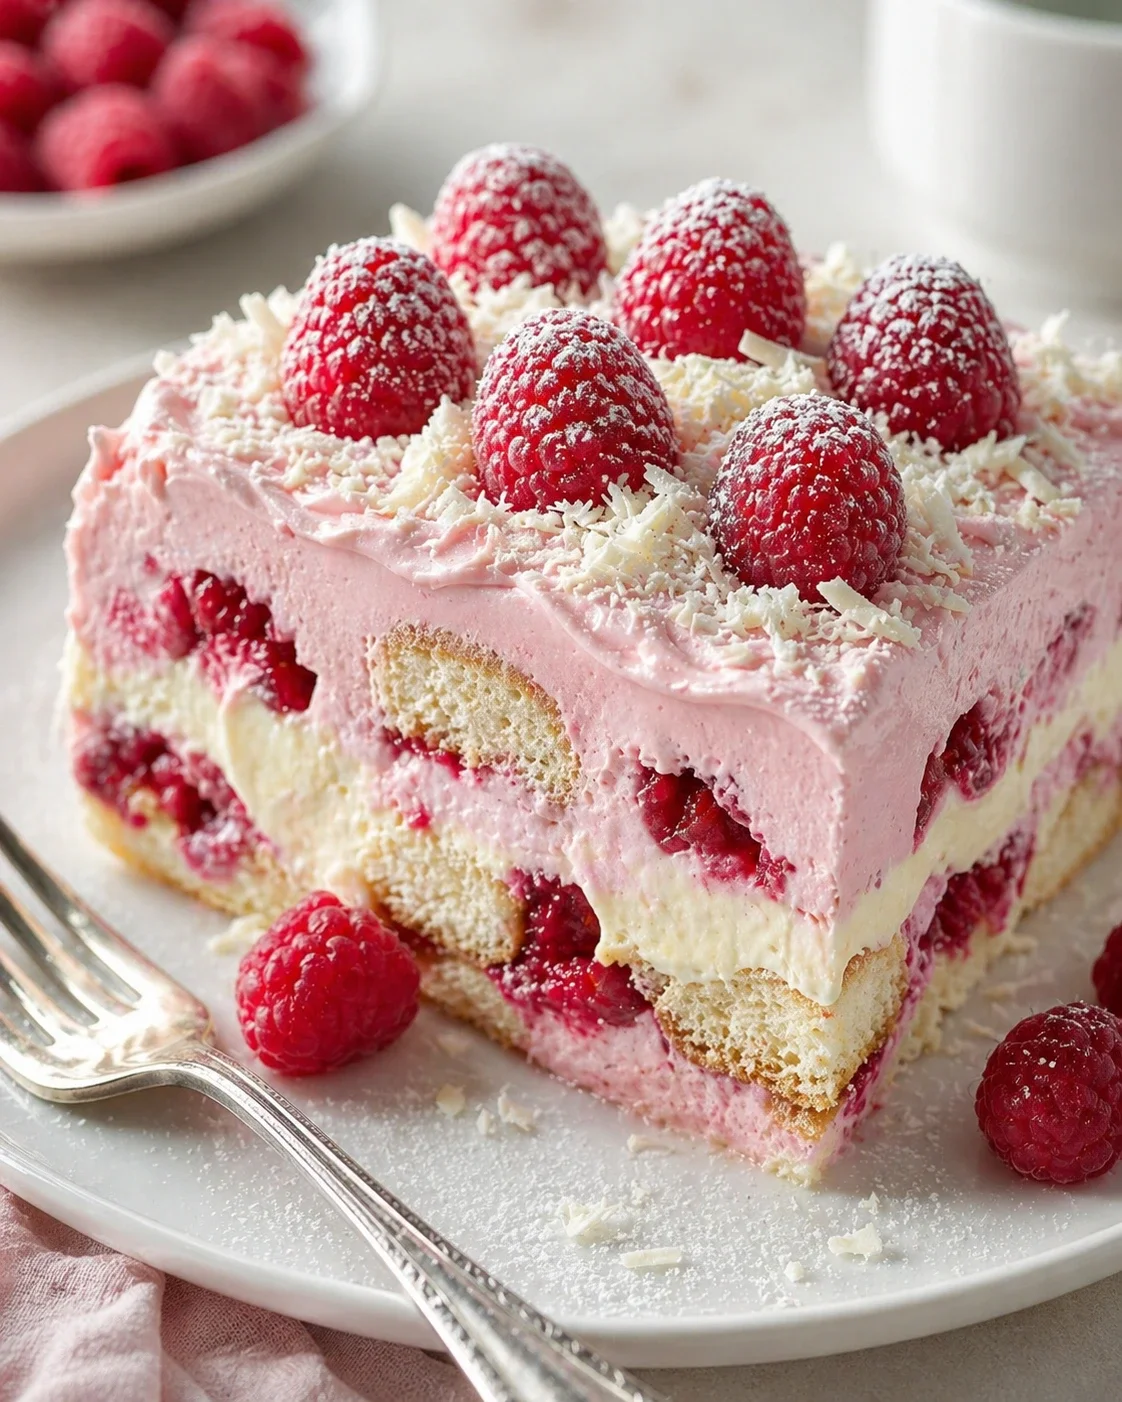
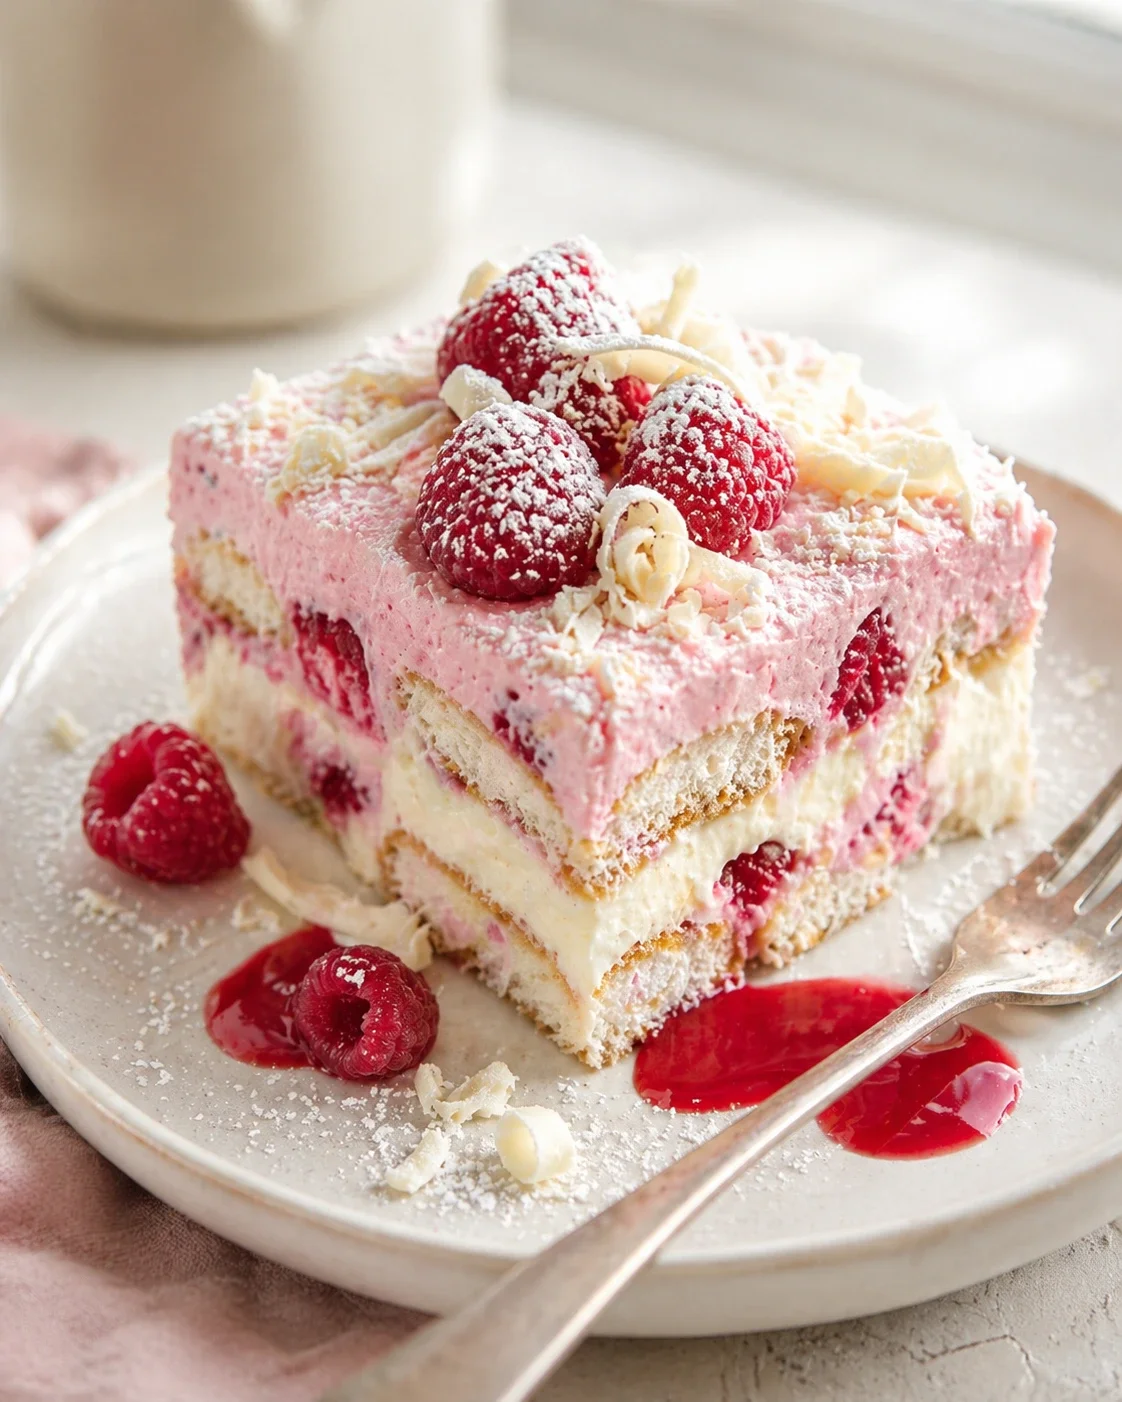
White Chocolate Raspberry Tiramisu is exactly what you want when you need a make-ahead dessert that’s as stunning as it is simple. Think creamy, dreamy layers, a bright pop of raspberry, soft ladyfingers soaked just right, all topped off with a gentle snow of grated white chocolate. It feels special and romantic, slices cleanly after chilling, and looks like you worked all afternoon when really, it’s a breeze.
If you’re serving this White Chocolate Raspberry Tiramisu for a party, don’t forget to snap a picture right when it comes out of the fridge — it disappears faster than you’d expect!
© 2026 | KinsleyRecipes.com. All Rights Reserved.
Think of this recipe as your go-to no-bake dessert that turns heads without any fuss. It comes together easily in a few simple steps before spending several hours chilling in the fridge to set perfectly. You’ll start by making a lively raspberry syrup, whip up a light, egg-free mascarpone cream, then layer those syrup-soaked ladyfingers with plenty of white chocolate for a gorgeous, soft pink tiramisu that cuts like a dream.
The hands-on time is pretty short — most of your work will be simmering syrup and mixing cream — but be sure to give it at least 6 hours of rest (overnight is even better!). That chill time is what lets the flavors meld together and the layers firm up just right. When it’s ready, you get a silky, slightly tangy treat with tender ladyfingers and a beautiful, snowy top of white chocolate.
- Simple parts: raspberry syrup, whipped mascarpone filling, ladyfingers, and white chocolate.
- Fast to assemble, slow to chill: about 30–45 minutes of prep; then 6 hours or overnight to relax in the fridge.
- Ideal for making ahead: looks elegant on any occasion, serves cold, and pairs beautifully with coffee or sparkling wine.
What Makes It Special
White Chocolate Raspberry Tiramisu is that dessert you bring out when you want to impress without stress. It has all the charm of something from a bakery, but you get to say “I made this!” with total confidence.
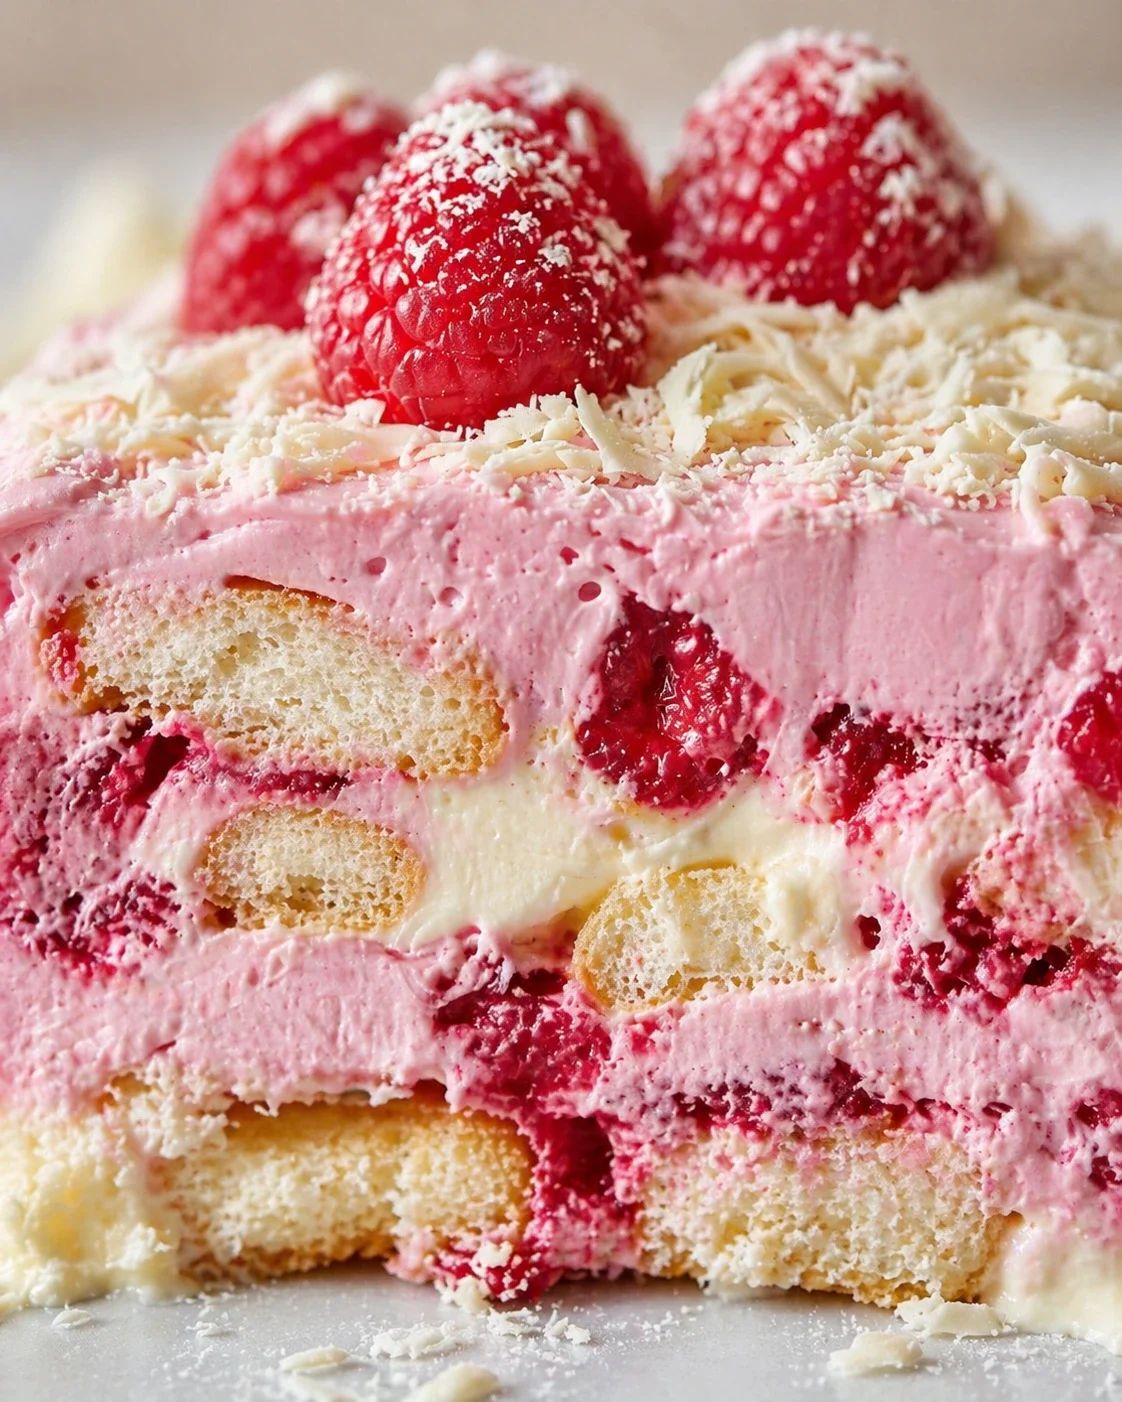
Soft ladyfingers take a bath in bright, tangy raspberry syrup, then get tucked between luscious, pink-tinted mascarpone cream that’s just the right mix of sweet, tangy, and softly vanilla-scented. The final flourish — a dusting of grated white chocolate — melts so perfectly, it’s like a little snowstorm of sweetness.
This dessert takes the cozy vibe of traditional tiramisu and flips it on its head by swapping espresso for vibrant raspberry syrup. Plus, rather than eggs, it relies on whipped cream and mascarpone, making the filling light yet rich, soft like velvet, and easy to spoon.
What I love most? It fits so many special moments. Whether it’s Valentine’s Day, a springtime brunch, or a baby shower, White Chocolate Raspberry Tiramisu feels right at home and ready to wow.
The Story Behind This White Chocolate Raspberry Tiramisu
I’m all about desserts that feel romantic but don’t require a million steps or fancy equipment. This tiramisu nails that sweet spot perfectly. The layers do most of the work, and your fridge takes care of the rest. It’s the kind of recipe that makes you look like a kitchen rockstar without breaking a sweat.
Why White Chocolate and Raspberry Work So Well
Raspberries bring a bright, tangy zing that keeps the mascarpone cream from ever tasting overly sweet or heavy. White chocolate balances that tang with a mellow, creamy sweetness, so each bite of White Chocolate Raspberry Tiramisu feels perfectly smooth and balanced. It’s a flavor match made in dessert heaven—also showcased in this Raspberry White Chocolate Loaf Cake.
Ingredients for Syrup, Filling, Assembly
- Raspberries (fresh or frozen)
- Water
- Granulated sugar
- Lemon juice
- Heavy cream (whipped to stiff peaks)
- Mascarpone cheese
- 3/4 cup of the cooled raspberry syrup
- About 1 cup whipped cream
- Vanilla
- Savoiardi ladyfingers
- Good-quality white chocolate
How to Build the Layers
- Add raspberries and water to a medium saucepan over medium-high heat.
- Crush the berries with a masher or fork until juicy and broken down.
- Bring to a gentle simmer, reduce heat, and simmer about 2 minutes.
-
Strain the mixture through a fine-mesh sieve into a bowl, pressing with the back of a spoon and discard seeds.
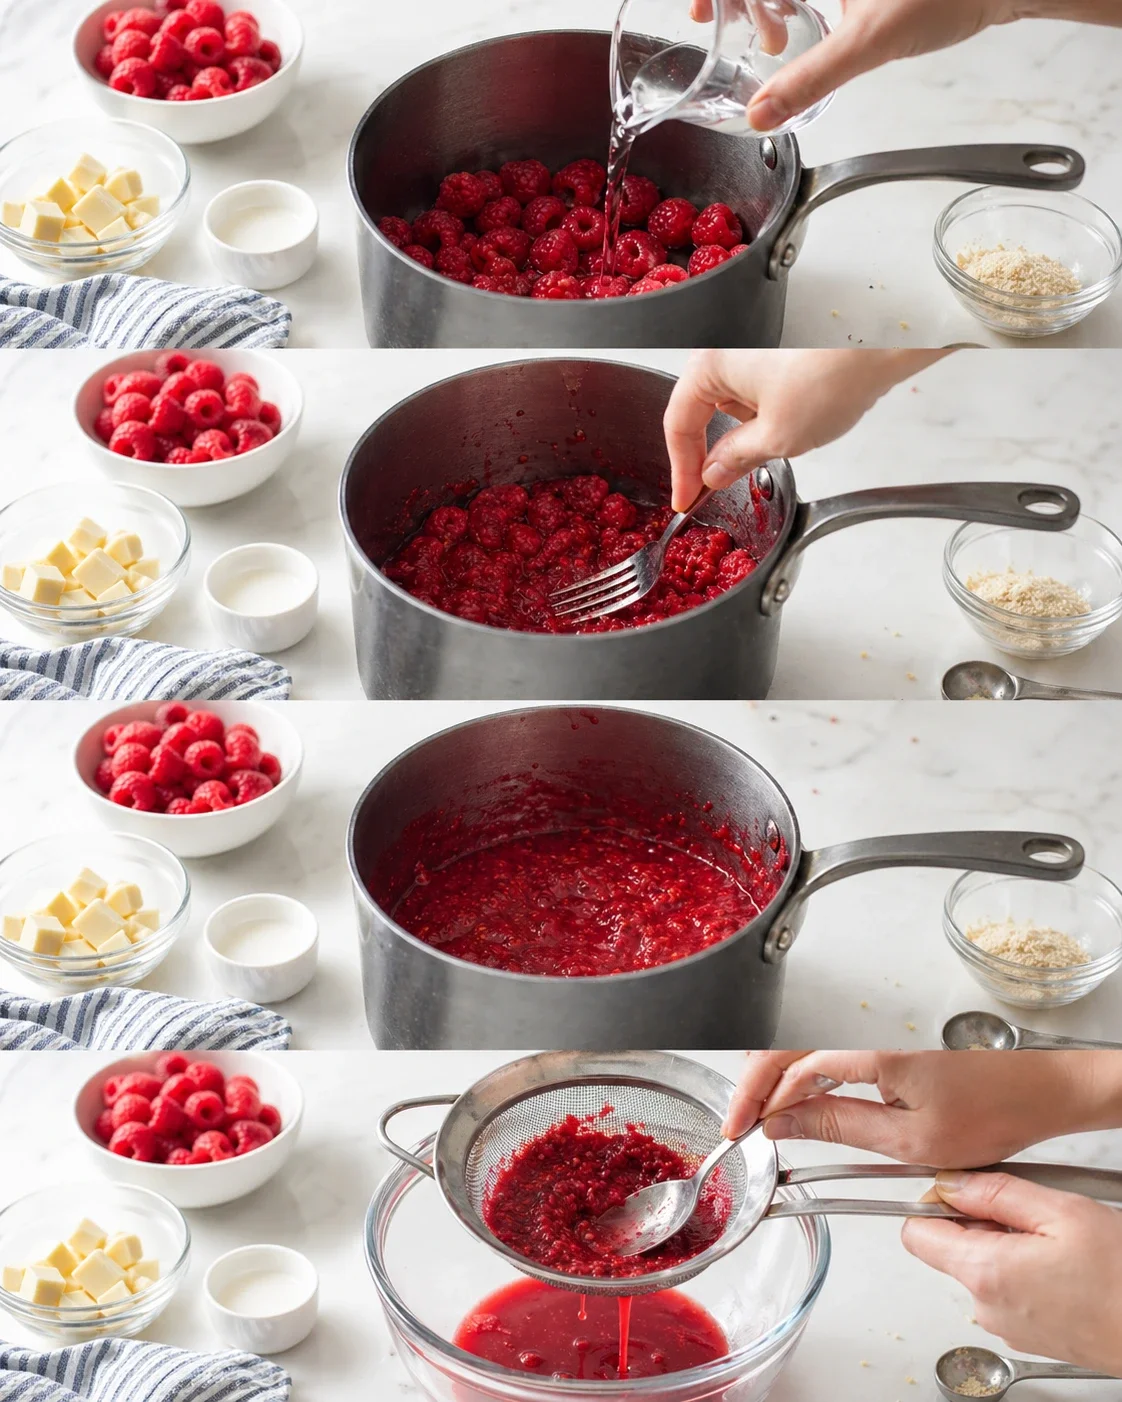
- Pour the strained juice back into the pan, add sugar and lemon juice, bring to a boil, then simmer 4–5 minutes until slightly thickened.
- Chill the raspberry syrup completely in the refrigerator.
- Using a stand mixer with a whisk attachment, whip the heavy cream to stiff peaks and transfer to a separate bowl.
-
In the mixer bowl, combine mascarpone, sugar, 3/4 cup of the cooled raspberry syrup, and vanilla; mix on medium speed until smooth.
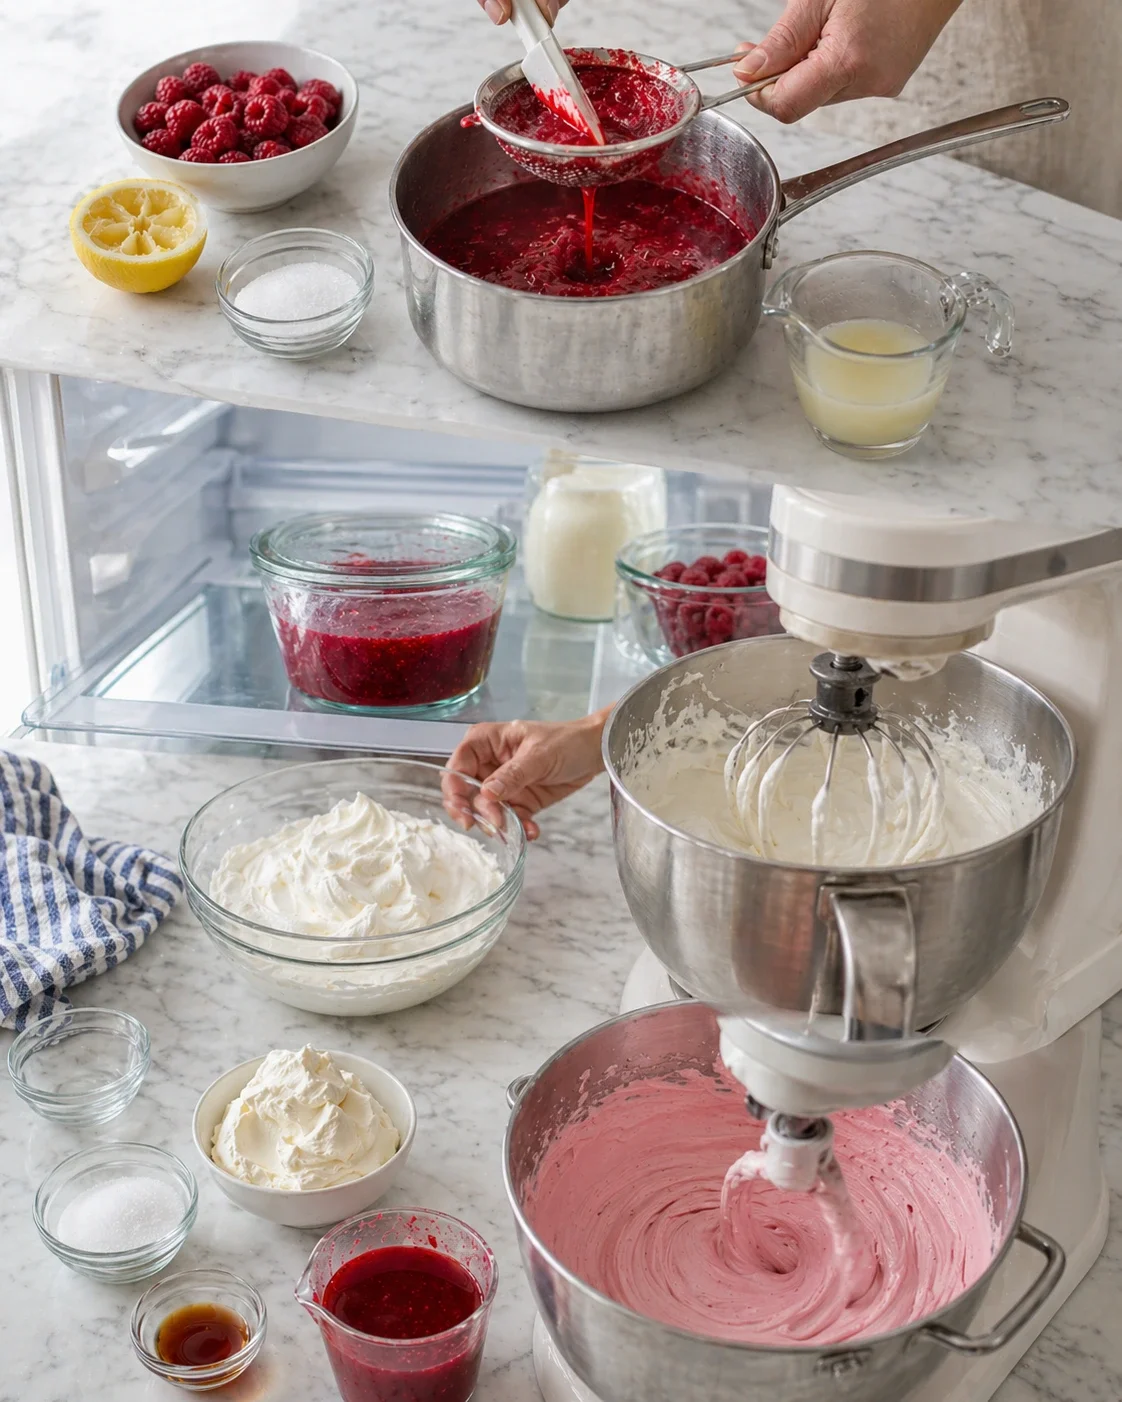
- Add about 1 cup of the whipped cream to the mascarpone mixture and mix until blended.
- Gently fold in the remaining whipped cream with a spatula until light and airy.
- One at a time, quickly dip each ladyfinger into the cooled raspberry syrup, shake off excess, and arrange in an even layer in an 8-inch square dish.
-
Spoon and spread half of the mascarpone filling evenly over the ladyfingers.
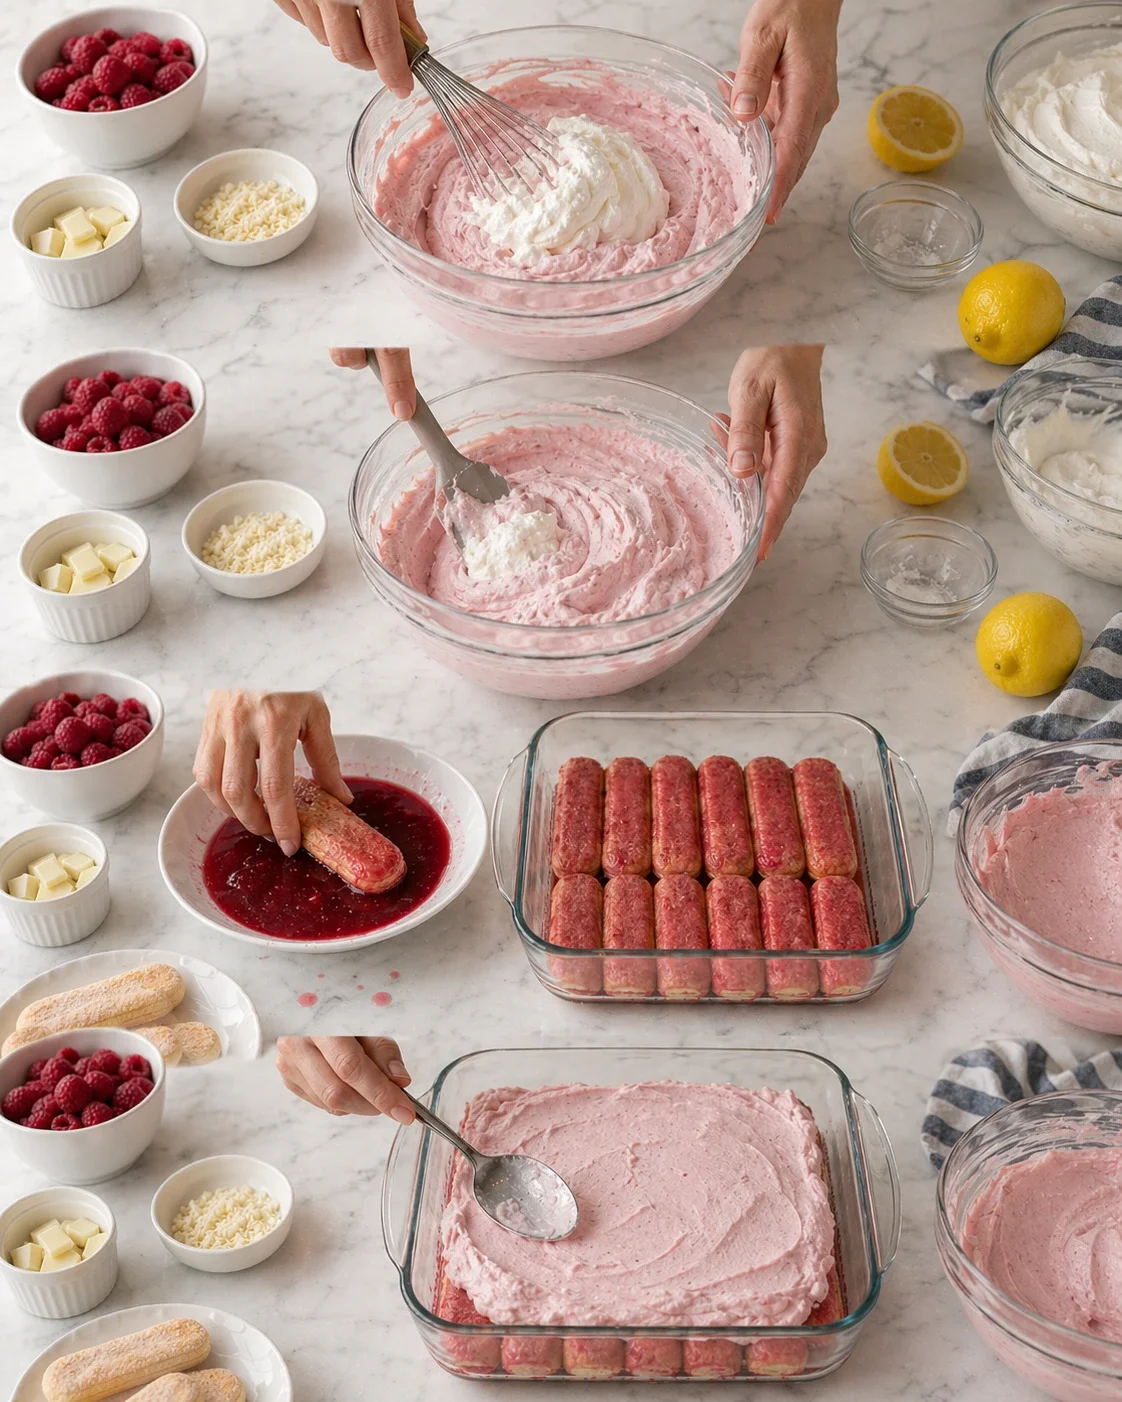
- Grate half of the white chocolate over the first cream layer.
- Dip another layer of ladyfingers in the syrup and arrange them over the grated white chocolate.
- Spread the remaining mascarpone filling smoothly over the second layer of ladyfingers.
-
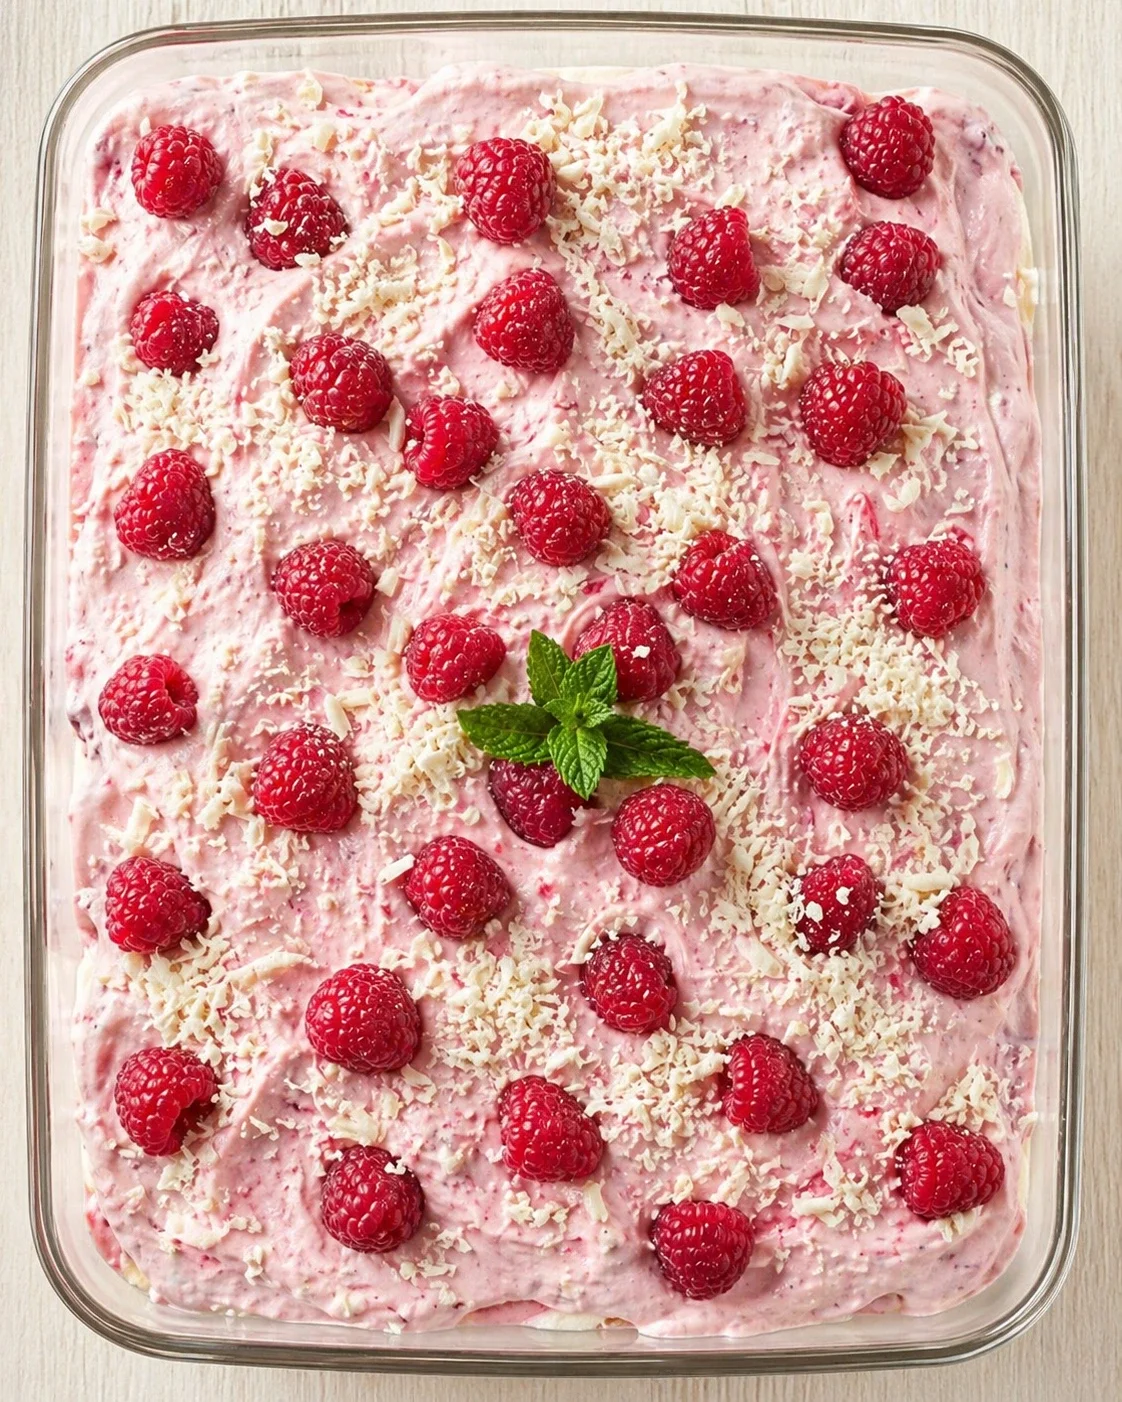
Transfer some filling to a pastry bag and pipe evenly across the surface for a decorative, fluffy top.
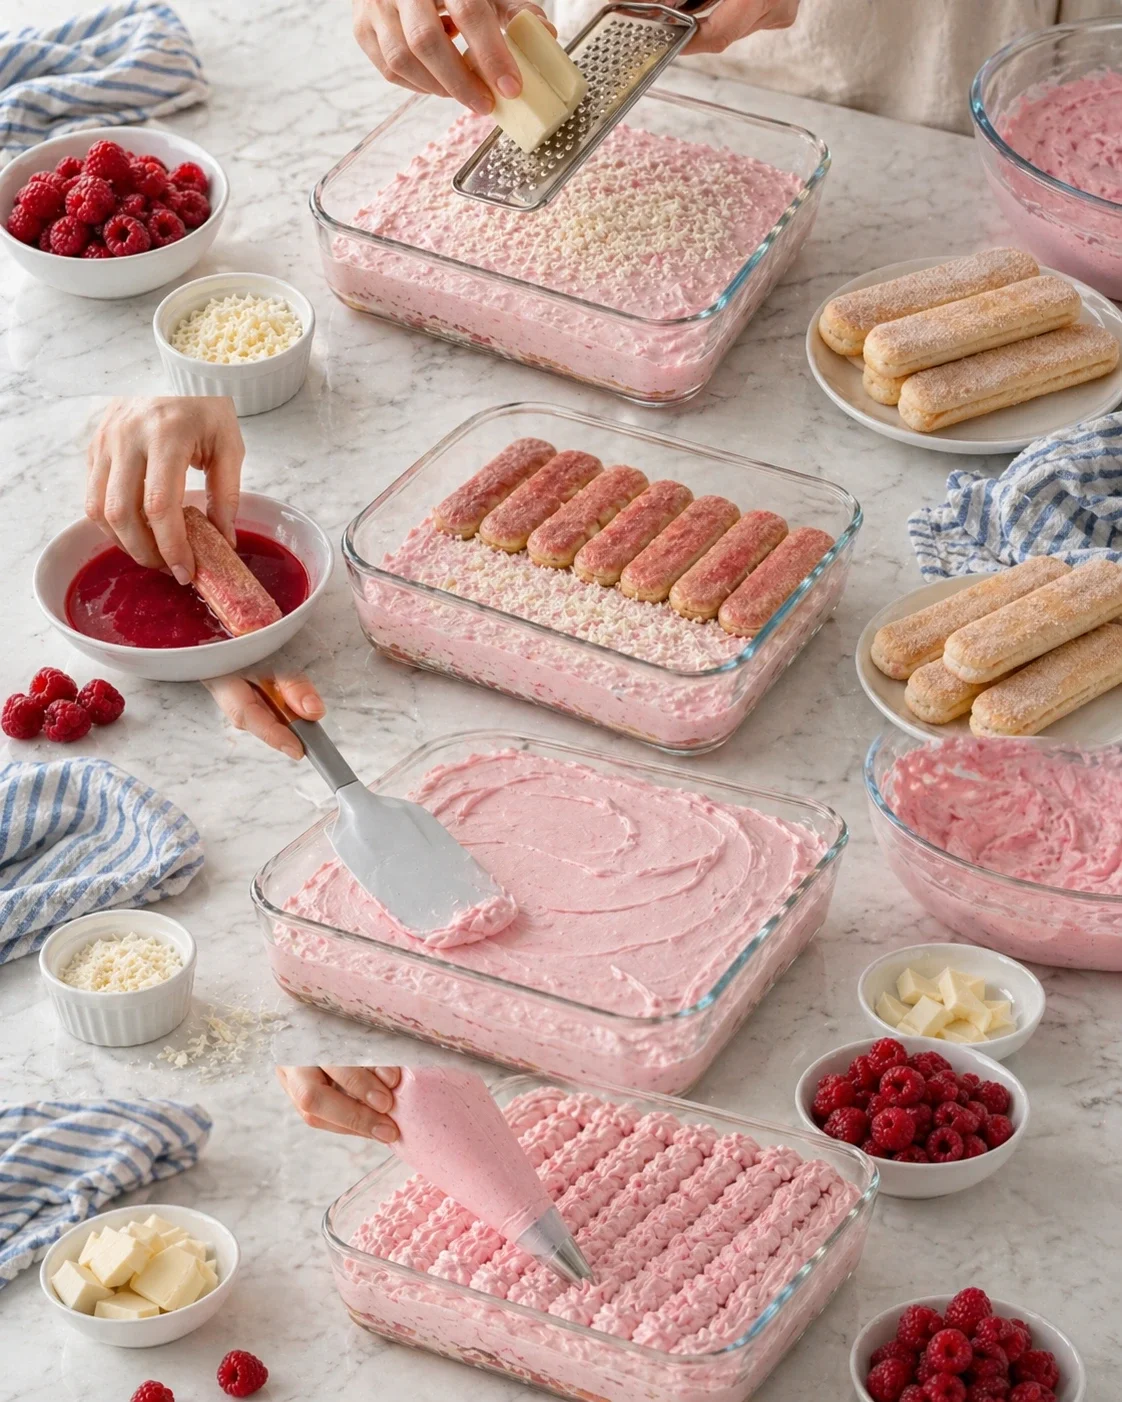
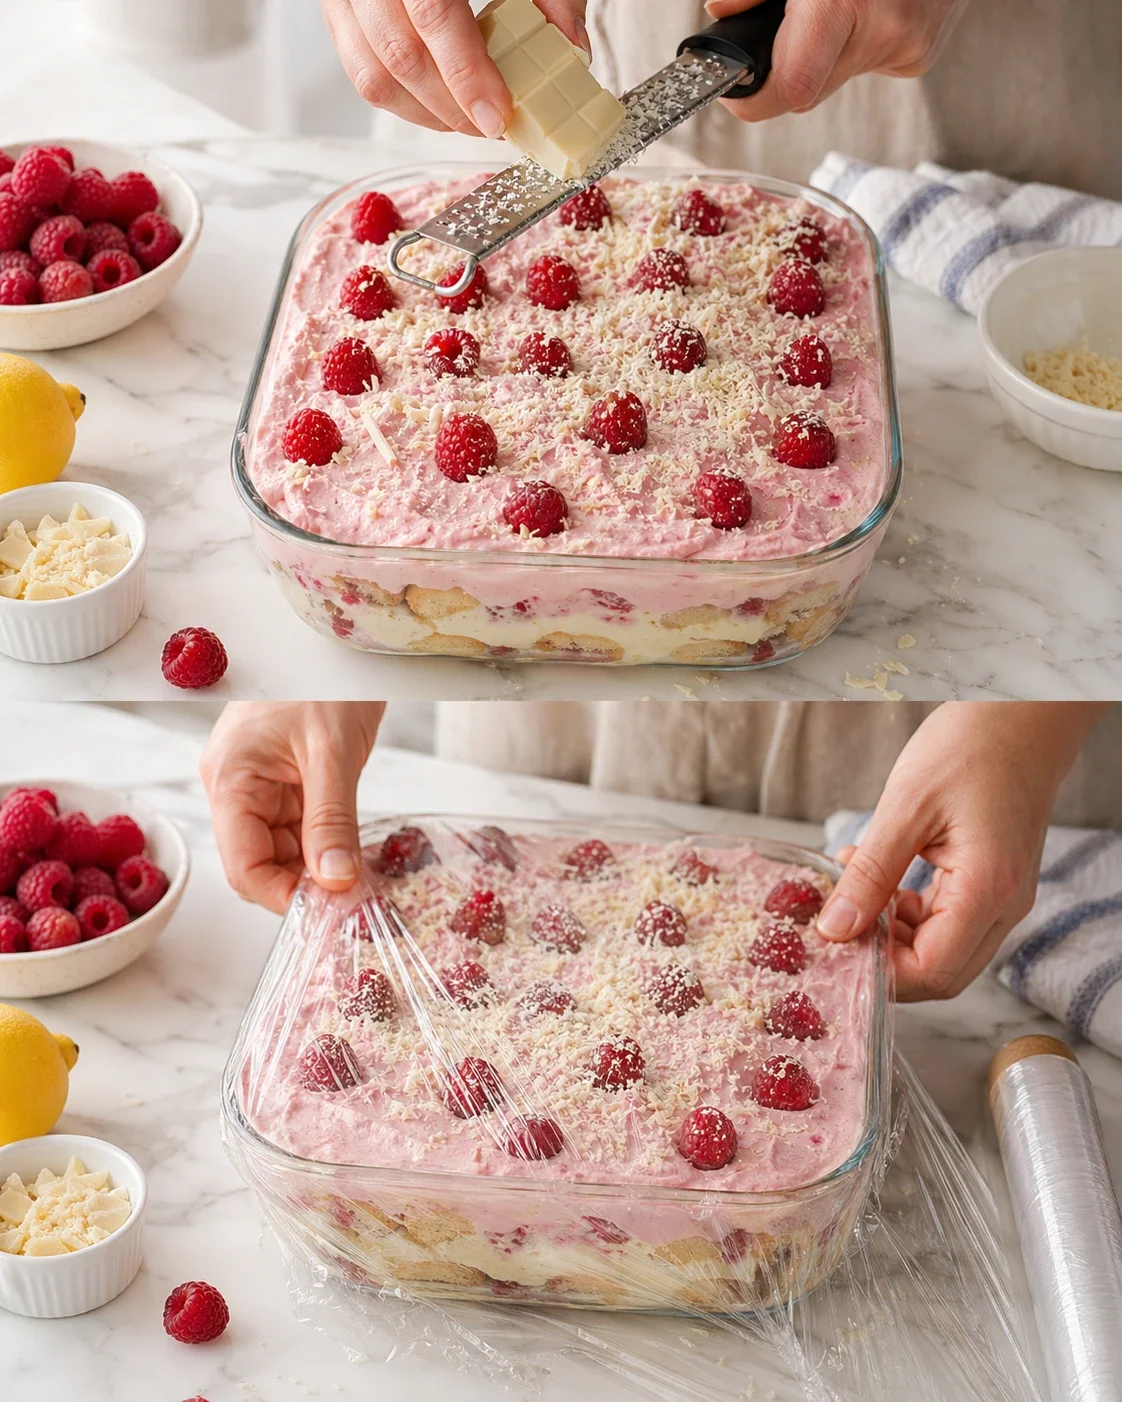
- Grate the remaining white chocolate over the top of the tiramisu.
-
Cover the dish with plastic wrap and refrigerate for at least 6 hours or overnight to set.
Tips for Perfect, Sliceable Layers
This dessert looks simple, but getting those beautiful, sliceable layers takes some little tricks. Once you keep these in mind, you’ll nail creamy, balanced layers every time.
- Cool the raspberry syrup before using it. If it’s warm, it can melt your filling or make the ladyfingers too soggy too quickly.
- Whip your cream fully to stiff peaks. This gives the filling the right body so it holds up and slices well. If you’re unsure what that looks like, this Light and Airy Raspberry Mousse recipe walks through the exact texture and gentle folding technique.
- Keep mascarpone cold, but not frozen. Cold mascarpone blends smoothly and stays thick, which is key for texture.
- Dip ladyfingers fast and gently. Quick dips let them soak just right without falling apart. For timing cues, see how quickly we dip in our Strawberry Tiramisu.
- Grate white chocolate from a solid bar. This gives you fluffy shavings that look and feel like fresh snow on top of your tiramisu.
If something doesn’t quite work, most hiccups come down to syrup temperature, mixing technique, or how long you soak the ladyfingers. Fortunately, this tiramisu is forgiving so a few tweaks will fix any issues.
- Ladyfingers turned soggy:
Dip them quicker and let extra syrup drip off before layering. If your bottom layer feels too wet, sprinkle a light amount of grated white chocolate between layers next time to act as a moisture barrier. - Filling looks runny:
Make sure you whip your cream fully to stiff peaks, then fold gently. Overmixing mascarpone can thin the filling, so stop mixing as soon as it’s smooth. - Filling tastes too sweet:
Try adding a splash more lemon juice to the syrup or a pinch of salt to the filling. Salt balances sweetness without changing the overall flavor. - Layers slip when serving:
Give it extra chill time. Overnight refrigeration helps the tiramisu set firmly and slices come out neat. - Top doesn’t look fluffy like the photo:
Pipe the last layer with a large round tip, then grate white chocolate on top. This combo creates that fluffy, cloud-like look you’re after.
Serve White Chocolate Raspberry Tiramisu cold from the fridge to show off those sharp, pretty pink layers. It also plays well alongside other fruity or coffee-flavored desserts at any gathering.
- Serve chilled for neat slices:
Use a clean knife and wipe between cuts for the tidiest edges. - Serve slightly softened for extra creaminess:
Let it sit 5–10 minutes at room temperature before serving for a softer, silkier mouthfeel. - Pair with drinks:
Espresso, vanilla lattes, black tea, or sparkling rosé all complement these flavors beautifully. - Garnish ideas:
Fresh raspberries, white chocolate curls, or a delicate dusting of grated white chocolate add perfect final touches.
Flavor Swaps and Add-Ins
You can easily mix things up with White Chocolate Raspberry Tiramisu without losing the story those creamy, pink layers tell. Here are a few fun ideas to customize:
- Strawberry swap:
Switch raspberries for strawberries to get a softer berry flavor and a paler pink color—or make a full-on strawberry version like this Strawberry Tiramisu. - Lemon-raspberry twist:
Add lemon zest to the filling and boost the lemon juice just a bit in the syrup for a bright, refreshing lift. - Chocolate-raspberry mix:
Use a combo of grated white and dark chocolate on top for a lovely contrast and deeper chocolate notes. - Mini tiramisu cups:
Layer broken ladyfinger pieces, filling, and white chocolate in individual cups. For presentation inspo, see these gorgeous layered dessert cups. - Extra-berry texture:
Add a thin spread of smashed fresh raspberries between cream layers for juicy fruit pops every bite.
Make-Ahead and Storage Tips
White Chocolate Raspberry Tiramisu is a dream dessert to make ahead, and honestly, it tastes even better after a good rest. Time in the fridge lets the ladyfingers soften into the creamy filling and allows flavors to blend beautifully into one indulgent bite. For another creamy, make-ahead no-bake dessert that sets beautifully in the fridge, see our No-Bake Strawberry Cheesecake Recipe.
For general guidance on safely storing creamy desserts in the fridge or freezer, you can check out this USDA page on safe refrigeration and freezing timelines for leftovers. It’s a handy reference for keeping your treats fresh.
- Refrigerator storage:
Cover your tiramisu tightly and keep it refrigerated for 3–4 days. The top looks best during the first two days, but the flavors keep melding to be even richer. - Best way to cover:
Press plastic wrap gently against the surface, then place a lid or foil over the dish. This stops the filling from soaking up fridge odors. - Freezing:
You can freeze tiramisu in a freezer-safe container wrapped tightly. It keeps well for up to a month. For easier access, slice it first and wrap individual pieces before freezing. - Thawing:
Defrost overnight in the refrigerator. Avoid leaving it out at room temp too long since the filling softens quickly. - Texture note:
After freezing and thawing, the tiramisu still tastes great, though the cream might be a little softer than freshly chilled.
Clean slice of creamy White Chocolate Raspberry Tiramisu
Answers to Common Questions
Q1: Can I make White Chocolate Raspberry Tiramisu ahead of time?
Absolutely! It actually tastes better when you make it a day before serving so everything has time to set and slice perfectly.
Q2: Can I use frozen raspberries?
Yes, frozen raspberries work great for the syrup. Just simmer them the same way and strain well for a smooth finish (see the step-by-step raspberry mousse method for cooking and straining berries).
Q3: Why is my filling runny?
Most likely, the cream wasn’t whipped stiff enough or the mascarpone was overworked. Whip the cream to stiff peaks and fold gently to keep the filling thick and creamy.
Q4: Can I make this without mascarpone?
You can swap mascarpone for full-fat cream cheese. It’ll be tangier and a bit denser, but the tiramisu still comes together beautifully and tastes delicious. For best texture with cream cheese, follow the beating and folding cues in our easy no-bake cheesecake recipe.
Q5: What’s the best white chocolate to use?
Choose a good-quality white chocolate bar you enjoy eating on its own. Bars grate beautifully into soft shavings that give you that pretty, snowy topping.
Q6: How do I keep ladyfingers from getting soggy?
Dip each quickly in the syrup and gently shake off the excess before layering. They should be moist but still hold their shape without falling apart.
More in Uncategorized

Crock Pot Chicken and Rice Recipe

Crock-Pot Chicken Noodle Soup

Slow Cooker Hearty Chicken Soup.