Strawberry Tiramisu

Let’s take the classic Italian favorite and give it a fresh spin with this absolutely delightful no-bake strawberry tiramisu recipe! Imagine sweet, crisp ladyfingers layered with silky mascarpone cream and homemade fresh strawberry jam between each level, delivering a burst of bright berry flavor in every bite!
If you’ve been craving a fun and easy way to shake up the classic tiramisu, you’re absolutely in the right spot! This strawberry tiramisu recipe is bursting with fresh fruit flavor, wonderfully tasty, and totally manageable—even if you’re just starting out in the kitchen. I’ve kept it simple but also included little bits of science behind the magic, so you feel confident without getting overwhelmed!
What I love most about this recipe is how easy it is—no fancy gadgets or hard-to-find ingredients. Most likely, you already have everything you need at home or can pick it up from your local store without any trouble.
Honestly, this has got to be one of the most delicious takes on strawberry tiramisu you’ll ever try. I use only the freshest, top-quality ingredients to bring out every bit of flavor. Plus, I’ll share my tried-and-true techniques and insider tips so your first attempt turns out absolutely flawless.
On top of being straightforward and tasty, this strawberry tiramisu is super flexible. Feel free to get creative by mixing in different flavors or fillings—making it your own perfect dessert every time!
Welcome to this no-bake strawberry tiramisu recipe—a bright, fresh twist on the beloved Italian dessert. Think crunchy ladyfingers dipped in a luscious homemade strawberry syrup, layered with a rich strawberry jam, and a smooth, creamy mascarpone mixture that chills to silky perfection. It’s fruity, elegant, and surprisingly simple for anyone to whip up, even if you’ve never done a layered dessert before.
This recipe keeps things approachable. You won’t need anything fancy beyond standard kitchen tools you probably already own (check the Equipment section down below). And the ingredients? Easy to find, too. You’ll start by gently cooking egg yolks on a double boiler (or use pasteurized eggs if you prefer), whip cold mascarpone and heavy cream to just the right texture, then assemble two generous layers of dipped ladyfingers and cream. Pop it into the fridge to set for at least four hours—overnight is even better. This recipe makes about eight servings, perfect for a family dessert or small gathering.
Keep reading for a full list of ingredients and tools, step-by-step instructions with photos, smart tips to avoid sogginess or runny filling, ideas for flavor swaps, and handy storing and make-ahead advice to make sure your tiramisu is a shining star every time you make it.
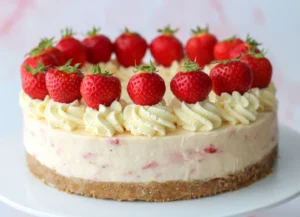
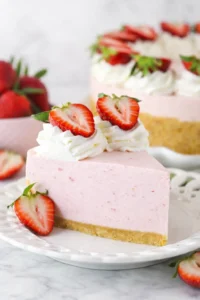
Sweet, crunchy ladyfingers layered with smooth mascarpone cream and fresh homemade strawberry jam give this strawberry tiramisu a wonderful burst of flavor that dances on your palate!
What You Need to Gather

- 300 g (about 2 cups) fresh strawberries
- 50 g (¼ cup) granulated sugar, adjust depending on strawberry sweetness
- 1 tablespoon fresh lemon juice
- 6 large egg yolks
- 150 g (¾ cup) granulated sugar
- 500 g (2¼ cups) high-fat mascarpone cheese, kept very cold
- 350 g (1½ cups) heavy cream (at least 36% fat), very cold
- 20 ladyfinger cookies
- A handful of fresh strawberries, diced (for layering)
- Fresh strawberries for garnish
- Freeze-dried strawberries, crushed into powder, for decoration
- Chantilly cream for topping
Build and Layer the Dessert
- Blend strawberries, granulated sugar, and fresh lemon juice until smooth.
- Cook the strawberry puree over low–medium heat until the sugar fully dissolves.
- Remove half the syrup and set it aside for dipping the ladyfingers.
-
Simmer the remaining syrup about 10 minutes, stirring occasionally, until reduced and thickened into jam; refrigerate to chill.

- Whisk egg yolks and sugar over a double boiler on very gentle heat until the sugar dissolves (about 5 minutes), keeping heat low to avoid scrambling.
- Cool the yolk mixture completely to room temperature.
- Whip very cold mascarpone with an electric mixer until soft early stiff peaks form.
-
Fold the whipped mascarpone gently into the cooled egg yolk mixture with a rubber spatula.

- Whip very cold heavy cream until early stiff peaks form.
- Fold the whipped cream gently into the mascarpone–yolk mixture until light and uniform.
- Prepare an 18×24 cm (7×9 in) or 8×8 in pan.
-
Briefly dip each ladyfinger into the cooled strawberry syrup so they are moist but not soaked.

- Arrange a single layer of soaked ladyfingers across the bottom of the pan (about 10 per layer).
- Spread half of the chilled strawberry jam evenly over the ladyfingers.
- Dollop and spread half of the mascarpone cream over the jam.
-
Optionally sprinkle chopped fresh strawberries between the layers.

- Repeat: dip and arrange another layer of ladyfingers, then spread the remaining jam and remaining mascarpone cream.
- Smooth the top with an offset spatula.
- Chill the assembled tiramisu in the refrigerator for at least 4 hours, preferably overnight, to set.
-
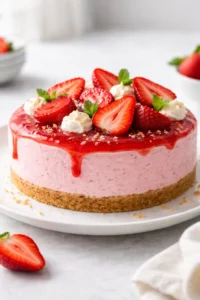
Just before serving, decorate the top with chantilly cream, a dusting of crushed freeze-dried strawberries, and sliced fresh strawberries.

Tips for Smooth, Stable Cream
- For consistent, perfect results, measure your ingredients by weight using a digital scale instead of relying on cup measures.
- Keep your mascarpone and heavy cream well chilled before whipping (see how to make perfect homemade whipped cream). If you chill your mixing bowls and beaters for 10–15 minutes, the cream whips up more easily to just the right texture without overdoing it.
- When cooking your egg yolks and sugar over the double boiler, keep the heat low and stir constantly until all the sugar dissolves. Afterward, let the yolk mixture cool fully before folding in the mascarpone, so your cream stays luscious and smooth.
- Always fold gently and slowly to keep as much air in the whipped mixtures as possible. Use a rubber spatula and soft folding motions at every step to prevent a runny filling.
- Don’t soak your ladyfingers too long—just a quick dip in the cooled strawberry syrup is enough. Over-soaking makes them soggy and your tiramisu harder to slice neatly.
- If you’re using frozen strawberries, thaw them first and plan for a slightly longer cooking time to reduce the extra liquid.
- Make sure you chill your assembled tiramisu for at least 4 hours, but overnight in the fridge is a game changer—it gives such a smooth texture and helps you get perfectly clean slices.
- For nice clean slices, chill thoroughly. Use a hot, dry knife and wipe it between each cut or try a thin, sharp spatula for smooth edges.
- Store leftovers airtight in the fridge for 2–3 days for best freshness. Avoid freezing, since mascarpone and whipped cream don’t freeze well and get watery after thawing.
- Adjust the sugar in your strawberry syrup as needed based on how sweet your berries are. A splash of lemon juice adds a fresh pop that really brightens the flavors.
Creative Flavor Swaps

Feel free to swap strawberries for raspberries, blueberries, or a mixed berry combo to shake things up. You might also try adding a little vanilla bean or herbs like dried basil or mint to the mascarpone cream for a unique twist. If you love the strawberry–mascarpone pairing, this Strawberry Mascarpone Cake shows how luscious it can be.
Instead of strawberry syrup, soak your ladyfingers in matcha tea for a stunning matcha-strawberry tiramisu. Chocolate whipped cream frosting is another fun topping that pairs beautifully with the strawberry layers.
If freeze-dried strawberries aren’t your thing, just dust powdered sugar on top or pile fresh strawberries all over for a simple, elegant finish—much like the presentation in a classic French strawberry tart.
To switch things up even more, layer some chocolate or caramel between the mascarpone to add a rich, creamy surprise. And, of course, for a classic take, you can always make your tiramisu the traditional way with coffee and cocoa powder.
Storing and Serving Leftovers
Storing your strawberry tiramisu is easy. Just keep any leftovers in an airtight container in the refrigerator and enjoy within 2–3 days. To refresh the top before serving, sprinkle a little more crushed freeze-dried strawberries—they add a lovely pop of color and flavor—or spoon on some macerated strawberries for extra juiciness.
I don’t recommend freezing this dessert. The mascarpone cream base doesn’t hold up well to freezing and thawing, and you’ll risk a watery, separated texture.

Answers to Common Questions
- Is it safe to eat raw egg yolks in this tiramisu? When possible, use fresh, pasteurized eggs. Heating the yolks with sugar over a double boiler lowers risk, but pasteurized eggs are the safest choice for peace of mind.
- Can I use frozen strawberries? Absolutely! Just thaw them fully first and cook the mixture longer to reduce extra liquid before making your syrup or jam (see the cooked strawberry filling method used in Strawberry Filled Cupcakes).
- How far in advance can I make this tiramisu? You can assemble it a day ahead. Just chill it for at least 4 hours (overnight is best) and consume within 2–3 days thereafter.
- Can I freeze the tiramisu? I recommend not to. Maskarpone and whipped cream textures don’t survive freezing well and can separate and get watery after thawing.
- What can I substitute for mascarpone? Full-fat cream cheese is okay in a pinch, but expect a different flavor and texture. Soften it slightly and mix with a bit of heavy cream to mimic mascarpone’s richness. If you’d rather make a dessert designed for cream cheese, try this No-Bake Strawberry Cheesecake.
- How do I keep the cream from getting runny? Make sure the yolk-sugar mix is fully cooled before folding in mascarpone, keep all dairy cold, and stop whipping the cream at early stiff peaks to avoid overwhipping.
- Can I create flavor variations? Yes! Use coffee for soaking to get a classic tiramisu, try matcha for a matcha-strawberry mix, or add cocoa, chocolate shavings, or flavored liqueurs to complement the strawberry layers.
- How long do leftovers last? Store leftovers airtight in the fridge and enjoy within 2–3 days.
- My tiramisu is too soft—what went wrong? Usually, it’s from over-soaking ladyfingers, folding mascarpone when the yolk mix is still warm, or not chilling long enough. Follow the recipe chilling times and gentle folding tips for perfect texture.
- Can I use store-bought ladyfingers? Definitely. Just trim them to fit your pan and avoid soaking too long to prevent soggy layers.

A no-bake strawberry tiramisu featuring layers of ladyfinger cookies dipped in homemade strawberry syrup, fresh strawberry jam, and a smooth mascarpone cream mixture. This bright and fresh twist on classic tiramisu uses fresh strawberries and chilled cream for a luscious, fruity dessert perfect for gatherings.
- Prep Time: 30 minutes
- Cook Time: 20 minutes
- Total Time: 4 hours 50 minutes (including chilling)
- Yield: 8 servings 1x
- Category: Dessert
- Cuisine: Italian-inspired
Ingredients
- 300 g (about 2 cups) fresh strawberries
- 50 g (¼ cup) granulated sugar, adjust depending on strawberry sweetness
- 1 tablespoon fresh lemon juice
- 6 large egg yolks
- 150 g (¾ cup) granulated sugar
- 500 g (2¼ cups) high-fat mascarpone cheese, kept very cold
- 350 g (1½ cups) heavy cream (at least 36% fat), very cold
- 20 ladyfinger cookies
- A handful of fresh strawberries, diced (for layering)
- Fresh strawberries for garnish
- Freeze-dried strawberries, crushed into powder, for decoration
- Chantilly cream for topping
Instructions
- Blend strawberries, granulated sugar, and fresh lemon juice until smooth.
- Cook the strawberry puree over low–medium heat until the sugar fully dissolves.
- Remove half the syrup and set it aside for dipping the ladyfingers.
- Simmer the remaining syrup about 10 minutes, stirring occasionally, until reduced and thickened into jam; refrigerate to chill.
- Whisk egg yolks and sugar over a double boiler on very gentle heat until the sugar dissolves (about 5 minutes), keeping heat low to avoid scrambling.
- Cool the yolk mixture completely to room temperature.
- Whip very cold mascarpone with an electric mixer until soft early stiff peaks form.
- Fold the whipped mascarpone gently into the cooled egg yolk mixture with a rubber spatula.
- Whip very cold heavy cream until early stiff peaks form.
- Fold the whipped cream gently into the mascarpone–yolk mixture until light and uniform.
- Prepare an 18×24 cm (7×9 in) or 8×8 in pan.
- Briefly dip each ladyfinger into the cooled strawberry syrup so they are moist but not soaked.
- Arrange a single layer of soaked ladyfingers across the bottom of the pan (about 10 per layer).
- Spread half of the chilled strawberry jam evenly over the ladyfingers.
- Dollop and spread half of the mascarpone cream over the jam.
- Optionally sprinkle chopped fresh strawberries between the layers.
- Repeat: dip and arrange another layer of ladyfingers, then spread the remaining jam and remaining mascarpone cream.
- Smooth the top with an offset spatula.
- Chill the assembled tiramisu in the refrigerator for at least 4 hours, preferably overnight, to set.
- Just before serving, decorate the top with chantilly cream, a dusting of crushed freeze-dried strawberries, and sliced fresh strawberries.
Notes
Measure ingredients by weight for best results., Keep mascarpone and heavy cream well chilled before whipping; chilling bowls and beaters helps., Keep heat low when heating egg yolks and sugar to avoid scrambling; cool mixture completely before folding., Fold gently to keep the mixture light and prevent runniness., Do not soak ladyfingers too long to avoid sogginess., If using frozen strawberries, thaw fully and cook longer to reduce liquid., Chill the assembled tiramisu for at least 4 hours, preferably overnight, for best texture and clean slices., Use a hot, dry knife wiped between cuts or a thin spatula for neat slicing., Store leftovers airtight in the fridge for 2-3 days; do not freeze as texture will degrade., Adjust sugar in strawberry syrup based on berry sweetness; lemon juice brightens flavor.
Nutrition
- Serving Size: 1 slice
- Calories: Approximately 350-400 kcal per serving (estimate)
- Fat: 25 g per serving (estimate)
- Carbohydrates: 35 g per serving (estimate)
- Protein: 7 g per serving (estimate)
More in Cakes