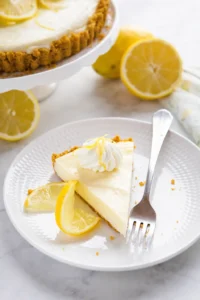
No Bake Lemon Tart

This No Bake Lemon Tart is your go-to easy dessert for summer! With just 3 simple ingredients in the filling—plus condensed milk—it’s bursting with fresh, bright lemon flavor and takes no oven time at all.
There’s something about citrus that just screams summer, right? This No Bake Lemon Tart is creamy, smooth from the condensed milk, and packed with that fresh, tangy lemon zing you love. Plus, the filling is a brilliant 3-ingredient magic trick that makes this tart so simple to pull together. Trust me, once you try this, it’ll be your new summer favorite!
When summer rolls around, nothing beats a bright, creamy lemon tart — and the best part? This one’s super easy. No oven needed! With just a few simple ingredients, you’ll whip up a silky filling made from condensed milk combined with fresh lemon juice and zest, plus rich heavy cream. It’s a no-bake wonder that chills to perfection, giving you a dessert that slices like a dream.
You’ll start with a quick graham cracker crust and mix up the filling in just a few minutes, then pop it in the fridge to set — ideally for about 6 hours or overnight. That’s it! Minimal hands-on time, maximum delicious payoff.
Below, I’ve laid out everything you need: step-by-step instructions, ingredient tips, tricks for the best texture and flavor, a bunch of easy variations for fun twists, plus advice on storage and make-ahead, and answers to your burning questions. Whether you want a fuss-free weeknight dessert or an impressive summer centerpiece, this tart has got you covered.
Ready to dive into a lemon tart that’s creamy, tangy, and so easy your family will keep asking for more? Let’s do this!
Why You’ll Love This
I have so many reasons why I keep coming back to this lemon tart recipe, and I’m betting you will too! Check these out:
- Super EASY to make: Forget the oven — this tart is a breeze, with no baking required.
- Clean-up is quick: Just a handful of ingredients and a couple of bowls—your kitchen will thank you.
- Fresh, vibrant flavor: Fresh lemon juice gives this tart that perfect sweet-tart pop.
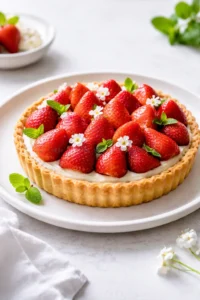
- Really versatile: Top with fresh berries, try it in a pre-baked pie crust, or add different citrus fruits — the filling works beautifully with so many options.
- Made for summer: Light, refreshing, and bursting with citrus goodness — the ultimate warm-weather treat.
- Great for make-ahead: You can prep this a day or two in advance and it tastes like you just made it!
What is a Lemon Tart?
A lemon tart is a bright, zesty dessert with a smooth, creamy filling and a crunchy crust. You can make it with lots of crust options — from a classic buttery pastry crust to a crumbly graham cracker base.
Usually served chilled, lemon tarts often come with fresh fruit toppings or a dollop of whipped cream. They’re perfect for sunny days and are easy enough for casual get-togethers but still fancy enough for special occasions!
How Different Lemon Tart Fillings Set
There are a few popular ways to make lemon tart fillings. Here’s a quick look:
- Fresh lemons and sweetened condensed milk – This combo thickens naturally without baking or extra stabilizers. It’s smooth, light, and bursting with real lemon freshness!
- Lemon curd filling – Made with lemon juice, zest, sugar, eggs, and butter, lemon curd is cooked until thick and spreadable. It has a sharper lemon punch — think classic French lemon tart.
- Custard filling – Made with eggs, sugar, cream, or milk with lemon zest, this is a creamier, sweeter take on lemon filling, usually baked or cooked on the stove.
What You’ll Need

- 1 1/2 cups graham cracker crumbs
- 5 tablespoons melted butter
- 14-ounce can of sweetened condensed milk about 400 grams
- 3 lemons, zest and juice
- 1 cup heavy whipping cream 30% fat or higher
Crust, Filling, and Chilling
- Combine graham cracker crumbs and melted butter in a bowl.
- Press the crumb mixture firmly into a tart pan or springform pan to form an even crust.
- Chill the crust until firm.
-
In a separate bowl, mix sweetened condensed milk with lemon zest and fresh lemon juice.

- Slowly pour in heavy whipping cream while stirring gently until the filling thickens and is smooth (avoid overmixing).
- Pour the filling into the chilled crust and smooth the surface with a spoon or offset spatula.
- Refrigerate the assembled tart for at least 6 hours or overnight until fully set.
-
Heat a knife under hot water, dry it, and slice the tart, wiping the knife between cuts.

Tips for a Perfect Tart
Want your lemon tart to come out perfect every time? Here are my best tips to keep it smooth, tasty, and picture-perfect!
Use Fresh, Quality Ingredients
With so few ingredients, each one really shines. Make sure your lemons are fresh and juicy, and pick a good-quality butter for the crust. Trust me, it makes a difference!
Chill That Crust
Even though you’re not baking it, press your crust in tight and chill it until it’s firm. This keeps it from crumbling once you add the luscious filling.
Choose the Right Pan
For clean edges and easy serving, I recommend a tart pan or a springform pan with a removable bottom. It’ll hold its shape beautifully after chilling.
Mix the Filling Gently
Keep your filling silky! Mix just enough to combine everything — avoiding whipping too hard, which can trap air and cause bubbles on the top of your tart.
Smooth It Out
Once the filling is poured into the crust, use a spoon or offset spatula to smooth the surface before chilling. This step gives you a beautiful, professional-looking finish.
Add Toppings Right Before Serving
I know it’s tempting to pile on berries or whipped cream early, but it’s best to wait until the last minute. Wet toppings can bleed color into your tart and mess with that pretty clean look.
Here’s how to solve common hiccups you might run into when making this tart:
Crumbs Falling Apart?
If your crust is crumbly and won’t hold together, you probably need more melted butter or finer crushed crumbs. Big chunks don’t stick well, so make sure your crumbs are evenly crushed and you measure that butter carefully.
Bitter Lemon Flavor?
Bottled lemon juice can make your tart taste too sharp or bitter, so always use fresh lemons. Also, zest only the bright yellow part of the peel; the white pith underneath is bitter and will ruin your tart’s flavor.
Air Bubbles in Filling?
Don’t overmix the filling! Whip just enough to combine ingredients. Over-whipping traps air, which shows up as bubbles and makes the texture less smooth.
Filling Too Runny?
If your tart filling isn’t set, it likely needs more chill time. Make sure it sits in the fridge at least 6 hours—or overnight for the best firm-yet-creamy texture.
Flavor Swaps and Add-Ins

Feeling adventurous? You can easily switch up this tart with these simple swaps and add-ins. They keep the creamy condensed milk filling but add new flavors and textures for fun variations!
- Crust swaps: Try digestive biscuits, crushed shortbread, or a store-bought pre-baked pie crust instead of graham crackers. For a fun chocolate twist, Oreo or chocolate cookie crumbs work like a charm.
- Citrus variations: Use lime juice to make a key lime-style tart, or blend orange, grapefruit, or blood orange juice to create a zesty multi-citrus flair.
- Fruit toppings: Fresh berries, sliced strawberries, or stewed rhubarb are delicious on top. Just remember to add them only after the tart is fully set to avoid staining the filling.
- Texture & stability: If you want the filling even lighter, fold in an extra 1/4 to 1/2 cup of softly whipped cream. Need it firmer for travel or warm weather? Dissolve a little unflavored gelatin and fold it in following the package instructions carefully.
- Toppings and finishes: Fancy a lemon meringue vibe? Toast meringue on top and lightly torch it. Or sprinkle toasted coconut for a tropical spin, or swirl raspberry coulis for a pretty, flavorful stripe.
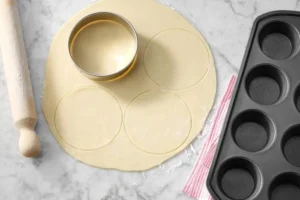
- Change the format: Make mini versions with pre-baked shells or individual tart pans, or layer your filling beautifully in glasses for lemon parfait desserts.
Storage and Make-Ahead Tips
Here’s how to keep your no-bake lemon tart fresh and lovely, plus tips on make-ahead and serving.
- Keep refrigerated: Always store your tart covered or sealed in an airtight container in the fridge. It’s best served chilled to keep its creamy texture and fresh flavor.
- Make-ahead friendly: You can prep and assemble the whole tart 1–2 days before serving. Reserve garnishes like whipped cream and fruit to add just before serving to keep everything fresh and vibrant.
- Slicing tips: For clean slices, chill fully (minimum 6 hours or overnight). Heat your knife under hot water, wipe it dry, and slice carefully, wiping between cuts for a perfect presentation.
- Freezing not recommended: This tart doesn’t freeze well. Thawing can separate the filling and make it grainy, so stick to fresh and chilled.
- Transport tips: Bringing your tart to a party? Keep it chilled on a cooler or ice pack to maintain shape and freshness until serving time.

Common Questions Answered
Can I make this Lemon Tart ahead of time?
Absolutely! This lemon tart can be made up to two days ahead. Just keep it refrigerated and add any toppings right before serving for the freshest look.
How do I store lemon tart?
Keep your finished tart in an airtight container or covered well in the fridge until you’re ready to serve.
Can I freeze this lemon tart?
It’s better not to freeze this tart since the filling may release liquid and become grainy after thawing. It’s designed to be enjoyed chilled and fresh.
Is there a dairy-free version of this recipe?
This recipe relies on dairy proteins to help set the filling with lemon juice, so it’s not possible to make it dairy-free without adding gelatin or another stabilizer.
Why doesn’t this tart have eggs?
This is a no-bake recipe that sets naturally with condensed milk and lemon juice, so eggs aren’t needed at all.
Can I use a store-bought tart shell instead of making my own crust?
Yes, a pre-baked store-bought tart shell works fine and saves time. Just follow package instructions since some require pre-baking to get that crisp texture.
What does a lemon tart taste like?
It’s light, creamy, and sweet with a fresh, bright lemon flavor that’s just the right balance of tangy and sweet.
How do I know when the lemon tart is properly set?
Your tart should be firm enough to slice cleanly without the filling falling apart. Make sure to chill it for the full time in the recipe to achieve the perfect set.
Thanks for stopping by! I hope this tart becomes a favorite in your kitchen as it is in mine. What’s your favorite no-bake dessert? Drop me a note in the comments — I love hearing your sweet ideas!

A refreshing, no-bake lemon tart featuring a crumbly graham cracker crust and a creamy lemon filling made with sweetened condensed milk, fresh lemon juice, zest, and heavy whipping cream. Perfect for summer, this tart requires minimal prep and chilling time to set.
- Prep Time: 15 minutes
- Cook Time: 0 minutes (no baking)
- Total Time: 6 hours 15 minutes (including chilling)
- Yield: 8 servings 1x
- Category: Dessert
- Cuisine: American
Ingredients
- 1 1/2 cups graham cracker crumbs
- 5 tablespoons melted butter
- 14-ounce (approximately 400 grams) can sweetened condensed milk
- Zest and juice of 3 lemons
- 1 cup heavy whipping cream (30% fat or higher)
Instructions
- Make the crust: Combine graham cracker crumbs and melted butter in a bowl. Press the mixture firmly into a tart pan and set aside, chilling if desired for firmness.
- Prepare the filling: In a mixing bowl, combine sweetened condensed milk with fresh lemon juice and lemon zest, stirring gently.
- Add heavy cream: Slowly pour in the heavy whipping cream and stir gently until the filling thickens and becomes smooth. Avoid overmixing to prevent air bubbles.
- Assemble and chill: Pour the filling into the prepared crust, smooth the surface with a spoon or offset spatula, and refrigerate for at least 6 hours or overnight until set and firm.
- Serve: Slice the tart and optionally top with a dollop of whipped cream and a sprinkle of lemon zest before serving.
Notes
Use fresh lemons (avoid bottled lemon juice) to prevent bitterness., Press crust tightly and chill for a firmer base., Use a tart pan or springform pan with removable bottom for easy serving., Do not overmix filling to avoid air bubbles., Add toppings like fresh berries or whipped cream just before serving to maintain presentation., If crust is crumbly, add more melted butter or crush crackers more finely., Chill tart for minimum 6 hours or overnight for best results., Store tart refrigerated in airtight container; do not freeze as texture may be affected., For variations, swap graham cracker crust with other crusts (digestive biscuits, shortbread, Oreo), try lime or mixed citrus juice, add toppings like toasted coconut or raspberry coulis., To transport, keep tart chilled on ice or cooler.
Nutrition
- Serving Size: 1 slice
- Calories: Approximately 350 calories per serving
- Fat: 18 grams per serving
- Carbohydrates: 45 grams per serving
- Protein: 5 grams per serving
More in Pies