Mini Fruit Tarts with Vanilla Pastry Cream

These Easy Mini Fruit Tarts are filled with a simple, homemade vanilla pastry cream made from scratch! You can top them with strawberries, kiwi, mandarin slices, or any fruit you love! They’re the perfect bite-sized treat for bridal showers, baby showers, Mother’s Day, or a cozy afternoon tea with friends.
Mini Fruit Tarts are totally one of my all-time favorite treats!
Have you ever had a dessert that just grabs your heart and won’t let go? That’s exactly how I felt about the La Madeline Fruit Tart.
Imagine a vanilla pastry cream that’s creamy and dreamy, dotted with vanilla bean specks. Sweet and tart fruits like fresh berries, kiwi slices, mandarin oranges, and slivers of red grapes piled on top. The shortcrust pastry was always buttery, tender, and just lightly sweetened. Every bite was a perfect harmony of buttery crust, smooth vanilla cream, and fresh fruit’s zing.
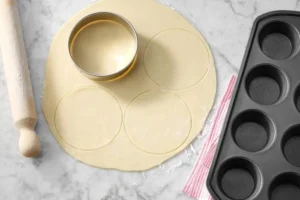
Today, I’m sharing my quick, easy mini fruit tarts recipe where I use store-bought mini tart shells instead of making a shortcrust crust from scratch. That little shortcut saves a ton of time and makes these little delights way easier to pull off—especially if you’re not a big baker! Of course, if you prefer, you can make your own crust, or even use sugar cookie dough pressed into muffin tins to make cookie cups. Just a heads up, cookie cups will make these tarts sweeter, so I tend to stick to shortcrust or mini pie crusts for the best balance.
This time, I’m skipping the kiwi, mandarin, and grapes and going all in on a berry medley—blackberries, raspberries, and blueberries. Bright, festive, and perfect for a 4th of July picnic, Mother’s Day brunch, or any special get-together.
If you love desserts that are both pretty and bursting with flavor, these mini fruit tarts are made for you. Picture little buttery shells filled with silky vanilla pastry cream dotted with real vanilla bean, topped with colorful, fresh fruit and brushed with a shiny apricot glaze. They’re charming and scrumptious—ideal for bridal showers, Mother’s Day brunch, afternoon tea, or just a special treat at home.
This recipe stays simple without cutting corners on taste. I’ll show you how to make a from-scratch creme patisserie using cornstarch that creates a super smooth texture. But if you’re pressed for time, skipping straight to store-bought mini tart shells or pre-baked pie shells works wonderfully too. The recipe makes about 14 mini tarts and includes easy finishing details like a light apricot glaze, pretty piping, and styling tips so your tarts look just as gorgeous as they taste.
Stick around for step-by-step instructions, pastry tips to get you feeling confident, and smart advice on making ahead and storing so you can prep these for parties ahead or whip them up last-minute without stress.
Why These Tarts Shine
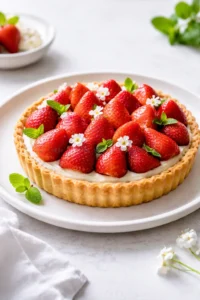
These mini fruit tarts bring delicious flavor with very little hassle: a luscious, from-scratch vanilla pastry cream made silky smooth with cornstarch, nestled into either homemade or store-bought tart shells, and topped with fresh, vibrant fruit finished off with a glossy apricot glaze. Using store-bought shells saves you prep time and makes this recipe an approachable choice for beginner bakers, while the fresh fruit makes every bite bright, fresh, and elegant—perfect for showers, brunches, or casual entertaining at home. Prefer a full-size showstopper? Try our French Strawberry Tart (Tarte aux Fraises) for the classic pastry-cream-and-berries finish. Or, if you want an even quicker bite-size option, these No Fuss Berry Tartlets keep assembly ultra simple.
Ingredients and Helpful Swaps

- ½ cup granulated sugar
- 3 egg yolks (cold)
- 3 tablespoons cornstarch
- 1 cup milk (whole milk or 2%)
- 1 cup heavy cream (36% fat)
- 2 tablespoons salted butter (cold)
- 1 teaspoon vanilla bean paste (double if extract)
- 14 mini tart shells (see notes)
- ~2 cups assorted fresh berries (or diced fruit)
- 2 tablespoons apricot preserves
Make, Bake, and Fill
- Bake or blind-bake mini tart shells (follow package instructions or blind-bake with pie weights) and let them cool completely.
- In a heatproof bowl whisk cold egg yolks and granulated sugar until pale and creamy (about 1–2 minutes); whisk in cornstarch until combined.
- Heat milk and heavy cream in a saucepan over medium until tiny bubbles form around the edges, then remove from heat.
-
Slowly drizzle the hot milk mixture into the egg yolk mixture while whisking to temper the eggs.

- Return the combined mixture to the saucepan and cook over medium-low, whisking constantly, until it thickens to a custard consistency (about 4–5 minutes); stir in vanilla bean paste.
- Strain the cooked pastry cream through a fine-mesh sieve into a bowl, stir in cold salted butter until smooth, cover the surface with plastic wrap pressed onto the cream, let cool to room temperature, then refrigerate at least 2 hours.
- Whisk chilled pastry cream with a hand mixer to lighten and smooth it.
-
Pipe about 2 tablespoons of pastry cream into each cooled tart shell.

- Top each filled shell with fresh berries or diced fruit.
- Warm apricot preserves with a splash of water in the microwave until thin (about 15–30 seconds), then brush lightly over the fruit to glaze.
-
Refrigerate assembled tarts for at least 1 hour before serving.

Tips for Silky Pastry Cream
- Temper your eggs slowly by pouring hot milk and cream into the egg yolks in a steady, thin stream while whisking continuously. This keeps the eggs from curdling and you’ll end up with silky smooth cream. For a practical example of gentle tempering in a custard, see this homemade lemon pie recipe.
- Cook the custard gently over medium-low heat, whisking constantly, so it thickens evenly without lumps or burning.
- Strain your pastry cream through a fine mesh sieve after cooking to catch any bits of cooked egg for a perfectly smooth texture every time.
- Press plastic wrap directly onto the surface of the cooled cream as it chills. This little trick prevents a pesky skin from forming on top.
- Let the pastry cream cool completely before piping it into the tart shells. Warm filling can make the crust soggy, so refrigerate the cream for at least 2 hours or up to 2 days ahead.
- Make a thin glaze by warming apricot preserves with a splash of water, thinning it to the right consistency. Brush lightly over the fruit so it looks glossy but still holds its fresh texture and vibrant color.
- For the tidiest look, use a piping bag to fill your tart shells. Arrange fruit just before serving to keep everything fresh and vibrant.
- If you’re working with juicy fruits like ripe strawberries or mango, pat them dry or toss with a tiny bit of sugar and drain off excess juice before topping the tarts. It helps prevent soggy shells!
Flavor Swaps and Toppings
- Crust options: Swap in homemade shortcrust pastry, prebaked mini pie crusts, a graham cracker crust, or sweet cookie cups made from sugar cookie dough for a sweeter treat.
- Filling alternatives: Mix things up by replacing all or some of the pastry cream with lemon curd, chocolate pastry cream, or fold in whipped cream for a lighter, mousse-like filling.
- Fruit options: Instead of berries, try sliced kiwi, mandarin segments, diced mango, halved grapes, or seasonal stone fruit for different flavors and colors.
- Glaze choices: Brush with warmed apricot preserves, a neutral simple syrup, or a light strawberry glaze. Or skip the glaze altogether for a rustic, natural look.
- Dairy-free alternative: Use full-fat coconut milk instead of milk and cream and thicken with cornstarch. The texture will be a little different but still tasty.
Storage and Make-Ahead Tips
Once assembled, keep your mini fruit tarts in a single layer in the fridge, covered well. They’re best enjoyed within 1 to 2 days, as the fruit will start to release juices over time and soften the crust.
If you want to prep in advance, you can make the pastry cream up to 48 hours ahead. Just cover its surface tightly with plastic wrap to prevent a skin from forming—exactly as in our Homemade Classic Coconut Cream Pie—and keep it chilled. Tart shells are great stored at room temperature in an airtight container for a few days or frozen unfilled for longer storage.
Don’t heat assembled tarts; it can ruin the texture of the cream and fresh fruit. If the pastry cream feels a bit firm straight from the fridge, let the tarts sit at room temperature for 10-15 minutes before serving. If your pastry cream separates a bit while resting, just whisk it again to smooth before filling your shells.
Avoid freezing fully assembled tarts since freezing and thawing can affect the custard and fruit textures. However, you can freeze baked shells and thaw them before filling.

Quick Answers to Common Questions
- How do I prevent soggy tart shells? Make sure the pastry cream is fully chilled before filling, dry or drain juicy fruits well, and apply only a thin layer of glaze. For an alternative base that resists sogginess, a homemade Oreo pie crust holds up nicely under creamy fillings. These steps keep the crust crisp and fresh.
- Can I make the pastry cream ahead? Yes! It stores nicely in the fridge for up to 48 hours when covered tightly with plastic wrap directly on the surface to prevent skin.
- What’s that shiny glaze on top? It’s usually apricot preserves warmed with a little water or simple syrup, then brushed over the fruit for a beautiful shine and subtle sweetness.
- Can I use store-bought pudding instead of pastry cream? You can in a pinch, but homemade pastry cream offers a richer flavor and smoother, more authentic texture.
- My pastry cream is lumpy—how can I fix it? Strain the cream through a fine mesh sieve while still warm to remove lumps. If needed, gently reheat and whisk or blend, then cool and cover again.
- Can I freeze the tarts? I don’t recommend freezing assembled tarts because the texture changes. Freeze shells only and fill fresh after thawing for best results.
Easy Mini Fruit Tarts filled with homemade vanilla pastry cream and topped with assorted fresh fruit and apricot glaze. Perfect bite-sized desserts for celebrations or afternoon tea.
- Prep Time: 20 minutes
- Cook Time: 10 minutes
- Total Time: 3 hours 30 minutes (including chilling)
- Yield: 14 mini tarts 1x
- Category: Dessert
- Cuisine: French-inspired
Ingredients
- ½ cup granulated sugar
- 3 egg yolks (cold)
- 3 tablespoons cornstarch
- 1 cup milk (whole or 2%)
- 1 cup heavy cream (36% fat)
- 2 tablespoons salted butter (cold)
- 1 teaspoon vanilla bean paste (or 2 teaspoons vanilla extract)
- 14 mini tart shells (store-bought or homemade)
- ~2 cups assorted fresh berries or diced fruit
- 2 tablespoons apricot preserves
Instructions
- Bake or blind-bake mini tart shells according to package instructions or using pie weights; cool completely.
- In a heatproof bowl, whisk cold egg yolks and granulated sugar until pale and creamy (1–2 minutes).
- Whisk in cornstarch until combined.
- Heat milk and heavy cream in a saucepan over medium heat until tiny bubbles form around edges; remove from heat.
- Slowly drizzle the hot milk mixture into the egg yolk mixture while whisking continuously to temper the eggs.
- Return the combined mixture to the saucepan; cook over medium-low heat, whisking constantly until thickened to custard consistency (4–5 minutes).
- Stir in vanilla bean paste (or extract).
- Strain pastry cream through a fine-mesh sieve into a bowl.
- Stir in cold salted butter until smooth.
- Cover surface of pastry cream tightly with plastic wrap to prevent skin; cool to room temperature then refrigerate at least 2 hours.
- Whisk chilled pastry cream with a hand mixer to smooth and lighten.
- Pipe about 2 tablespoons of pastry cream into each cooled tart shell.
- Top each tart with fresh berries or diced fruit.
- Warm apricot preserves with a splash of water in microwave until thin (15–30 seconds).
- Brush glaze lightly over the fruit to give a shiny finish.
- Refrigerate assembled tarts for at least 1 hour before serving.
Notes
Temper the eggs slowly by drizzling hot milk mixture gradually to prevent curdling., Cook custard gently over medium-low heat, whisking constantly to avoid lumps., Use plastic wrap pressed onto pastry cream surface to prevent skin formation., Keep pastry cream chilled before filling to avoid soggy crusts., For juicier fruits (strawberries, mango), pat dry or toss with a bit of sugar and drain excess juice before topping., Use piping bag for neat filling and arrange fruit just before serving for freshness., Store completed tarts covered in a single layer in fridge; best enjoyed within 1-2 days., Make pastry cream up to 48 hours ahead; tart shells can be stored or frozen unfilled., Do not freeze assembled tarts as texture will be affected; freeze shells only.
Nutrition
- Serving Size: 1 mini tart
- Calories: Approximately 180 calories per tart
- Fat: 8 g per serving
- Carbohydrates: 25 g per serving
- Protein: 3 g per serving
More in Pies