Berry Tarts

Tarts are such a treat, aren’t they? From rustic, freeform beauties to those classic pies with fancy fluted edges, they all have their charm. But honestly, there’s something really magical about these tiny berry tarts. When it comes to pies and tarts, you don’t need any fancy gadgets or tricky steps to impress. For this recipe, all you do is cut buttery, flaky pie dough into rounds and nestle them inside a simple muffin tin. Seriously, it doesn’t get easier than that.
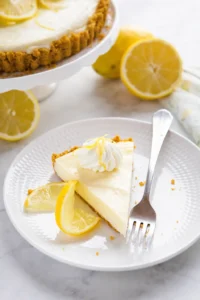
Then, you fill them with a sweet and tangy mix of berries and bake them until the crusts turn that perfect golden shade and the fruit fills the kitchen with a warm, inviting aroma. Now, here’s the best part — each tart gets topped with a creamy lemon curd and whipped cream blend that adds a bright, zesty burst of flavor. That fresh citrus note takes these little gems to the next level without any stress at all. They’re perfect for parties, casual family dinners, or whenever you want a charming dessert that’s easy to whip up.
These petite mixed-berry tarts truly deliver big on flavor without any fuss. And guess what? You only need a few simple tools — a rolling pin, cookie cutter, and muffin tin. Forget about fancy tart pans or complicated instructions. Just cut your pie dough into circles, press them into muffin cups, spoon in a fresh or frozen berry mix, and bake until golden and bubbly. Then finish with a fluffy whipped cream and tangy lemon curd topping that’s refreshingly delicious.
Stick around, and I’ll guide you through making those flaky tart shells from scratch, putting the berry filling together, and blending that bright lemon curd topping. I’ll also share my favorite tips for using fresh versus frozen berries, prepping ahead, storing your tarts, and even some fun variations to keep things interesting. Whether you want to feed a crowd or enjoy a few sweet personal treats, this recipe proves you can get bakery-quality results at home without any hassle.
Why You’ll Love Them
- Classic pie dough crusts that bake up flaky and buttery (our Perfect Pie Crust recipe nails it), giving you that homemade bakery vibe—no need for special tart pans, just a rolling pin and muffin tin does the trick.
- A fresh or frozen mixed berry filling that strikes the perfect balance between sweet and tangy. If your berries need a boost, macerating strawberries first can intensify their flavor; tossing berries with cornstarch thickens the juices beautifully—no syrupy canned fillings here, just pure fruit deliciousness.
- The lemon curd and whipped cream topping brings a bright, citrusy lift that cuts through the richness and makes each bite feel next-level special.
- Mini tarts are ideal for parties, easy to grab, and you can do much of the prep a day or two ahead to keep things stress-free when entertaining.
What You Need

- Double-crust pie dough (enough for a double crust)
- 2 1/2 cups all-purpose flour
- 1/2 teaspoon salt
- 1 cup cold butter
- 1/3 to 2/3 cup ice water
- Cornstarch
- Sugar
- Mixed berries (fresh or frozen—both work beautifully)
- A splash of fresh lemon juice
- Heavy whipping cream
- Lemon curd
- Vanilla extract
Tart Assembly and Baking
- In a big bowl, combine 2 1/2 cups all-purpose flour with 1/2 teaspoon salt.
- Cut in 1 cup cold butter until the mix looks crumbly and sandy, like coarse crumbs.
- Slowly add 1/3 to 2/3 cup ice water, stirring gently until the dough just sticks together when pressed.
-
Split the dough into two disks, wrap tightly in plastic, and chill in the fridge for at least 1 hour before rolling out.

- Preheat your oven to 400°F (200°C). This high heat will help get a golden crust with a tender crumb.
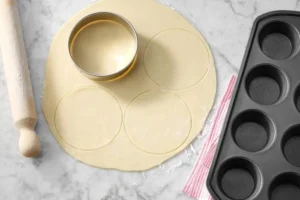
- Lightly flour your countertop and roll out one chilled dough disk to about 1/8-inch thickness.
- Use a 4-inch round cookie cutter to make 12 dough circles. Re-roll scraps as needed to get all your rounds.
-
Gently press each circle into an ungreased muffin tin cup, shaping each one into a neat tart shell.

- In a bowl, whisk together sugar and cornstarch, then toss with your berries and a splash of lemon juice until everything is coated evenly.
- If using frozen berries, make sure to thaw and drain them well, or toss with a little extra cornstarch to keep the crust crisp and avoid sogginess.
- Spoon roughly 2 tablespoons of the berry mixture into each tart shell, spreading the filling out evenly.
-
Set the muffin tin on the lower oven rack and bake for 24 to 26 minutes until the crust edges are golden and the berry filling bubbles invitingly.

- Let the tarts cool in the pan for 10 minutes, then carefully transfer to a wire rack to cool completely.
- Using a mixer, whip heavy cream until soft peaks form—light and airy is the goal here.
- In a separate bowl, mix lemon curd with a bit of sugar, vanilla extract, and about 1 tablespoon of the whipped cream to lighten the mixture.
-
Gently fold the remaining whipped cream into the lemon curd mixture until smooth and fluffy.

- Spoon the luscious lemon-curd whipped topping over each cooled tart, and if you want, garnish with fresh berries for a pop of color and extra zing.
-
Chill the tarts until you’re ready to serve and enjoy their fresh, glossy finish.

Tips for Best Results
Getting these berry tarts just right is surprisingly simple. Here are some easy tips to follow so your crusts come out flaky and your filling tastes perfect every time you bake!
How do you make a double-crust pie dough?
It’s easier than you might think! In a bowl, mix 2 1/2 cups all-purpose flour with 1/2 teaspoon salt. Cut in 1 cup cold butter until the mixture resembles coarse crumbs. Then slowly add 1/3 to 2/3 cup ice water, mixing gently with a fork just until the dough holds together when pressed. Divide it into two disks, wrap them tight, and chill for at least an hour before rolling out. This chill time really helps to make the crust flaky and tender.
Can you use premade tartlet shells?
Absolutely! There’s no shame in shortcuts, especially when time is tight. Frozen or refrigerated mini tart shells work great and still taste delicious. Or grab some refrigerated pie dough, roll it out, and cut with your cookie cutter for an easy homemade feel without all the fuss. Either way, you’ll have tasty berry tarts ready in no time.
Can you make these berry tarts ahead of time?
Definitely! You can prepare the pie dough and lemon curd topping up to two days in advance to make the process smoother. Even better, bake the tarts a day before your event and refrigerate them. Just wait to add the whipped cream topping until right before you serve to keep it fresh, fluffy, and picture-perfect.
What can you serve with berry tarts?
The lemon curd whipped cream is a total winner, but if you want to mix it up, plain whipped cream with a little grated lemon zest is wonderful too—or swap in silky vanilla pastry cream for a more classic fruit-tart vibe. Adding fresh berries on top always makes them feel festive and fresh. Sometimes a scoop of vanilla ice cream or a light dusting of powdered sugar is just the extra touch if you’re serving these as a crowd-pleasing dessert.
Flavor Swaps and Add-Ins

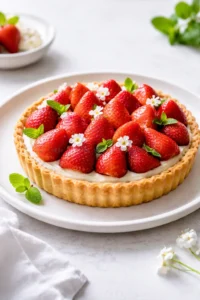
- Single-berry tarts: Want to highlight one type of berry? Make all your tarts with just strawberries, blueberries, or raspberries. It’s a simple way to let that fresh flavor shine.
- Mascarpone or cream cheese topping: Swap the lemon curd and whipped cream topping for a softer mascarpone whipped with a little cream; see how we whip it to silky peaks in this Strawberry Mascarpone Cake. This gives a richer, creamier finish that’s pretty dreamy.
- Almond twist: Stir in 1/4 teaspoon almond extract to the berry filling or sprinkle sliced almonds on top before baking to add a nice nutty crunch and extra flavor.
- Gluten-free: Use a good store-bought or homemade gluten-free pie dough. Bake time stays about the same—just keep an eye out and pull when edges turn golden.
- Dairy-free option: Swap the butter for coconut oil in your dough and use whipped coconut cream instead of heavy cream. This option tastes fantastic and works for dairy-free diets.
- Bigger tarts: Use mini tart pans or a large fluted tart pan instead of muffin tins. Just add more berry filling and bake longer until everything is bubbling and crusts are golden brown. For a full-size example, see our French Strawberry Tart (Tarte aux Fraises).
Storage and Make-Ahead Tips
Once your berry tarts are completely cool, store them covered in the refrigerator for up to three days; for mini versions, see our mini berry tarts for make-ahead assembly that keeps shells crisp. To keep things fresh and fluffy, it’s best to keep the whipped lemon curd topping separate and add it right before serving (you can make the lemon curd ahead using the method in our Best Homemade Lemon Pie recipe). This little step helps your tarts taste like they just came from a bakery.

Common Questions Answered
Q: Can I use fresh berries instead of frozen?
A: Absolutely! Fresh berries work wonderfully here. Just toss them with sugar, cornstarch, and a splash of lemon juice the same way. If they’re really juicy, add a little extra cornstarch to keep the filling firm and the crust crisp.
Q: Can I use premade tartlet or pie shells?
A: For sure! Frozen or refrigerated tart shells are a great timesaver. Just follow package instructions for baking and skip the step of shaping dough in muffin tins. Alternatively, you can press a quick graham cracker crust into the tins—this easy graham cracker crust recipe works perfectly.
Q: How far ahead can I make these tarts?
A: You can prep the dough and lemon curd topping a day or two before baking. After baking (without the whipped topping), tarts keep well in the fridge for up to three days. Add the whipped topping and fresh berries just before serving so everything tastes fresh.
Q: How do I avoid soggy tart bottoms?
A: Tossing berries with cornstarch helps soak up excess juices so the crust stays crisp. Baking them on the lower oven rack also crisps the bottom nicely. If you want, blind baking shells a few minutes before filling can help prevent sogginess too.
Q: Can I freeze these tarts?
A: Yes! Freeze them without the whipped topping. Place the tarts on a baking sheet to freeze individually, then transfer to a sealed container for up to 1-2 months. Thaw in the fridge before serving and add the topping fresh. Keep in mind the crust might lose a touch of crispness after freezing.
Q: What can I substitute for lemon curd?
A: No lemon curd? No problem! Try blending cream cheese or mascarpone with a bit of lemon zest and sugar instead. Or fold lemon zest into sweetened whipped cream for a softer, citrusy twist.

Mini mixed berry tarts with a homemade flaky pie crust, a sweet and tangy berry filling thickened with cornstarch, and topped with a bright and fluffy lemon curd whipped cream.
- Prep Time: 1 hour 20 minutes
- Cook Time: 26 minutes
- Total Time: 1 hour 46 minutes
- Yield: 12 mini tarts 1x
- Category: Dessert
- Cuisine: American
Ingredients
- 2 1/2 cups all-purpose flour
- 1/2 teaspoon salt
- 1 cup cold unsalted butter, cubed
- 1/3 to 2/3 cup ice water
- 1/4 to 1/3 cup sugar (for berry filling, adjust to taste)
- 1 to 2 tablespoons cornstarch (for berry filling)
- 2 to 3 cups mixed berries (fresh or frozen, such as strawberries, blueberries, raspberries)
- 1 tablespoon lemon juice (for berry filling)
- 1 cup heavy whipping cream
- 1/2 cup lemon curd
- 1 teaspoon vanilla extract
- Optional: additional sugar for lemon curd mixture
- Optional garnish: fresh berries
Instructions
- In a large bowl, combine 2 1/2 cups all-purpose flour with 1/2 teaspoon salt.
- Cut in 1 cup cold butter with a pastry cutter or fork until mixture resembles coarse crumbs.
- Gradually add 1/3 to 2/3 cup ice water, mixing gently until dough just holds together when pressed.
- Divide dough into two disks, wrap tightly in plastic wrap, and chill in the refrigerator for at least 1 hour.
- Preheat oven to 400°F (200°C).
- Lightly flour a clean countertop and roll out one of the dough disks to about 1/8-inch thickness.
- Using a 4-inch round cookie cutter, cut out 12 circles from the dough; re-roll scraps as needed.
- Press each dough circle gently into the wells of an ungreased muffin tin to form tart shells.
- In a bowl, mix sugar and cornstarch together; toss with the mixed berries and lemon juice until evenly coated.
- If using frozen berries, thaw and drain excess liquid, and add extra cornstarch if needed to prevent sogginess.
- Spoon about 2 tablespoons of the berry filling into each tart shell, spreading fruit evenly.
- Place the muffin tin on the lower oven rack and bake for 24 to 26 minutes, until crusts are golden and filling is bubbling.
- Allow tarts to cool in the pan for at least 10 minutes, then transfer to a wire rack to cool completely.
- In a mixing bowl, whip 1 cup heavy cream with a mixer until soft peaks form.
- In a separate bowl, combine 1/2 cup lemon curd, vanilla extract, and a small amount of the whipped cream to lighten the mixture.
- Gently fold the remaining whipped cream into the lemon curd mixture until smooth and fluffy.
- Spoon the lemon curd whipped topping generously over each cooled tart. Garnish with fresh berries if desired.
- Chill the assembled tarts until ready to serve.
Notes
You can use premade tartlet shells or refrigerated pie dough as a shortcut., Make dough and lemon curd topping up to two days in advance., Add whipped cream topping just before serving to keep it fresh., For a dairy-free version, substitute butter with coconut oil and heavy cream with whipped coconut cream., Baking on the lower rack helps crisp the tart bottoms., Blind baking tart shells before filling can reduce sogginess., Tarts can be frozen without topping for 1-2 months; thaw before adding topping., Variation ideas: single-berry tarts, mascarpone or cream cheese topping, almond extract or sliced almonds, gluten-free dough, or larger tart pans.
Nutrition
- Serving Size: 1 tart
- Calories: Approximately 250 calories per tart
- Fat: 14 g per serving
- Carbohydrates: 30 g per serving
- Protein: 3 g per serving
More in Pies