4th of July Waffle Cones with Fresh Berries and Whipped Cream


Tried by 391
If you’re hunting for a festive, fuss-free treat to brighten your 4th of July table, but don’t want the same old sheet cake or another popsicle tray, these 4th of July waffle cones are just the ticket. They’re quick, cute, and come together without any stress, making them perfect for a crowd without turning your kitchen upside down.
These cones bring the perfect crunch, a pop of vibrant color, and best of all—they won’t melt all over your patio before you get to enjoy them. In this post, I’m sharing how to whip up a batch of these cones in 30 minutes or less, easy tips for prepping ahead, and ways to customize the flavor that keep things interesting.
I’ve served these at backyard barbecues, school parties, and one summer I even filled them and lined them up on a cake stand for a dessert board that the whole family loved. The best part? No oven, no chilling time, no last-minute scrambling. Pure, simple, fun.
When it comes to the Fourth of July, you want a dessert that’s bright, grab-and-go, and super easy to share—without resorting to the usual sheet cake or a sticky popsicle mess. These 4th of July waffle cones nail it perfectly. They’re fun, festive, come together quickly, and hold up well whether you’re at a backyard cookout, a school party, or serving up a family-friendly dessert spread.
In this guide, you’ll get everything you need to create a dozen perfect cones: a simple method for dipping the rims in chocolate to get those neat sprinkle edges; a whipped cream filling that holds its shape; and the easiest way to top it all off with fresh strawberries and blueberries. Plus, I’ll share tips to prep parts ahead of time, how to keep your cones crisp, and smart swaps for filling options—think ice cream, cheesecake mousse, or even stabilized whipped cream depending on your occasion.
Plan on about 30 minutes from start to finish if you’re making these cones right before serving. Keep scrolling for all the ingredients, step-by-step tips for dipping and assembling, storage and make-ahead ideas, plus troubleshooting advice to keep your 4th of July waffle cones looking stunning and tasting fresh.
Perfect for Casual Patriotic Gatherings
If you’re weighing your dessert options—maybe between these festive waffle cones or a more formal sweet like an American Flag Cake Roll—think about the vibe you want. These cones are super handy for casual settings since you don’t need plates or forks. Guests can just grab, munch, and mingle. That ease is their biggest plus.
On the flip side, if you’re aiming for a fancier table or a show-stopping centerpiece, something like a Patriotic Cheesecake might suit better. At my gatherings, I often serve both—cones for the kids (and the kids at heart) and cheesecake for the grown-ups.
Looking for other festive handheld treats? These Patriotic Chocolate Balls are a breeze if you want a no-bake option, and if you’re feeling creative, the Fireworks Sugar Cookies bring extra detail to the party.
Ingredients for Twelve Cones
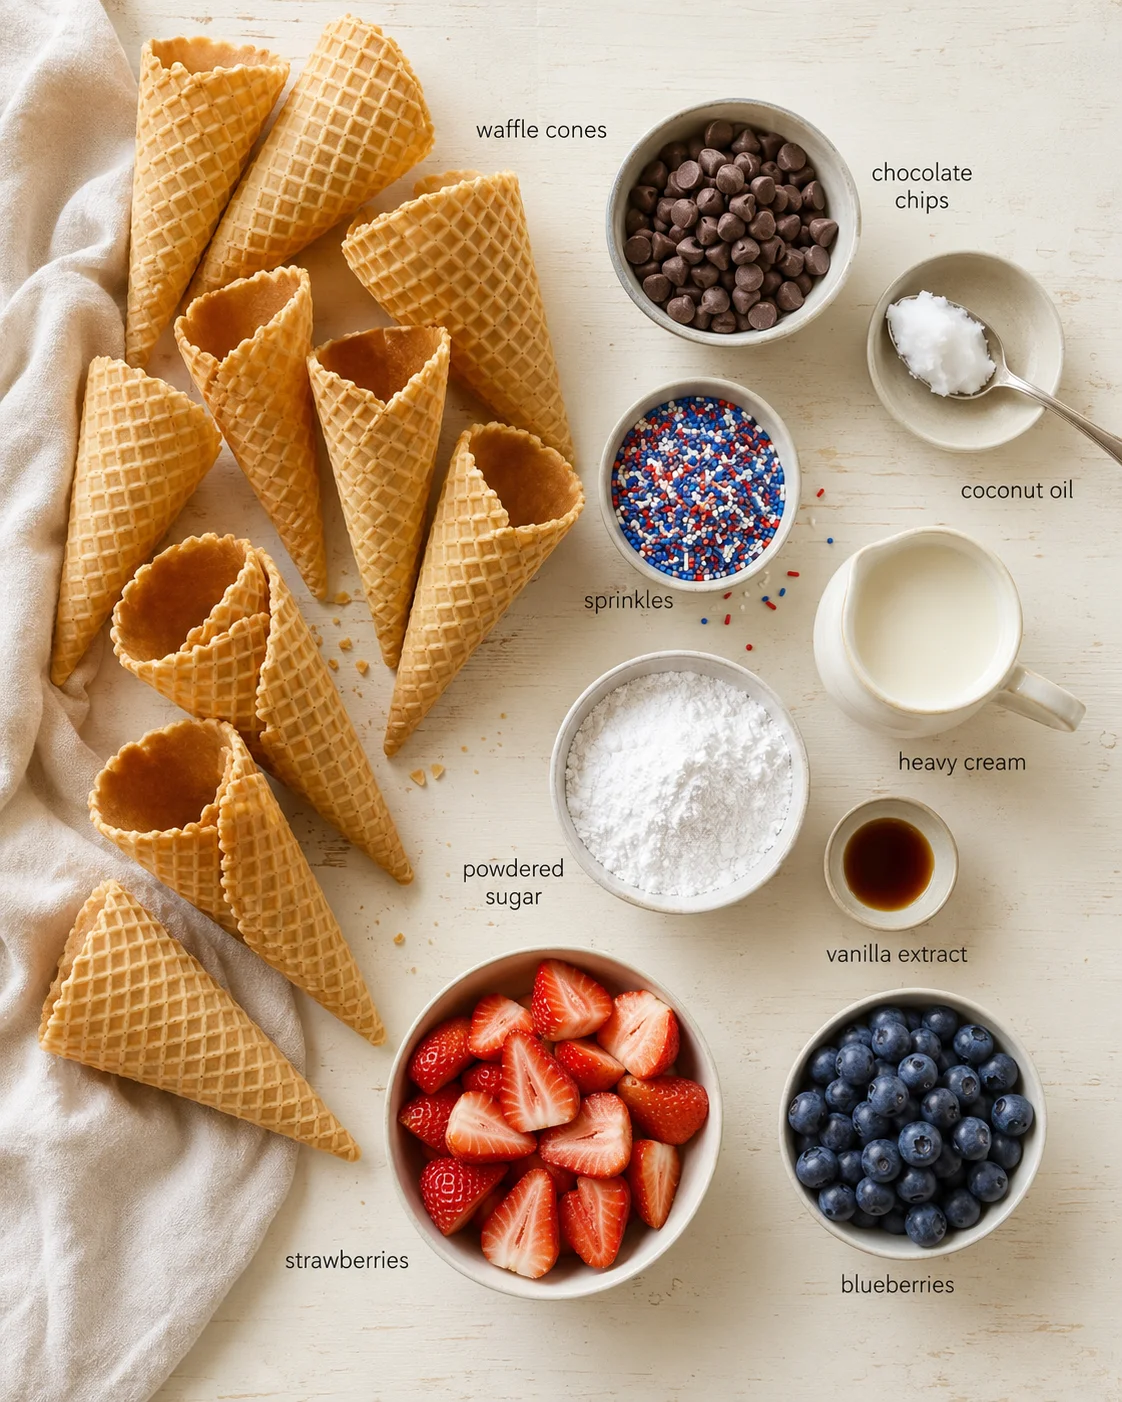
- twelve waffle cones
- 1 cup milk or semi-sweet chocolate chips
- a spoonful of coconut oil
- red, white, and blue sprinkles
- heavy cream
- powdered sugar
- vanilla extract
- about a cup of halved strawberries
- three-quarters of a cup of blueberries
Assembly and Decorating Steps
- Line a baking sheet with parchment paper.
- Set waffle cones upright in small cups or a cone stand to hold while decorating.
- Melt chocolate in the microwave in 20-second bursts, stirring after each burst, until silky smooth.
- If chocolate is too thick, add coconut oil a teaspoon at a time and stir until fluid.
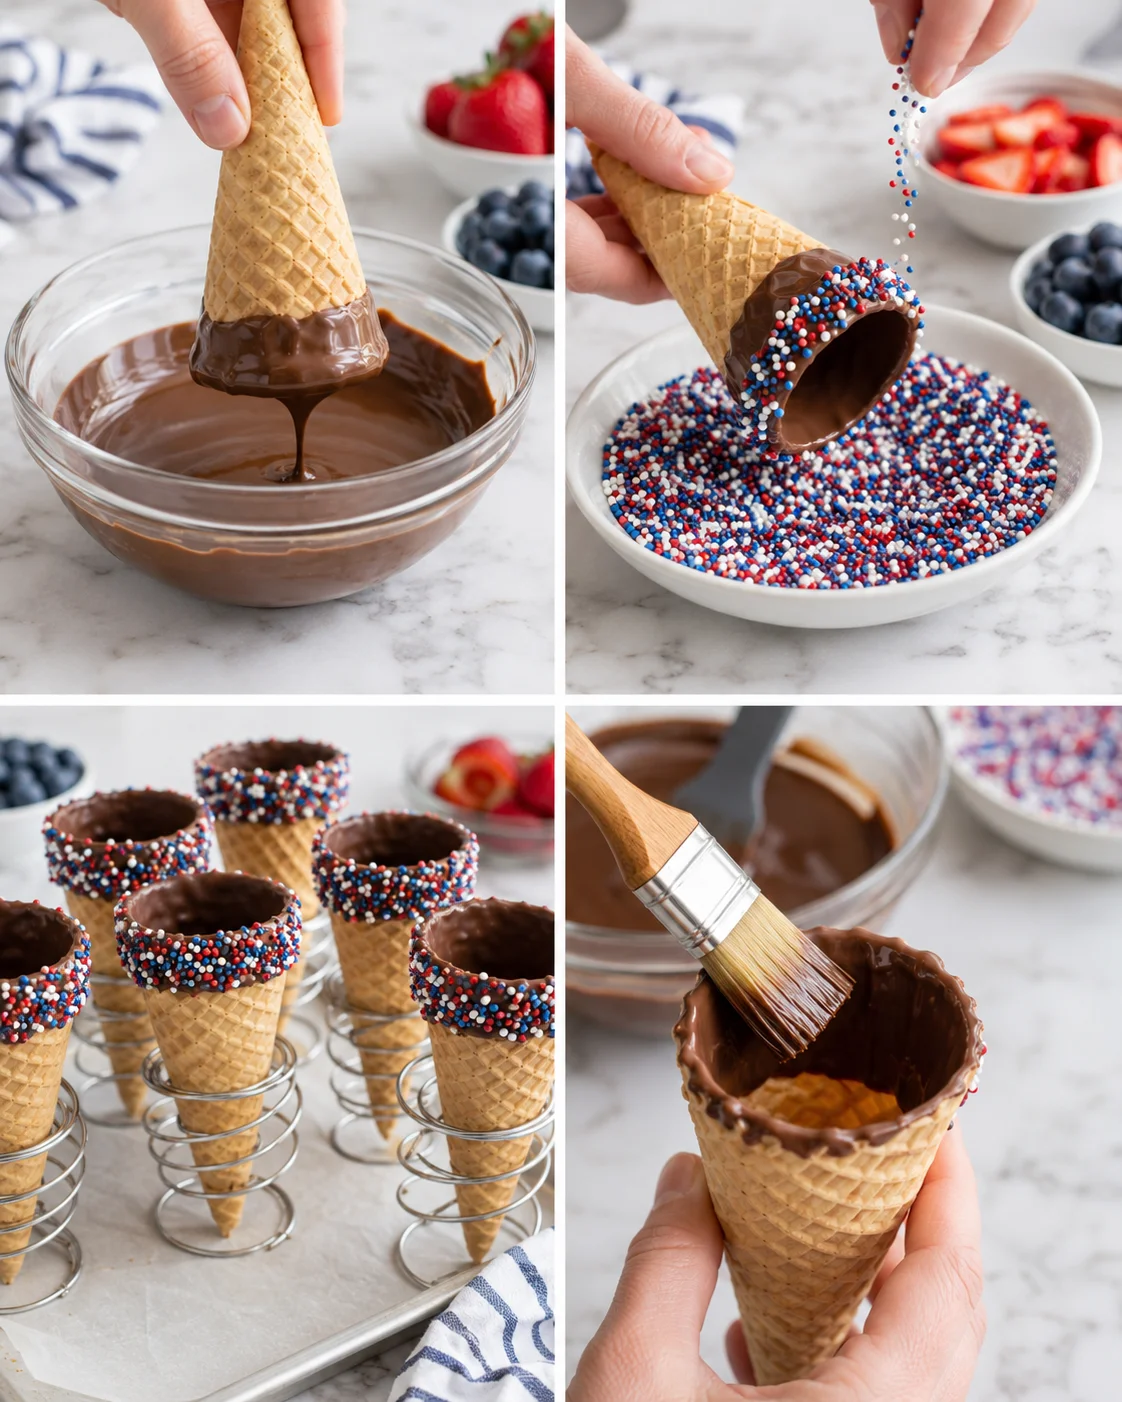
- Dip each cone’s rim about 1 inch into the melted chocolate and let the excess drip off.
- Immediately roll or sprinkle the wet chocolate rims with red, white, and blue sprinkles.
- Let dipped cones cool and the chocolate set at room temperature or briefly in the fridge.
-
After dipping, brush a thin layer of melted chocolate inside the top inch of each cone to create a moisture barrier.
- Start with very cold heavy cream and whip it with a hand mixer until soft peaks form.
- Add powdered sugar and vanilla, then continue whipping until stiff peaks form, being careful not to overbeat.
- Transfer whipped cream to a piping bag fitted with a wide tip or use a spoon to fill the cones.
- Fill each cone with whipped cream, leaving about a 1/4-inch space at the rim.
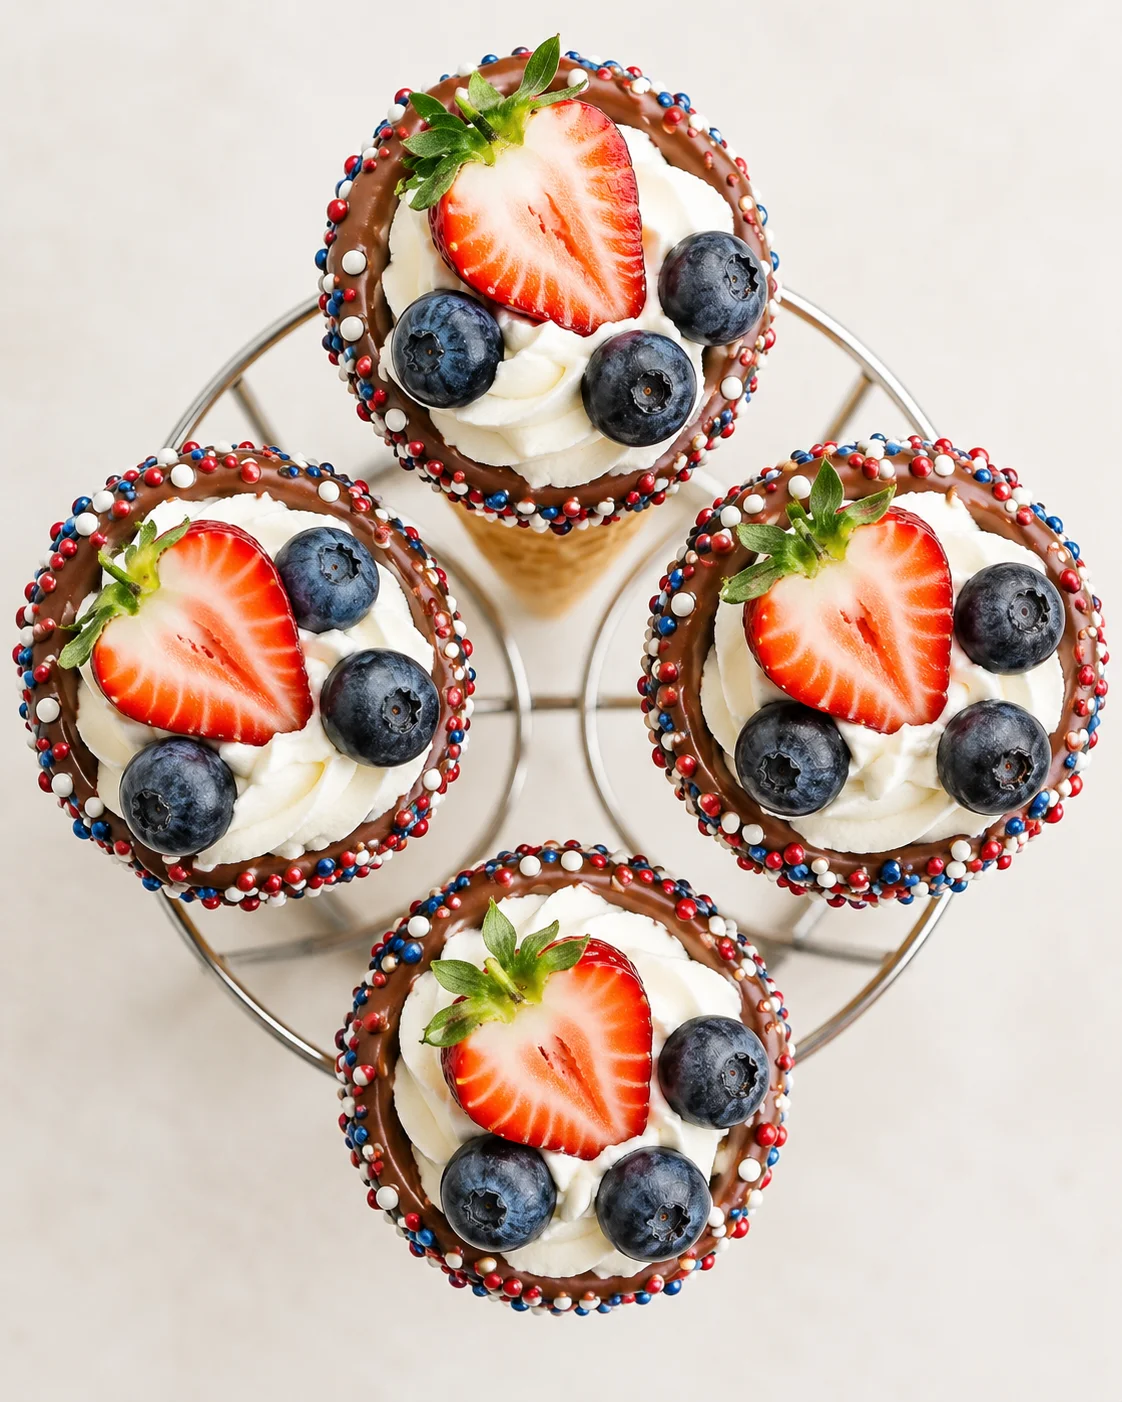
- Top each filled cone with halved strawberries and a scatter of blueberries.
Keeping Cones Crisp and Neat
It’s a few little tricks that make these cones truly shine. These tips will help ensure your cones stay crisp, your chocolate rims are neat, and your whipped cream holds its shape, especially if you’re serving outdoors on a warm day.
- Go for thicker waffle cones when you can—they hold together better when dipped and won’t crack as easily when guests handle them. And don’t overfill your cones; leaving about a quarter-inch space at the rim keeps toppings from spilling over.
- Melt chocolate in short microwave bursts—20 seconds at a time—stirring well between each session. If it looks grainy or thick, add coconut oil a teaspoon at a time until the chocolate smooths out. Or if you prefer, use a double boiler for more control over the melting.
- Roll your sprinkles on immediately after dipping, while the chocolate is still wet. Bigger sprinkles or sanding sugar stick way better than tiny nonpareils, so go big if you want maximum festive impact.
- To keep whipped cream stable longer, start with very cold cream and a chilled bowl. Whip to soft peaks first, then add powdered sugar and vanilla before finishing to stiff peaks. For even better hold—great for picnics or outdoor parties—try folding in a few tablespoons of mascarpone cheese or gently mix in a teaspoon of dissolved, cooled gelatin per 1½ cups of cream. For detailed ratios and technique, see this Chantilly frosting recipe.
- Prevent soggy cones by creating a moisture barrier: after dipping the rims, brush a thin layer of extra-melted chocolate or white chocolate inside the top inch of each cone. This is especially helpful if you plan to use juicy fruit like macerated strawberries or want to prep cones ahead of time.
- Make-ahead tip: You can dip and decorate cones as much as 24 hours before serving. Store them upright in an airtight container at room temperature. Keep the whipped cream cold and assemble the cones just before guests arrive for the best texture and freshness.
- For transport and display: stand cones upright in small cups or a cone holder. If it’s hot outside, keep them chilled in the fridge until just before serving to avoid melting.
Fruit and Filling Variations
I’ve played around with both fresh and canned fruit for filling these cones, so here’s what I’ve learned that might help you decide.
Fresh strawberries and blueberries hold their shape beautifully and keep your cones nice and crisp. On the other hand, canned berries—even those packed in juice—can bleed color into the whipped cream and soften the cones quicker. They’re sweeter, for sure, but they do cut down the time between serving and sogginess. If you’re making these ahead or want the best look and texture, fresh is definitely the way to go. For a citrusy twist that layers well under berries and helps balance the sweetness, try a spoonful of lemon curd. If you’re whipping your own, this step-by-step guide to perfect homemade whipped cream will help you get the right texture.
Make-Ahead and Storage Notes
To keep your 4th of July waffle cones crisp and fresh, assemble them just before serving. I like to pipe the whipped cream filling using a wide tip for a pretty swirl, then top each cone with halved strawberries and a scatter of blueberries. Have extra berries? Put them to work on this Lemon Olive Oil Cake with Berries and Vanilla.
If you want to prep ahead, no problem. You can dip and decorate the cones up to 24 hours in advance and keep them stored upright in an airtight container. Whipped cream should be kept chilled separately, then filled in right before your guests arrive.
Feel free to swap the whipped cream for vanilla ice cream for a cool summer twist, or try cheesecake mousse, lemon curd, or even strawberry jam to change up the flavors. I’ve even filled a few cones with leftover Frozen Patriotic Cheesecake once—it was a hit! If you love bright citrus, try the Best Homemade Lemon Pie recipe for another crowd-pleasing option.
Quick Answers to Common Questions
- Can I prepare these cones ahead of time? Absolutely! You can dip and sprinkle the cones up to 24 hours ahead. Store them upright in an airtight container at room temperature. Make your whipped cream the same day and keep it chilled. Then assemble just before you serve to keep everything crisp and fresh.
- Can I use ice cream instead of whipped cream? Yes, definitely. Just fill the cones right before serving and enjoy immediately so the ice cream doesn’t melt too fast. For best results, chill your cones beforehand and work quickly when filling.
- How do I stop the cones from getting soggy? Use fresh, dry berries—if needed, pat them with paper towels. Also, brush a thin layer of melted chocolate inside the top inch of your cones after dipping to create a moisture barrier. Finally, fill cones as close to serving time as possible.
- Are canned or frozen berries okay? Fresh berries are definitely preferred for keeping the cones crisp and beautiful. Canned fruit is syrupy and can soften cones quickly. Frozen berries can release excess liquid when thawed, which may color the whipped cream and make cones soggy.
- How can I make the whipped cream more stable? Start with very cold cream and a chilled bowl, then whip to soft peaks before adding powdered sugar and vanilla, finishing at stiff peaks. For extra hold, fold in a couple tablespoons of mascarpone or cream cheese, or mix in a small amount of dissolved, cooled unflavored gelatin. Powdered sugar helps too thanks to its cornstarch content.
- Can I make these vegan or gluten-free? Yes! Use vegan waffle cones and dairy-free chocolate, and swap in stabilized coconut whipped cream or aquafaba-based whipped topping. For gluten-free cones, look for cones labeled gluten-free.
- What about nut allergies? Always check labels on cones, sprinkles, and chocolate for any nut cross-contamination warnings. Choose certified nut-free products if you’re serving friends or family with severe allergies.
- How many cones does this recipe make and how long do leftovers last? This recipe yields 12 cones. Assembled cones are best enjoyed right away. If you have leftovers, remove any fresh fruit, and store the cones and whipped cream separately in the fridge—the whipped cream will last a few hours, but once filled, cones will start to soften within hours. Have extra berries? Put them to good use in an easy grilled strawberry chicken salad.

Festive and easy-to-make waffle cones dipped in chocolate and sprinkles, filled with whipped cream, and topped with fresh strawberries and blueberries, perfect for casual patriotic gatherings.
- Prep Time: 15 minutes
- Cook Time: 15 minutes
- Total Time: 30 minutes
- Yield: 12 cones 1x
- Category: Dessert
- Cuisine: American
Ingredients
- 12 waffle cones
- 1 cup milk or semi-sweet chocolate chips
- 1 tablespoon coconut oil (adjust as needed)
- Red, white, and blue sprinkles (amount as desired)
- 1 cup heavy cream (very cold)
- 2 tablespoons powdered sugar (adjust to taste)
- 1 teaspoon vanilla extract
- About 1 cup halved strawberries
- 3/4 cup fresh blueberries
Instructions
- Line a baking sheet with parchment paper.
- Set waffle cones upright in small cups or a cone stand to hold while decorating.
- Melt chocolate chips in the microwave in 20-second bursts, stirring after each, until smooth.
- If chocolate is too thick, add coconut oil 1 teaspoon at a time and stir until fluid.
- Dip each cone’s rim about 1 inch into the melted chocolate and allow excess to drip off.
- Immediately roll or sprinkle the wet chocolate rims with red, white, and blue sprinkles.
- Let dipped cones cool and the chocolate set at room temperature or briefly in the fridge.
- Brush a thin layer of melted chocolate inside the top inch of each cone to create a moisture barrier.
- Whip the very cold heavy cream with a hand mixer until soft peaks form.
- Add powdered sugar and vanilla extract then continue whipping until stiff peaks form, careful not to overbeat.
- Transfer whipped cream to a piping bag fitted with a wide tip or use a spoon to fill cones.
- Fill each cone with whipped cream, leaving about 1/4-inch space at the rim.
- Top each filled cone with halved strawberries and scatter blueberries over.
Notes
Use thicker waffle cones to avoid cracking and for better handling., Roll sprinkles on immediately after dipping when chocolate is wet; bigger sprinkles stick better., For a more stable whipped cream, start with very cold cream and chilled bowl; optionally fold in mascarpone or dissolve cooled gelatin for extra hold., Make-ahead tip: Dip and decorate cones up to 24 hours before serving; store cones upright at room temperature in an airtight container., Keep whipped cream chilled separately and fill cones right before serving to maintain crispness and freshness., Fresh berries are preferred over canned or frozen to prevent soggy cones and color bleeding., For vegan or gluten-free options, use vegan waffle cones, dairy-free chocolate, and coconut or aquafaba whipped toppings; check labels carefully for nut allergies.
Nutrition
- Serving Size: 1 cone
- Calories: Approx. 250 calories per cone (estimated)
- Fat: 15 g per serving (estimated)
- Carbohydrates: 25 g per serving (estimated)
- Protein: 3 g per serving (estimated)
More in Uncategorized

Crock Pot Chicken and Rice Recipe

Crock-Pot Chicken Noodle Soup

Slow Cooker Hearty Chicken Soup.