Blueberry Cheesecake Crumb Bars with Brown Butter Crumble – Emma’s Cake Studio
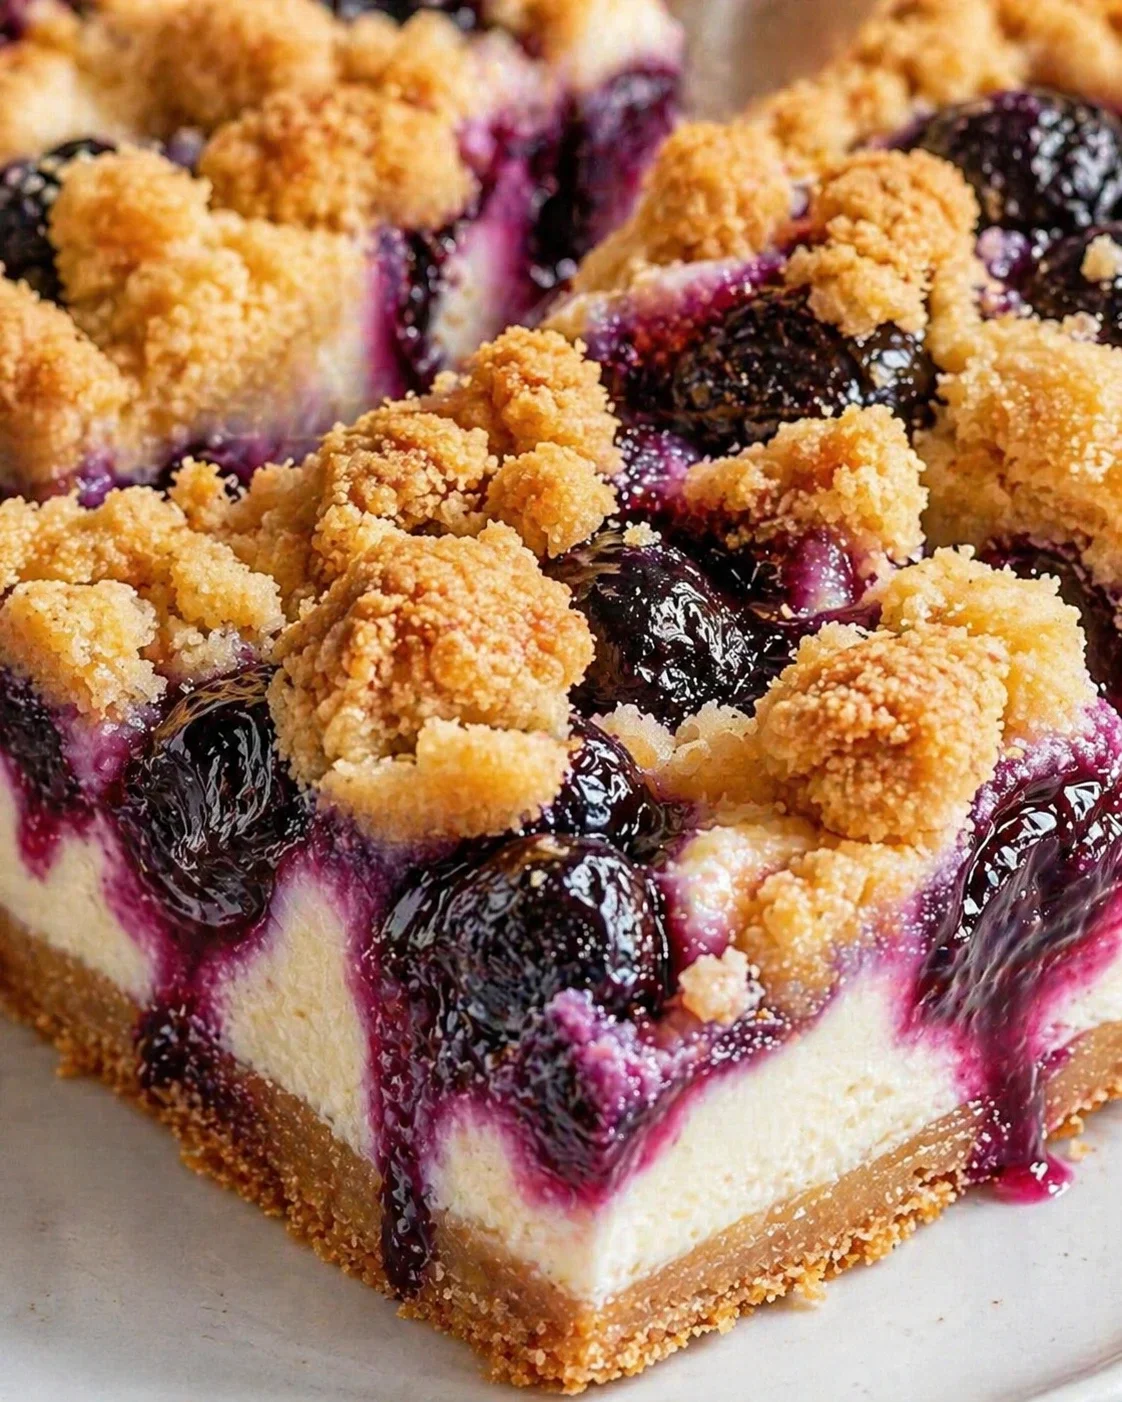
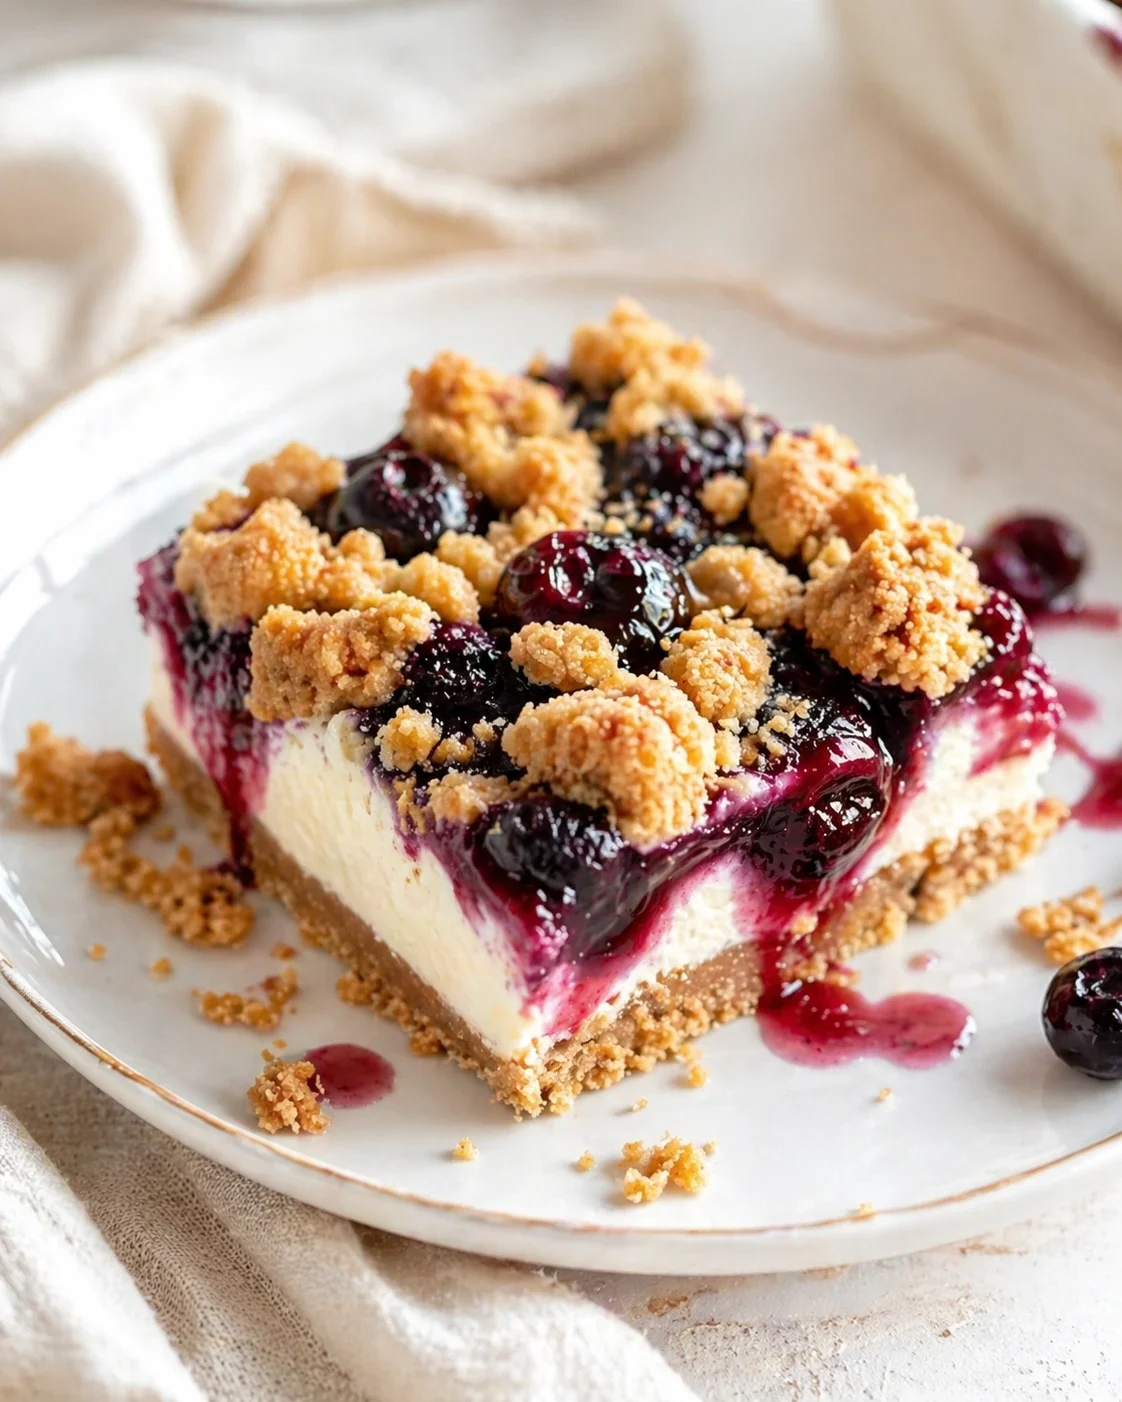
If you’re craving Blueberry Cheesecake Bars with a rich, bakery-style vibe rather than just a simple fruit bar, this recipe hits the spot. These bars bring together a creamy cheesecake filling, fresh blueberries, and a nutty brown butter crumble. The result? A soft, creamy center, juicy fruit in every bite, and a buttery, crisp topping—all baked together in one pan.
This mix of textures and flavors is exactly why these Blueberry Cheesecake Crumb Bars are such a winner. They hold their shape well, so you get clean slices that travel beautifully to potlucks or dessert tables. Plus, they have more texture than your typical soft cheesecake bars. If you’re all about easy blueberry desserts that look polished and keep tasting great the next day, these bars are just the ticket.
Pin
Blueberry Cheesecake Crumb Bars like these feel just a step above your usual fruit bars—they’re still super approachable but bring a little extra polish to any dessert spread. You’ll start with a firm, buttery crust, add a rich, silky cream cheese middle, fold in pockets of juicy blueberries, then top everything off with a golden brown-butter crumble—all baked in a single 9×9-inch pan and sliced into perfect squares.
Keep reading for a no-fuss, step-by-step guide on building each layer, including a simple trick for browning the butter in the crumble and why it’s worth the little extra effort. Plus, find tips on working with fresh versus frozen berries, how to bake, cool, and slice your bars so they stay pretty and stable, and quick troubleshooting notes. If you want to customize the flavor, I’ve also added some easy swaps and add-ins at the end.
If you love blueberry desserts that travel well, slice cleanly, and taste like you picked them up at a bakery but made them at home, this recipe won’t disappoint. I packed lots of helpful tips along the way to make sure you get those perfect bars every time.
What Makes Them Special
The magic here happens because each layer plays a clear role. The crust and crumble provide buttery structure and crunch, keeping the bars firm and satisfying—much like lemon bars with a buttery shortbread crust. The cheesecake filling lends a smooth, creamy texture that softens the whole bite. Then the blueberries cut through the richness with fresh bursts of bright, juicy flavor. When it all comes together, you get bars that feel more substantial than your average fruit bar (think strawberry rhubarb bars) but aren’t as dense or heavy as a full-on cheesecake slice.
Don’t skip browning the butter for the crumble! That step adds toasted, nutty depth that lifts the whole bar beyond just sweet and creamy. It’s what makes these bars stand out compared to simpler blueberry cheesecake recipes that rely only on fruit and cream cheese for flavor.
Ingredients You’ll Need
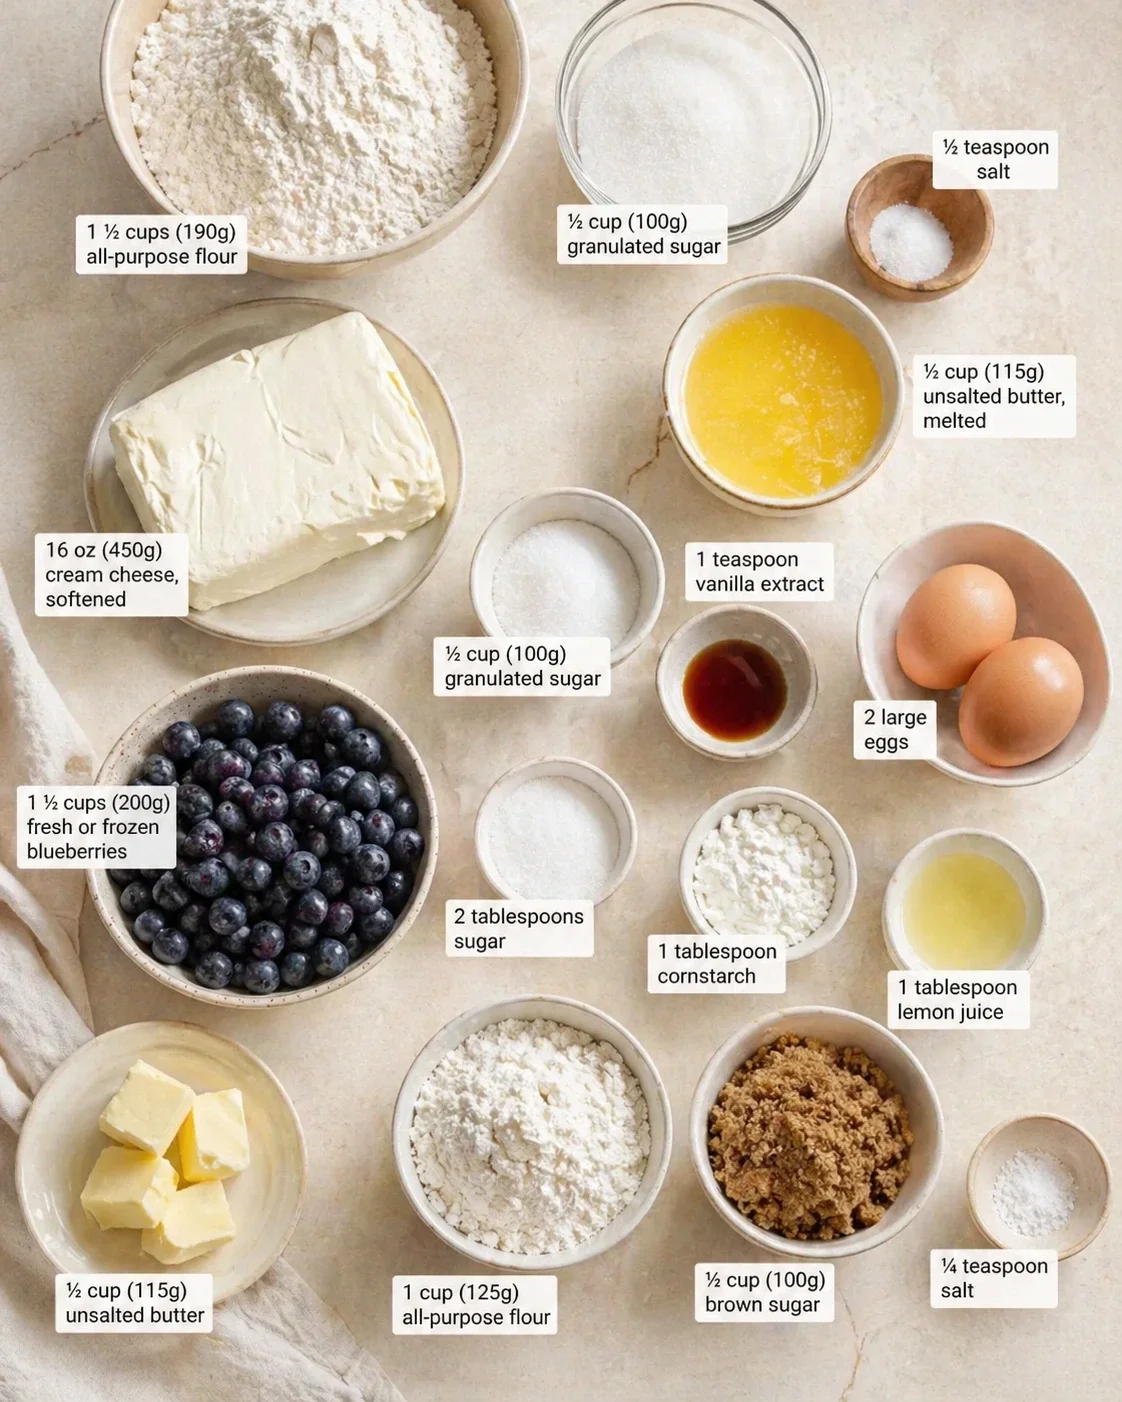
- 1 ½ cups (190g) all-purpose flour
- ½ cup (100g) granulated sugar
- ½ teaspoon salt
- ½ cup (115g) unsalted butter, melted
- 16 oz (450g) cream cheese, softened
- ½ cup (100g) granulated sugar
- 1 teaspoon vanilla extract
- 2 large eggs
- 1 ½ cups (200g) fresh or frozen blueberries
- 2 tablespoons sugar
- 1 tablespoon cornstarch
- 1 tablespoon lemon juice
- ½ cup (115g) unsalted butter
- 1 cup (125g) all-purpose flour
- ½ cup (100g) brown sugar
- ¼ teaspoon salt
How to Make the Bars
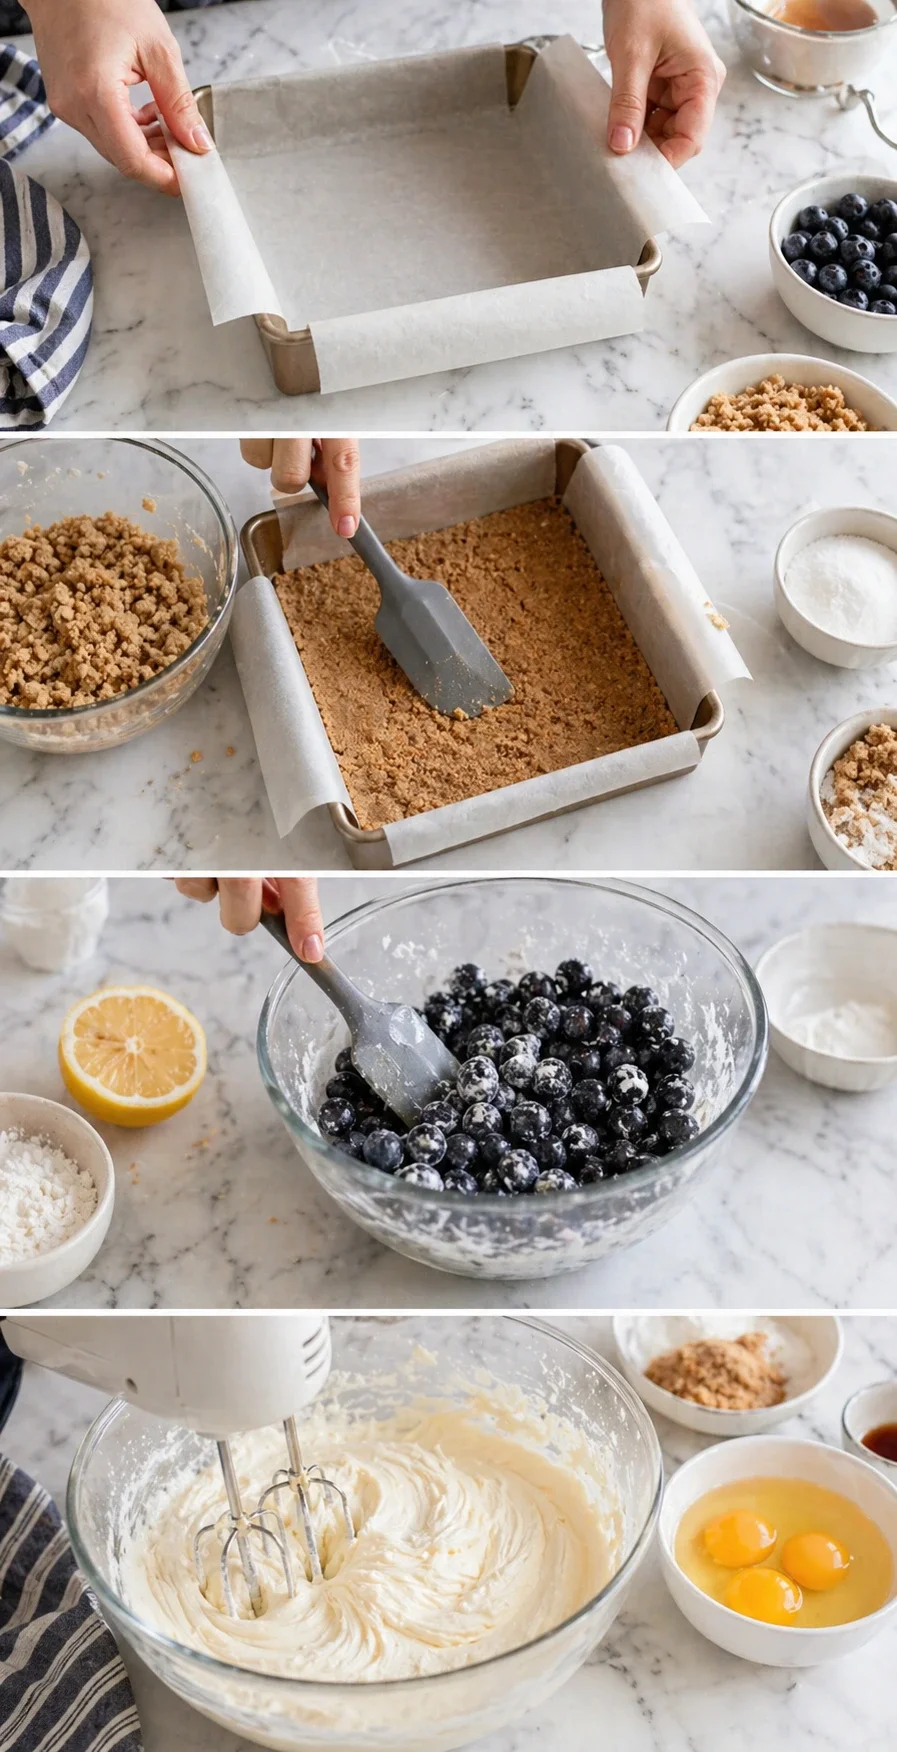
- Preheat oven to 350°F (175°C) and line a 9×9-inch baking pan with parchment, leaving an overhang on two sides.
- Combine flour, granulated sugar, and salt for the crust, stir in melted butter until crumbly, press evenly and firmly into the pan, and bake 10 minutes; let cool slightly.
- Toss blueberries with sugar, cornstarch, and lemon juice until coated and set aside to macerate.
-
Beat softened cream cheese until smooth, add sugar and vanilla, then beat in eggs one at a time until the filling is silky and uniform.
- Melt butter in a small saucepan over medium heat, stirring until it foams and the milk solids turn golden brown and nutty, then remove from heat and cool slightly.
- Mix flour, brown sugar, and salt for the crumble, pour in the warm brown butter, and stir until clusters of crumbly pieces form.
- Spread the cheesecake filling evenly over the pre-baked crust, spoon the blueberry mixture (including juices) over the filling, and scatter the brown butter crumble on top.
-
Bake the assembled pan 40–45 minutes until the edges are set and the crumble is golden and the center has a slight jiggle but is not wet or shiny.

- Cool the bars completely at room temperature, then chill in the refrigerator for at least 2 hours or overnight.
-
Use the parchment overhang to lift the bars from the pan, then slice into squares (warming and drying the knife or wiping between cuts for clean edges).

Crumble, Browning, and Troubleshooting
The crumble isn’t just a topping here—it gives a wonderful contrast to the creamy cheesecake and helps these bars stand apart. Browning the butter adds a deep, toasty flavor that keeps the crumb lively and interesting instead of tasting flat or one-note. This step makes the dessert feel more special and brings out the best in those blueberries.
If your crumble is too finely ground, it might sink right into the cheesecake and disappear, but if it’s too heavy, it can overwhelm the filling. The perfect crumble has some visible clusters that give a lovely bite, without drying out the bars.
Your cream cheese filling should be thick and smooth before spreading it in the pan. This is crucial to keep the bars sturdy and help them bake into those neat square shapes we all love. A perfect cheesecake layer is creamy when cool but firm enough to hold up the blueberries and crumble on top.
This is where many homemade blueberry cheesecake bars miss the mark. If the filling is under-mixed, it bakes unevenly, and if it’s too loose, the berries can sink awkwardly. Aim for a smooth, spreadable layer that holds the blueberries right where you want them.
You’ll know the bars are done when the edges look set and golden, the crumble is nicely browned, and the cheesecake center has a bit of that gentle jiggle but doesn’t look wet or shiny. These are the same visual cues we use in our White Chocolate Key Lime Bars with a Creamy Citrus Layer. Once fully cooled, the bars should slice into clearly layered, tidy squares without any sinking or bubbling.
Cooling is just as important as baking here. If you slice too soon, the filling won’t set properly and the crumble will crumble (literally). Be patient and give your bars enough time to firm up.
If your bars feel too soft, they probably needed more time to chill. Too much juice from the berries might make the fruit layer soggy. And if your crumble looks pale, that usually means the butter wasn’t browned enough or you spread the topping too thickly in spots. These little tweaks totally change the final taste and texture and help get that bakery-style finish. For a fruit-forward bar that stays crisp and well-set, check out the layering and bake cues in our Rhubarb Dream Bars.
Flavor Swaps and Add-Ins
- Mixed berries: Swap in raspberries or a berry mix instead of just blueberries. Just reduce the lemon juice a bit if you’re using very tangy berries.
- Lemon boost: Stir 1–2 teaspoons of lemon zest into the cheesecake filling to brighten and complement the berries perfectly.
- Graham cracker crust: For a classic cheesecake base, swap the flour-sugar crust for 1 ½ cups crumbed graham crackers mixed with 6–7 tablespoons melted butter (or follow this Easy Graham Cracker Crust Recipe).
- Oaty crumble: Mix in ½ cup rolled oats to the crumble for a heartier, chewier topping with extra texture.
- Gluten-free: Use a 1:1 gluten-free flour blend in both the crust and crumble or opt for gluten-free graham cracker crumbs to keep it allergy-friendly.
- Mini bars or cupcakes: Use a lined 9×13 pan for a bigger batch (just add a few more minutes to baking) or make individual portions in muffin cups—reduce baking time and keep an eye on them so they don’t dry out.
- Dairy-free/vegan version: Try a firm vegan cream cheese, vegan butter (brown it carefully if you can), and an egg replacer designed for baking; texture will be a bit different but still tasty and satisfying. For a fully dairy-free cheesecake method, see our Vegan Biscoff Cheesecake Recipe.
How to Store and Serve
Once your bars have cooled completely, store them in the fridge—this keeps the cheesecake layer firm and helps your bars slice cleanly. If you’re bringing them to a cookout or picnic, keep them chilled as long as possible to make sure they stay nice and firm until serving time.
Serve these bars just as they are for a no-fuss dessert tray, or add a dollop of whipped cream for a bit of extra indulgence. They’re perfect for gatherings when you want a dessert that slices neatly—much like classic Lemon Bars with Shortbread Crust—yet feels a little more special than your everyday fruit squares.

Answers to Common Questions
-
Can I use frozen blueberries?
Absolutely! Toss your frozen berries with sugar, cornstarch, and lemon juice right out of the freezer. Just know that they’ll release a bit more juice and your bake time might need to be a little longer. Chilling the bars fully before slicing helps them hold together nicely.
-
How do I keep the bars from getting soggy?
Coating the berries with cornstarch helps soak up excess juices. Also, baking until the filling is fully set and chilling the bars thoroughly before slicing makes a big difference in keeping everything firm instead of soggy.
-
How do I tell when the bars are done baking?
Look for set edges that are lightly golden and a golden brown crumble. The cheesecake center should still have just a tiny jiggle but shouldn’t be wet or shiny.
-
How long do the bars last?
These bars stay fresh for up to 4 days when stored in an airtight container in the fridge. You can also freeze cut bars for up to 2 months—just wrap them well and thaw in the fridge overnight before enjoying.
-
Can I make these in advance?
Yes, definitely! Bake and fully cool the bars, then refrigerate overnight for the best slicing results. They also freeze well if you want to get a head start on dessert prep. Prefer a make-ahead dessert that sets entirely in the fridge? Try our No Bake Oreo Cheesecake Recipe.
-
Why did my crumble sink into the cheesecake layer?
If your cheesecake filling was too loose or your crumble was too finely ground, the topping can sink into the layer. Try keeping your filling a bit thicker (avoid extra liquids), make some medium-sized crumble clusters, and spread the topping carefully to keep it from disappearing during baking. For a detailed, practical walkthrough, see this step-by-step crumble method.
More in Uncategorized
Crock Pot Chicken and Rice Recipe
Crock-Pot Chicken Noodle Soup

Slow Cooker Hearty Chicken Soup.