No bake cheesecake

This no-bake cheesecake tastes just like a traditional baked cheesecake but without any oven time! It features a wonderfully smooth, silky filling that’s light yet creamy, all cradled by a rich, buttery, crumbly crust that everyone will rave about.
I love my classic baked cheesecake dearly, but a no-bake option is a lifesaver when the weather heats up or time is tight—no heating the kitchen or standing over the oven!
That said, I have strong feelings about no-bake cheesecakes; they shouldn’t skimp on flavor or texture just for the sake of convenience. The filling must be rich but airy, silky smooth but firm enough so you can cut beautiful slices that don’t fall apart.
That’s where powdered gelatine comes in. It’s affordable, easy to find, and super important for getting the right set. I’ve tested this both with and without, and believe me, without gelatine it either won’t set properly or turns into a dense brick because of all the extra cream cheese needed. (More on that in the FAQs!) Let’s just say, my kitchen has seen a LOT of cheesecake experiments lately!
If you’re a fan of that creamy, rich flavor of classic baked cheesecake but want something faster and cooler that doesn’t need an oven, this no-bake version is your new best friend. It tastes almost identical to my baked cheesecake—silky, rich yet light, and perfectly sliceable—without any heat or mess.
Here, I’ll guide you through every detail: from the buttery, crumbly biscuit crust that even has a little “wall” for extra fanciness if you want, to the mousse-like cream cheese filling set with gelatine (yes, important stuff!), and a simple assembly that results in neat, clean slices every time.
Heads up: this cheesecake needs some serious fridge time to set up properly—plan for at least 6 hours, but I recommend 12 hours to be safe. Below, you’ll find my full ingredient list, step-by-step photos, a quick video demo, and plenty of insider tips like how to bloom gelatin correctly, pressing the crust perfectly, and the little trick of flipping the springform base for easy removal. Plus, I share topping suggestions, storage advice, freezing tips, and answers to all your common questions.
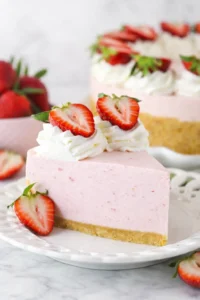
- Texture: light but creamy, with a mousse-like feel that’s still firm enough to slice without drama.
- The secret: powdered gelatine, room-temperature block cream cheese, and cold whipping cream make this happen.
- Timing: active work time is short; most of it is just chilling in the fridge (6–12 hours).
Keep reading, and you’ll have everything you need to make an effortlessly elegant no-bake cheesecake that tastes totally indulgent—without ever turning on your oven. 🙂
What makes it special
This no-bake cheesecake is designed to be really close to my classic baked cheesecake. The only difference? It’s a touch lighter because it skips eggs, which baked cheesecakes rely on to set the filling.
Aside from that, the sweetness and texture are almost twins. Honestly, most folks wouldn’t guess which is which!
To prove how creamy it is, here’s a fancy smear I made—because why not show off sometimes? 😂 Check out the video below for a better look at that luscious texture!
There are countless cheesecake styles out there—from that light-as-air, souffle-like Japanese cotton cheesecake to the dense, sweet-as-can-be New York cheesecake that uses way more cream cheese and sugar.
My cheesecakes sit in the sweet spot between these. The filling has a mousse-like texture, but it’s not fragile enough to call it a mousse cake—when you bite it, it melts creamy and velvety on your tongue. I chase this texture for both my baked and no-bake cheesecakes.
Here’s a handy little chart that breaks it down for you:
Typical ingredients Japanese Cotton Cheesecake New York Cheesecake My Cheesecakes* Filling Airy like a souffle and lightly sweetened Rich, thick, and quite sweet Rich but still light Cream cheese 250g (8 oz) 1 kg (2 lb) 500g (16 oz) Sugar 35g (1.2 oz) 260g (9 oz) 150 – 200g (5.3 – 7 oz)
* Applies to both my classic baked cheesecake and this no-bake version. Flavored variations might differ in sweetness, but texture remains consistent.
Ingredients and crucial notes

- 500g (16 oz) cream cheese (blocks), softened, not cold
- 150–200g (5.3–7 oz) caster sugar (superfine)
- powdered gelatine
- about 2 tablespoons water (for blooming the gelatine)
- whipping cream (heavy or thickened), very cold
- pure vanilla extract
- lemon juice (a splash)
- salt – just a pinch
- biscuits (for the crust)
- melted butter (for the crust)
- cinnamon (for the crust)
- sugar (for the crust)
- pinch of salt (for the crust)
How to make it
- Flip the bottom of a 20cm/8″ springform pan upside down.
- Lightly grease the base with butter, line with a square piece of baking/parchment paper with extra overhang, then clip the sides into place.
- Break biscuits into bite-size chunks and transfer to a food processor.
-
Pulse the biscuits until fine, sandy crumbs.

- Add melted butter, cinnamon, sugar, and a pinch of salt; blitz until the crumbs resemble damp sand and hold when squeezed.
- If the crumbs don’t stick when squeezed, add a little more melted butter and mix.
- Roughly press the crumb mixture into the prepared pan, spreading over the base and pushing up the sides.
-
Firmly press the crust evenly into the base and up the walls with a flat straight edge and tidy the top edge for a clean finish.

- Pour the water into a small bowl and evenly sprinkle the powdered gelatine over the surface; stir and let bloom undisturbed for 5 minutes.
- Gently melt the bloomed gelatine in the microwave for about 15 seconds and stir until smooth; do not boil, then cool for about 5 minutes until liquid but not hot.
- Whip very cold whipping cream on high speed until it holds stiff peaks.
-
Beat softened cream cheese with sugar until smooth, then add vanilla, lemon juice, salt, and the cooled melted gelatine; beat just until combined.

- Fold a quarter of the whipped cream into the cream cheese mixture to lighten it, then gently fold in the remaining whipped cream to keep the mixture airy.
- Pour the filling over the crust, smoothing the surface and nudging it into corners.
- Chill the cheesecake in the fridge for a minimum of 6 hours, preferably 12, until fully set.
-
Unclip and remove the springform ring sides.

- Use the parchment overhang to slide the cheesecake off the base onto a serving plate.
- Slide the parchment paper out from under the cheesecake while holding the cake steady; if it’s stuck, warm the base slightly or loosen with a spatula before pulling.
-
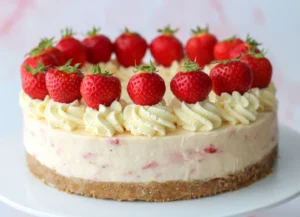
Decorate as desired (for example, pipe whipped cream around the edge and top with halved strawberries).

Pro tips for best results
Getting both your cream cheese and whipping cream at the right temperature is key: take your cream cheese out an hour early so it whips into a silky smooth base, and keep your whipping cream chilled and ready to reach stiff peaks every time.
- Bloom gelatine carefully: sprinkle over water (don’t just dump it in one spot), wait for 5 minutes, gently melt for 15 seconds in the microwave, then cool slightly before adding it. Never boil or add hot gelatine directly to the filling.
- Don’t overmix your cream cheese mixture; stop once it’s smooth and the gelatine is evenly blended. Too much beating adds big bubbles that break the texture.
- Fold whipped cream in gently in two parts: start with a quarter to lighten the mix, then fold in the rest carefully to keep it airy.
- Firmly press the crust crumbs into the base and walls. For ratios and pressing technique, see the easy graham cracker crust recipe. If crumbs don’t stick together when squeezed, add a touch more melted butter until they feel like damp sand.
- Invert your springform pan base before assembling. This trick makes taking the cheesecake out much easier and reduces the chance of breaking the crust.
- If the pastry paper clings stubbornly to your crust after chilling, gently warm the pan’s underside or run a narrow spatula between crust and paper before pulling it free—avoid yanking it off.
- For neat slices, chill the cheesecake well, then dip a large knife in hot water, dry it off, and slice in one firm smooth motion, cleaning the blade after each cut.
Flavor twists and topping ideas
Honestly, a perfectly made cheesecake tastes amazing on its own—no frills needed! A plain slice of this no-bake beauty will leave you feeling completely satisfied.
But if you’re serving to guests or want to jazz it up a bit, here are some ideas you might like:
- Pipe whipped cream around the edges and top with halved strawberries, like in the photos;
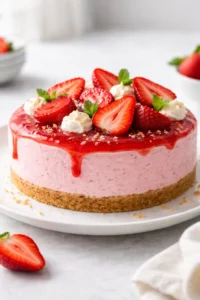
- Spread whipped cream all over the top with big swirls, then scatter mixed fresh berries and dust with powdered sugar;
- Add a tropical twist with passionfruit pulp drizzled on either of the above;
- Serve slices with a side dollop of whipped cream and fresh berries to complement;
- Try fruit compotes or simple fruit sauces like macerated strawberries for a fruity kick;
- Sauces like chocolate or salted caramel are delicious—but when I make chocolate, caramel, or cookie-butter cheesecakes, I like to swirl those flavors directly into the filling (see my no-bake mini Biscoff cheesecakes for an easy swirl idea). Stay tuned for the chocolate and caramel versions coming soon!
-
Sprinkle chopped nuts or chocolate shavings for a bit of crunch—think macadamias with white chocolate, peanuts with dark chocolate, or pistachios with almonds. It’s a lovely way to add extra texture!
That’s cheesecake perfection in my book.
I really hope you give this a try. It’s a simple yet elegant dessert that always gets comments on how it tastes rich and decadent but never cloyingly sweet—more like “just right.”
Also, I’ve added notes in the recipe for those who want to bump up the sweetness, because I know lots of folks prefer it that way (hello, American sweet tooth!). My goal is to keep it flexible for every palate.
Would love to hear your thoughts if you try it! And if you have ideas on decorating or flavor twists, send them my way—I could always use fresh inspiration! — Lisa x
Storage and make-ahead tips
Keep your fresh cheesecake covered in the fridge for up to 3–4 days. Use an airtight container or a cake dome to protect it from absorbing those pesky fridge odors. If your fridge tends to be smelly, wrap the cake surface lightly with plastic wrap too.
Make-ahead? Absolutely—it’s a fantastic dessert to prep in advance! Just remember it needs a good 6 hours minimum to set (12 hours is best), so assembling it the day before serving is a brilliant plan.
Freezing works well too: freeze whole or sliced cheesecake for up to a month. First, freeze it uncovered on a tray until solid, then wrap tightly in plastic and pop it in a freezer bag or airtight container. Thaw overnight in the fridge before serving. Keep in mind, the texture softens a touch but it’s still delicious!
Serve it chilled. If it’s just out from the fridge and feels firm, let it sit at room temp for 15–30 minutes to soften the filling a bit and let those flavors bloom.
Food safety: since it’s a dairy dessert, try not to leave cheesecake out at room temperature for longer than 2 hours. Need a dairy-free alternative? Try our Vegan Biscoff Cheesecake, which sets in the fridge just like this one.

Common questions answered
- Can I make this without gelatine? Honestly, not if you want those clean slices and that light, mousse-like texture. Without gelatine, the filling is too soft and either won’t set or needs way more cream cheese, which makes it heavy. Gelatine keeps it classic, smooth, and sliceable.
- Can I use gelatine leaves instead of powder? Yes, gelatine leaves work fine. Just follow the package’s instructions for blooming and melting. Remember, different brands of leaves vary in strength, so use the recommended conversion amounts to swap between powder and leaves.
- What if my gelatine doesn’t set? If it stays sticky or liquid after blooming, it’s probably old or past its best—grab a fresh pack. Also, be careful not to boil gelatine when melting or add it hot to cold dairy; always cool it before adding to keep it working properly.
- Is block cream cheese necessary? Can I use tub cream cheese? You can use tub cream cheese, but it’s softer and moister, so you might need a bit more gelatine and possibly longer setting time. For the best, most predictable texture, blocks are preferred.
- Why won’t my cream whip to stiff peaks? Make sure you use cream labeled for whipping and it’s very cold. Warm bowls or beaters slow down whipping. Higher-fat cream whips easier than low-fat versions. For step-by-step tips and ways to stabilize, see how to make perfect homemade whipped cream.
- How long does it need to set? At least 6 hours minimum, but I recommend letting it chill for 12 hours to get the firmest, cleanest slices.
- Can I use agar-agar instead of gelatine for a vegetarian option? Agar sets differently and needs to be boiled to activate. It tends to produce a firmer, sometimes brittle texture that isn’t quite the same as gelatine. If you use agar, follow the package instructions carefully and expect the texture to be different.
- Why is my crust stuck to the parchment paper? Usually because of too much butter. Try warming the bottom of the pan slightly or slide a thin spatula underneath to loosen the butter before pulling off the paper. For dependable butter-to-crumb ratios and pressing technique, follow this homemade Oreo pie crust recipe.
- Can I bake this cheesecake instead? This recipe is built as a no-bake cheesecake relying on gelatine to set. Baked cheesecakes have a completely different texture and use eggs to set, so use a baked cheesecake recipe if you want that style.


A no-bake cheesecake with a smooth, silky cream cheese filling set with gelatine, on a buttery, crumbly biscuit crust.
- Prep Time: 20 minutes
- Cook Time: 0 minutes
- Total Time: 6 to 12 hours (mostly chilling time)
- Yield: 12 servings (standard 20cm/8" cheesecake) 1x
- Category: Dessert
- Cuisine: American-style cheesecake
Ingredients
- 500g (16 oz) cream cheese (blocks), softened, not cold
- 150–200g (5.3–7 oz) caster sugar (superfine)
- Powdered gelatine (amount not specified, see notes)
- About 2 tablespoons water (for blooming the gelatine)
- Whipping cream (heavy or thickened), very cold (quantity not specified)
- Pure vanilla extract (quantity not specified)
- Lemon juice (a splash)
- Salt – just a pinch
- Biscuits (for the crust) (quantity not specified)
- Melted butter (for the crust) (quantity not specified)
- Cinnamon (for the crust) (quantity not specified)
- Sugar (for the crust) (quantity not specified)
- Pinch of salt (for the crust)
Instructions
- Flip the bottom of a 20cm/8″ springform pan upside down.
- Lightly grease the base with butter and line it with a square piece of baking/parchment paper with extra overhang, then clip the sides into place.
- Break biscuits into bite-size chunks and transfer to a food processor.
- Pulse the biscuits until fine, sandy crumbs.
- Add melted butter, cinnamon, sugar, and a pinch of salt; blitz until the crumbs resemble damp sand and hold when squeezed.
- If the crumbs don’t stick, add a little more melted butter and mix.
- Roughly press the crumb mixture into the prepared pan, spreading over the base and pushing up the sides.
- Firmly press the crust crumbs evenly into the base and walls with a flat straight edge and tidy the top edge for a clean finish.
- Pour about 2 tablespoons water into a small bowl and evenly sprinkle powdered gelatine over the surface; stir and let bloom undisturbed for 5 minutes.
- Gently melt the bloomed gelatine in the microwave for about 15 seconds and stir until smooth; do not boil, then cool for about 5 minutes until liquid but not hot.
- Whip very cold whipping cream on high speed until it holds stiff peaks.
- Beat softened cream cheese with sugar until smooth, then add vanilla extract, lemon juice, salt, and the cooled melted gelatine; beat just until combined.
- Fold a quarter of the whipped cream into the cream cheese mixture to lighten it, then gently fold in the remaining whipped cream to keep the mixture airy.
- Pour the filling over the crust, smoothing the surface and nudging it into corners.
- Chill the cheesecake in the fridge for a minimum of 6 hours, preferably 12 hours, until fully set.
- Unclip and remove the springform ring sides.
- Use the parchment overhang to slide the cheesecake off the base onto a serving plate.
- Slide the parchment paper out from under the cheesecake while holding the cake steady; if it’s stuck, warm the base slightly or loosen with a spatula before pulling.
- Decorate as desired, for example, pipe whipped cream around the edge and top with halved strawberries.
Notes
Use block cream cheese, softened to room temperature for best results., Bloom gelatine by sprinkling it evenly over water and letting it sit then melting gently; do not boil or add hot gelatine directly to cold dairy., Do not overbeat the cream cheese mixture to avoid big bubbles., Fold whipped cream in two parts to keep mixture airy., Press biscuit crumbs firmly to form crust; add more butter if crumbs do not stick., Invert springform pan base for easier removal without breaking crust., If parchment sticks to crust after setting, warm bottom or loosen with a spatula gently before removing., For neat slices, chill cheesecake well, dip a large knife in hot water and dry it between slices before cutting., The cheesecake needs 6-12 hours in the fridge to set properly; 12 hours recommended for clean slices., To store, keep covered in fridge for 3-4 days; can freeze up to a month, thaw overnight in fridge before serving., Freezing may soften texture slightly but is still delicious., Serve chilled, allow to soften 15-30 minutes at room temperature before serving for best flavor., This recipe uses gelatine for a light mousse-like yet firm texture; without gelatine, the filling may be too soft or dense., Gelatine leaves can be used instead of powder following package instructions and conversions., Agar-agar can be used as vegetarian alternative but texture will differ and is firmer and sometimes brittle., Tub cream cheese can be used but may require more gelatine and longer setting time for best texture.
Nutrition
- Serving Size: 1 slice (approx.)
- Calories: Approximately 300 calories per serving (estimated, varies with topping and crust amount)
- Fat: Approx. 23-26g fat per serving
- Carbohydrates: Approx. 20-25g carbohydrates per serving
- Protein: Approx. 5-6g protein per serving
More in Cakes