Lemon Bars

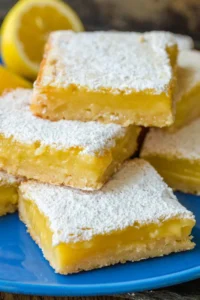
Lemon bars are seriously one of the EASIEST desserts you can whip up, and they never fail to bring a little sunshine to the table. I adore the soft, tangy lemon filling resting on top of a buttery, crisp shortbread crust. The flavor bursts with fresh lemon zest and juice, so bright and zingy, making these bars absolutely irresistible!
These lemon bars are exactly what you want when you’re craving a simple, comforting dessert. They feature a crisp, buttery shortbread crust topped with a smooth, vibrant lemon filling made with fresh lemon juice and zest. They’re perfect for a quick weeknight treat but fancy enough to impress guests — plus, they freeze and keep wonderfully well.
- You’ll need a handful of pantry staples (don’t skip fresh lemons!) and basic tools — a 9×13 pan and a food processor make things easier but aren’t absolutely required.
- Step-by-step instructions walk you through every part: making the crust, zesting the sugar, whisking up the filling, baking, chilling, and cutting flawless bars.
- Helpful tips and shortcuts included — how to get that perfect crisp crust, when the filling is set just right, and tips for slicing neat bars.
- Flavor twists, storage advice, and answers to your burning questions so you feel confident baking these delicious bars.
Quick glance at time and yield: about 20 minutes active prep, 55 minutes baking, plus a few hours chilling (around 3 hours), so about 4 hours 15 minutes total. You’ll get roughly 15 tasty bars. Ready? Scroll down for the ingredient list and simple steps to follow.
Zesty Flavor with Minimal Effort
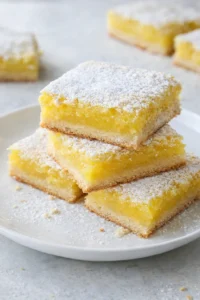
These bars pack a punch of bright, fresh lemon flavor thanks to fresh juice and zest. The crisp shortbread crust contrasts beautifully with the luscious, silky lemon filling. Plus, they come together fast with easy ingredients and need very little baking know-how. Make them ahead for parties, potlucks, or an effortless weeknight dessert everyone will love — or, for a no-bake make-ahead treat, try this lemon icebox cake.
- Zesty lemon flavor from fresh lemons — juice and zest both matter here.
- A satisfying contrast between tender filling and crunchy shortbread base.
- Simple, everyday ingredients and straightforward steps anyone can handle.
- Freeze-friendly and great for prepping ahead, saving you time and stress.
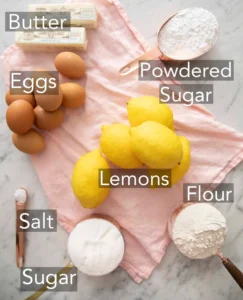
What You’ll Need

- 3 cups all-purpose flour 360g, divided 2 1/2 cups for crust and 1/2 cup for filling
- 2/3 cups powdered sugar 66g, for the shortbread, plus more for dusting
- 1/2 tsp salt
- 12 tbsp unsalted butter melted, 170g
- 3 tbsp lemon zest zest of three lemons
- 3 cups sugar 600g
- 8 eggs large, room temperature
- 1 cup lemon juice fresh, 240mL
How to Make the Bars
- Preheat oven to 350°F and line a 9×13-inch baking pan with parchment paper.
- Whisk together 2 1/2 cups all-purpose flour, 2/3 cup powdered sugar, and 1/2 tsp salt in a bowl.
- Pour in 12 tbsp melted butter and mix until combined.
-
Sprinkle the dough into the lined pan and press into an even, smooth layer.

- Bake the crust at 350°F for about 20 minutes, or until light golden.
- While the crust bakes, grate the zest of 3 lemons into 3 cups sugar and pulse in a food processor until pale yellow (or finely mince the zest and mix with the sugar by hand).
- Combine the lemon-sugar mixture with the remaining 1/2 cup flour in a large bowl.
-
Add 1 cup fresh lemon juice and 8 large eggs to the lemon-sugar mixture and whisk until smooth and fully combined.

- Pour the lemon filling over the warm crust and bake at 350°F for about 25 minutes, rotating the pan halfway through, until the center is just set.
- Cool the baked bars on the counter for 1 hour, then refrigerate for at least 2 hours to fully chill and set the filling.
- Dust the top generously with powdered sugar.
-
Cut into bars using a sharp knife dipped in warm water, wiping and re-dipping the knife between each cut for clean slices.

Tips for Best Results
- Always choose fresh lemon juice! It’s the star of the show, so avoid anything bottled or from concentrate to get that bright zing.
- Don’t skip lining your baking pan with parchment paper — it’s a lifesaver for taking the bars out effortlessly. Foil is a backup option if needed. Prefer a crumb base instead of shortbread? Use this graham cracker crust recipe and pack it firmly for clean slices.
- If the bars look a bit soft when you pull them out, no worries — they continue to firm up as they cool.
- Lemon bars make fantastic make-ahead treats. Cut them, flash-freeze on a tray, then wrap individually and store in the freezer for up to three months. Dust with powdered sugar right before serving.
- Don’t rush the chilling! It’s essential for the filling to set properly, so give yourself that time for the best texture.
Mix-Ins and Citrus Swaps

- Try swapping out some or all the lemon juice and zest for orange or lime to mix up the citrus flavor — oranges add sweetness, limes bring a tart punch. For inspiration on balancing multiple citrus flavors, see the Sunshine Citrus Cake.
- For a fresh fruit twist, gently fold in a handful of fresh raspberries or blueberries into the warm lemon filling before chilling — the lemon-blueberry pairing in this Lemon Blueberry Layer Cake is a great reference. Be gentle to keep the filling smooth.
- If you love vanilla, stir 1 teaspoon into the melted butter for your crust for a warm, inviting flavor boost.
- Using salted butter? Just leave out the salt called for in the crust recipe to keep everything balanced.
- Want thicker bars? Bake them in an 8×8 or 9×9 pan instead, but watch the baking time — they’ll need a bit longer to set through.
How to Store and Freeze
Keep your lemon bars fresh and delicious with these simple storage tips.
- Room Temperature: Perfect for serving, lemon bars can sit out for a few hours. But if you’re leaving them longer, pop them in the fridge.
- Fridge: Store in an airtight container for 3 to 4 days. Wait to dust with powdered sugar until just before serving so it doesn’t dissolve.
- Freezer: Freeze lemon bars for up to 3 months. Cut them first, freeze on a tray until firm, then wrap individually and store in a freezer-safe bag or container. Dust with powdered sugar after thawing.
- Thawing: Thaw overnight in the fridge or at room temperature for 30-60 minutes. These bars shine chilled or at room temp. If you love chilled citrus desserts, try our creamy lemon pie.
- Reheating: Like your lemon bars warm? Microwave a single bar for 8-12 seconds or warm in a 300°F oven for 5-8 minutes. Avoid overheating or the filling might get runny.

Troubleshooting and FAQs
Do I need to refrigerate them?
If you’re planning to leave lemon bars out for more than a couple of hours, it’s better to refrigerate them. They taste amazing either way — chilled or at room temperature.
How do I know if they are set?
Your lemon bars are done when the edges are set and the center barely jiggles — this same barely-jiggly test also applies to a homemade lemon pie. The filling continues to firm up as it cools, so don’t worry if it looks a touch soft right out of the oven. If it seems too loose, add a few extra minutes to baking time.
Can lemon bars be made a day ahead?
Absolutely! Lemon bars are great made in advance. Bake them up, chill overnight, then cut right before serving. This also makes cutting easier and cleaner.
How do you cut them cleanly?
Keep a sharp knife handy and wet it before cutting. Wipe the blade after each slice and re-wet to get smooth, perfect edges. If the top feels sticky or tough, you can score it gently with a sharp knife or razor before slicing.
Notes
- ALWAYS use fresh lemon juice! Lemons are the star ingredient so you don’t want to go the from concentrate or a bottle versions.
- Line your baking dish. The parchment paper makes it very easy to remove from the pan but in a pinch you can use foil instead.
- Don’t worry if your bars seem not quite done when you pull them from the oven. They will continue to set as they cool.
- Lemon bars are a great make ahead dessert. Cut then freeze on a baking try. Wrap individually and store in your freezer for up to three months. That and dust with powdered sugar before serving.
Nutrition
Serving: 1bar | Calories: 385kcal | Carbohydrates: 66g | Protein: 6g | Fat: 12g | Saturated Fat: 7g | Cholesterol: 111mg | Sodium: 113mg | Potassium: 79mg | Fiber: 1g | Sugar: 46g | Vitamin A: 407IU | Vitamin C: 8mg | Calcium: 22mg | Iron: 2mg
If you’ve tried this lemon bar recipe then don’t forget to leave a rating and let me know how you got on in the comments below, I love hearing from you!

Bright and zingy lemon bars featuring a crisp, buttery shortbread crust topped with a smooth and vibrant lemon filling made with fresh lemon juice and zest. A simple yet delightful dessert perfect for any occasion.
- Prep Time: 20 minutes
- Cook Time: 55 minutes
- Total Time: 4 hours 15 minutes
- Yield: 15 bars 1x
- Category: Dessert
- Cuisine: American, British, English
Ingredients
- 3 cups all-purpose flour (360g), divided (2 1/2 cups for crust and 1/2 cup for filling)
- 2/3 cups powdered sugar (66g) for the shortbread, plus more for dusting
- 1/2 tsp salt
- 12 tbsp unsalted butter, melted (170g)
- 3 tbsp lemon zest (zest of three lemons)
- 3 cups sugar (600g)
- 8 large eggs, room temperature
- 1 cup fresh lemon juice (240mL)
Instructions
- Preheat oven to 350°F (175°C) and line a 9×13-inch baking pan with parchment paper.
- In a bowl, whisk together 2 1/2 cups all-purpose flour, 2/3 cup powdered sugar, and 1/2 tsp salt.
- Pour in 12 tbsp melted unsalted butter and mix until combined (can use a stand mixer with paddle attachment). Optionally, add 1 tsp vanilla with butter.
- Sprinkle the dough evenly into the lined pan and press into a smooth layer.
- Bake crust at 350°F for about 20 minutes or until light golden.
- While crust bakes, add 3 cups sugar to a food processor along with zest of 3 lemons; pulse until sugar is pale yellow. Alternatively, mince zest and mix by hand.
- In a large bowl, combine the lemon-sugar mixture with the remaining 1/2 cup flour, mixing well.
- Add 1 cup fresh lemon juice and 8 large eggs to the mixture; whisk until smooth and fully combined.
- Pour lemon filling over the warm crust and bake at 350°F for about 25 minutes, rotating pan halfway through baking, until center is just set (edges set, center may jiggle slightly).
- Cool bars on counter for 1 hour, then refrigerate at least 2 hours to fully chill and set the filling.
- Dust the top generously with powdered sugar.
- Cut into bars using a sharp knife dipped in warm water; wipe and re-dip knife between cuts for clean slices.
Notes
Always use fresh lemon juice for best flavor; avoid bottled or from concentrate., Lining the pan with parchment paper makes for easy removal; foil can be used as backup., Bars continue to firm up as they cool—don’t worry if slightly soft when just out of oven., Make ahead friendly: cut and freeze bars individually for up to 3 months, dust with powdered sugar before serving., Do not rush chilling to allow proper setting of filling.
Nutrition
- Serving Size: 1 bar
- Calories: 385 kcal
- Fat: 12 g
- Carbohydrates: 66 g
- Protein: 6 g
More in Bars