My Strawberry Tart Is The Perfect Way To Spring Into Summer

As soon as the weather warms up, my mind races with all the strawberry desserts I want to make, but this easy strawberry tart always tops my list. The crust is a simple, no-chill version of pie dough that I’ve loved ever since making our apple tart with a similar recipe. It’s a press-in crust, which means no rolling or fussing, just buttery, flaky goodness every time. The tart is filled with a sweet cream cheese mixture that has a touch of lemon, giving the strawberries an extra bright pop. Trust me, I’ll be baking this all season—and here’s why you’ll want to, too!
What People Are Saying:
“OH MY GOSH, it was seriously amazing! I’m definitely passing this recipe down to future generations. That filling? TO DIE FOR!!! And it looks stunning when it’s done! You have to try it!” –BlueSeahorse
When strawberries are fresh and ripe, this tart is my go-to dessert. It’s simple, bright, and always impresses. You’ll love the ease of a no-roll, press-in crust that bakes into a golden, buttery shell. Inside, a light, lemon-kissed cream cheese filling folded with whipped cream keeps things fresh and airy. Then a shiny preserves glaze tops the strawberries, making the whole tart sing with flavor.
In this section, I’ll guide you through the three main parts of this tart: baking the crust, whipping and folding the filling, and arranging plus glazing the berries. The crust takes about 25 to 30 minutes to bake golden, and the whole tart chills for about 2 hours to set up perfectly. Both the crust and filling can be made ahead, making assembly a breeze on serving day.
I’ll also share my favorite tips and easy swaps—from crust options and cheese alternatives to smart storage and ways to avoid a soggy bottom. Keep scrolling for the full ingredient list and step-by-step recipe so you can nail this tart with confidence!
Why You’ll Love This Tart
This strawberry tart is as easy as it is gorgeous. The press-in, no-chill crust takes all the hassle out of dough rolling but still delivers a flaky, buttery base. The cream cheese and whipped cream filling is rich yet light, so every bite feels indulgent without being heavy.
The lemon zest and juice in the filling, paired with the glossy preserves glaze, really dial up the fresh strawberry flavor. A little bit of prep turns ripe, juicy berries into an elegant, crowd-pleasing dessert. Plus, since you can bake the crust and make the filling ahead, then chill the whole tart to set, it’s a perfect make-ahead option for parties.
Ingredients for Crust, Filling & Glaze

- all-purpose flour
- granulated sugar
- kosher salt
- melted butter
- heavy cream
- cream cheese
- granulated sugar
- lemon juice & zest
- vanilla extract
- strawberries
- strawberry or raspberry preserves
- 2 teaspoons water
Bake, Fill, and Finish
- Preheat oven to 350°F.
- Whisk together all-purpose flour, granulated sugar, and kosher salt in a large bowl.
- Pour in melted butter and stir until a dough forms.
-
Press the dough evenly into a tart pan, smoothing along the bottom and sides.

- Prick the dough lightly all over with a fork to prevent puffing.
- Bake the crust for 25–30 minutes, or until golden brown.
- Let the crust cool completely.
-
Whip heavy cream with a hand mixer until stiff peaks form.

- Beat cream cheese and sugar until smooth and combined.
- Add lemon juice, lemon zest, and vanilla to the cream cheese mixture and mix until blended.
- Gently fold the whipped cream into the cream cheese mixture until light and airy.
-
Spread the filling evenly into the cooled crust.

- Slice strawberries and arrange the slices in concentric circles from the outside in to cover the surface.
- Stir strawberry or raspberry preserves with 2 teaspoons water and warm until melted (about 30 seconds in the microwave).
- Brush the warm preserves glaze over the strawberries.
-
Chill the assembled tart in the refrigerator for at least 2 hours to set.

Tips for a Flawless Tart
- Make this tart in season. Using fresh strawberries at their peak really makes all the difference. Nothing beats juicy, sweet summer berries—I swear, it’s like tasting sunshine. If you can get your hands on in-season fruit, this tart will sing! For another simple way to let peak berries shine, try these mini fruit tarts with vanilla pastry cream.
Flavor, Crust, and Filling Variations
- Crust swaps: Try using a graham cracker or a cookie crumb crust (like an Oreo cookie crust) for a quick twist—just mix crushed graham crackers with melted butter and press into the pan. A buttery shortbread crust also works if you want something richer.
- Cheese variations: Swap out some or all of the cream cheese for mascarpone to get an even silkier, creamier texture. You can also stir in a splash of almond extract to add a delicate nutty hint.
- Fruit options: Feel free to mix it up or swap out strawberries with raspberries, blueberries, or even a blend—as in these berry tarts—or use some sliced stone fruit like peaches or nectarines, depending on what’s fresh in your area.
- Glaze alternatives: Instead of strawberry or raspberry preserves, use apricot preserves, peach jam, or even a drizzle of warmed honey for a different but delicious finish.
- Allergy and diet swaps: For a gluten-free option, try an almond flour crust that presses in the same way. For a lighter filling, you can substitute stabilized whipped topping, but keep in mind the texture and flavor will change a bit.
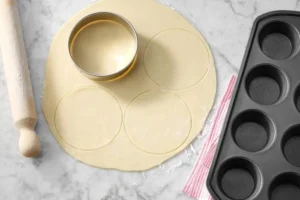
- Size and format: Make mini tarts using a muffin tin or tartlet pans for individual servings. Just adjust the baking time to avoid overbaking the smaller shells.
Storage and Make-Ahead Tips
If you want to get a head start, you can bake the crust up to 3 days ahead (see our Perfect Pie Crust Recipe for step-by-step baking and make-ahead guidance) and keep it unfilled. The filling can also be made and stored covered in the fridge for up to 3 days. Assemble the tart on the day you plan to serve it for the crispiest crust and freshest flavor.

Frequently Asked Questions
- Q: Can I make this ahead of time? A: Absolutely! Bake the crust ahead and store it unfilled for up to 3 days, and refrigerate the filling separately. For the best crust texture, fill and assemble just before serving.
- Q: Can I use frozen strawberries? A: You can, but frozen berries release extra water when thawed. Make sure to thaw them completely, drain well, pat dry, and consider tossing them with some sugar to soak up excess moisture before adding to the tart.
- Q: How do I avoid a soggy crust? A: Bake the crust until it’s golden and let it cool fully before adding the filling. You can also brush the inside of the baked crust with melted chocolate or warmed preserves first. This layer acts as a barrier to keep moisture from seeping in.
- Q: Do I have to use full-fat cream cheese and heavy cream? A: For the best texture and richness, yes! Lower-fat options won’t hold up as well and might result in a thinner filling. Whipped toppings can work but will change the flavor and structure. If you’re after a lighter, no-bake dessert with a creamy set, try my No-Bake Strawberry Cheesecake.
- Q: How long will the tart stay fresh after assembling? A: Once glazed and chilled, store the tart in the fridge. It’s best eaten within 24 to 48 hours since the strawberries will soften and release juice as time goes on.
-
Q: How do I get stiff peaks when whipping cream? A: Chill your mixing bowl and beaters ahead of time, use cold heavy cream, and whip on medium-high speed. It usually takes about 7 minutes with a hand mixer, but it depends on the mixer’s power. You want the cream to hold firm peaks that don’t fall over. For more step-by-step cues on whipping cream, see my classic strawberry shortcake with whipped cream.
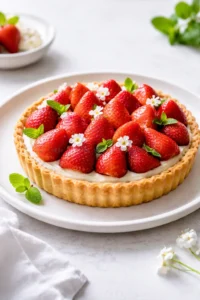
A fresh and easy strawberry tart featuring a no-roll, press-in buttery crust, a light lemon-kissed cream cheese and whipped cream filling, topped with glazed ripe strawberries. Perfect for spring and summer gatherings, this make-ahead tart offers a bright and indulgent treat.
- Prep Time: 20 minutes
- Cook Time: 30 minutes
- Total Time: 2 hours 50 minutes
- Yield: 8 servings 1x
- Category: Dessert
- Cuisine: American
Ingredients
- 1 1/4 cups all-purpose flour
- 1/4 cup granulated sugar (for crust)
- 1/4 teaspoon kosher salt
- 6 tablespoons melted unsalted butter
- 1 cup heavy cream (cold)
- 4 ounces cream cheese, softened
- 1/4 cup granulated sugar (for filling)
- 1 teaspoon fresh lemon juice
- 1 teaspoon lemon zest
- 1/2 teaspoon vanilla extract
- 12 ounces fresh strawberries, sliced
- 1/4 cup strawberry or raspberry preserves
- 2 teaspoons water
Instructions
- Preheat oven to 350°F (175°C).
- In a large bowl, whisk together all-purpose flour, 1/4 cup granulated sugar, and kosher salt.
- Pour melted butter into dry ingredients and stir until a dough forms.
- Press the dough evenly into a 9-inch tart pan, smoothing along the bottom and sides.
- Lightly prick the dough all over with a fork to prevent puffing.
- Bake the crust for 25-30 minutes, or until golden brown.
- Allow the crust to cool completely.
- In a chilled bowl, whip the heavy cream with a hand mixer until stiff peaks form.
- In a separate bowl, beat the cream cheese and 1/4 cup granulated sugar until smooth.
- Add lemon juice, lemon zest, and vanilla extract to the cream cheese mixture and blend until combined.
- Gently fold whipped cream into the cream cheese mixture until light and airy.
- Spread the filling evenly into the cooled crust.
- Arrange sliced strawberries on top of the filling in concentric circles covering the entire surface.
- In a small microwave-safe bowl, stir preserves with 2 teaspoons water and warm for about 30 seconds until melted.
- Brush the warm preserves glaze evenly over the strawberries to give a glossy finish.
- Refrigerate the assembled tart for at least 2 hours to set before serving.
Notes
Use ripe, in-season strawberries for the best flavor and texture., To prevent a soggy crust, ensure the crust is fully baked and cooled before adding the filling., Optionally brush the inside of the baked crust with melted chocolate or preserves as a moisture barrier., You can make the crust and filling up to 3 days ahead, store separately, and assemble before serving., Stiff peaks for whipped cream can be achieved by chilling the bowl and beaters, using cold cream, and whipping on medium-high speed., For a gluten-free crust option, use almond flour-based crusts., Variations include swapping cream cheese with mascarpone, or using other fruit or preserves for topping.
Nutrition
- Serving Size: 1 slice
- Calories: Approx. 280 calories per serving
- Fat: 15g per serving
- Carbohydrates: 30g per serving
- Protein: 5g per serving
More in Pies