Easter Egg Oreo Cookie Balls

These Easter Egg Oreo Cookie Balls are such a fun and tasty treat, perfect for celebrating Easter! They’re an awesome activity to do with the kids, and everyone will love sharing them together.
Let’s be honest, who can turn down Oreos? They’re hands down one of the best cookies you can buy. I’m a huge fan of Oreo cookie balls, and shaping them into cute little Easter eggs just makes them extra special. Plus, it’s an awesome way to get the little ones involved in the kitchen. Depending on their age, kids can help with almost every step. My three-year-old twins especially love drizzling and sprinkling—I won’t lie, that part gets a bit messy, but it’s absolutely worth it!
You only need 4 simple ingredients for these Easter Egg Oreo Cookie Balls! Seriously, it couldn’t be easier! Just make sure you have some gel icing colors on hand so you can create all those pretty pastel hues for decorating. Or, if you’d rather keep it simple, skip the gel colors and go all in with sprinkles. Colored sanding sugar or a fun Easter-themed sprinkle mix is perfect here.
This quick, no-bake Easter treat is just as fun to make as it is to eat. With just four ingredients — Golden Oreos, cream cheese, white candy coating, and gel icing colors — it’s a fantastic recipe to make alongside your kids while whipping up a colorful and festive dessert, all without any stress or fuss.
In this guide, I break down everything you need: a clear ingredient list, easy step-by-step instructions (crushing Oreos, mixing in room-temperature cream cheese, shaping into egg shapes, chilling, dipping in melted white coating, and decorating), plus tips for getting that smooth coating and pretty drizzle every time. I’m also sharing fun variations (think different Oreo flavors, sprinkles, and chocolate coatings), how to store and freeze them, make-ahead ideas, and answers to all the common questions so you can dive right in without any guesswork.
Why They’re So Delightful
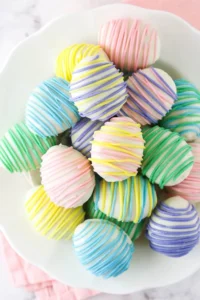
These Easter Egg Oreo Cookie Balls are a speedy no-bake dessert that calls for just four easy ingredients and very little equipment. They’re super kid-friendly and decorating them is an absolute party, making it a perfect family activity. The creamy filling of Oreo and cream cheese wrapped in a smooth layer of white candy coating brings that classic, comforting flavor, while the pastel drizzles or colorful sprinkles add a festive, almost professional touch. Plus, this recipe is so flexible—try different Oreo flavors, candy coatings, or sprinkle combos—and you can easily make it your own or adjust it for any holiday or theme.
Ingredient Checklist

- Golden Oreos: One full 14.3 oz package.
- Cream cheese: softened to room temperature for smooth mixing.
- White candy coating: Use Wilton candy melts, almond bark, Candiquick, or something similar — you’ll want about 10 ounces for dipping the eggs, plus a little extra for decorating with colored drizzles.
- Gel icing colors: to tint the white candy coating into soft pastel shades.
Shaping, Chilling, and Dipping
- Crush Golden Oreos into fine crumbs using a food processor or, if you don’t have one, seal the cookies in a plastic bag and crush them with a rolling pin until very fine.
- Mix softened cream cheese into the cookie crumbs until you get a dough-like mixture.
- Scoop about 1 1/2 tablespoons of the mixture and shape each piece into a small Easter-egg shape.
-
Place your shaped eggs on a tray and put them in the refrigerator to chill for around 1 hour until they’re nice and firm.

- Gently melt the white candy coating in short bursts in the microwave, stirring often until smooth; if it’s too thick for dipping, thin it out with a small amount of vegetable shortening or neutral oil.
- Stick a toothpick into the bottom of each chilled egg, then dip each egg into the melted candy coating. Twist the toothpick as you pull it out to avoid drips, then shake off any extra and place on parchment paper to dry.
- Fill the tiny hole left by the toothpick with a bit of melted coating and smooth it over.
-
Melt small amounts of white coating and add your gel icing colors to create the pastel shades you want.

- Put the colored coating into small piping bags or zip-top bags with a tiny corner cut off and drizzle or pipe pretty lines over each coated egg.
- While the coating is still wet, press on sprinkles or sanding sugar so they stick nicely, if you’re using them.
-
Let the coatings and drizzles set completely before handling or storing your Easter Egg Oreo Cookie Balls.

Baker’s Tips and Tricks
- Use cream cheese that’s upped to room temperature so it blends super smoothly with the crushed Oreos — lumps and sticky bits make shaping tricky.
- For the best texture, finely crush your cookies. No food processor? No worries—just seal them in a bag and use a rolling pin until they look like sand.
- Keep your eggs about the same size by measuring around 1 1/2 tablespoons for each one; this helps them dip nicely and cook evenly.
- Be sure to chill your shaped eggs at least an hour before dipping. This step is key—it helps them hold together and stops the coating from cracking as it cools.
- Heat the candy coating gently in short microwave bursts (15 to 30 seconds) and stir often. If it thickens too much for dipping, mix in a tiny bit of vegetable shortening or light oil—just a little goes a long way.
- Keep all water away from your melted candy melts! Even a drop of moisture can turn them into a grainy, clumpy mess.
- Using a toothpick to dip your eggs is genius: it lets you dip easily and, when you pull it out, fill the little hole with a drop of melted coating so it looks smooth and polished.
- For neat, tidy drizzles, put your pastel coating in a small piping bag or a zip-top bag with a tiny cut corner. It’s way easier than freehand drizzling.
- If you want sprinkles, add them right after dipping, while the coating is still wet, so everything sticks perfectly.
Fun Variations and Swaps

If you love to mix and match, you’re going to have a blast customizing these Oreo egg balls. Stick to the basics—mix, shape, chill, dip, decorate—but swap out ingredients or decorations for fresh new twists without any extra fuss.
- Try different Oreos: Chocolate Oreos dipped in milk or dark chocolate melts make a rich and delicious combo. You can also experiment with lemon, birthday cake, or other flavored Oreos. If you want that classic white coating look, lighter-colored cookies like Golden Oreos are best.
- Swap the binder: You can replace cream cheese with mascarpone or Neufchâtel for a slightly different texture and a bit less fat. If you’re dairy-free, try vegan cream cheese—just test it first to make sure it holds the crumbs together well.
- Add flavors: Mix in a teaspoon or two of vanilla, almond, or lemon extract for a flavor boost. Or for a really indulgent twist, fold in a tablespoon or two of peanut butter, Nutella, or cookie butter—just add a little so it stays easy to shape.
- Change up the coating: Tint your candy melts in different pastel shades or swap to white, milk, or dark chocolate melts depending on your Oreo choice. You can also buy premade colored candy melts for convenience.
- Different toppings: Instead of drizzling, press sanding sugar, nonpareils, mini chocolate eggs, crushed toasted coconut, or chopped nuts into the wet coating. Sprinkles are quick, easy, and kid-friendly too!
- Shape & size options: Make bite-sized minis to hand out, roll them into classic round truffles, or for a fun spin, stick lollipop sticks in before dipping to make Oreo “egg pops.”
- Allergy-friendly swaps: Use gluten-free or allergy-safe sandwich cookies. For nut or dairy allergies, pick compatible cookie and candy coating products and swap in a suitable dairy-free cream cheese.
- Quick decorating: If you want to skip the multi-colored drizzle, after dipping all your eggs in white coating, just sprinkle on a colorful Easter sugar mix or sanding sugar for a fast and festive finish. If you prefer a single color, melt enough coating to cover and decorate all your eggs easily.
The best part? All these swaps work with the same simple steps, so you can try lots of combos with no added stress! Before making a whole batch, chill one test egg to make sure your texture and coating are just right.
Remember, you can tailor these Easter Egg Oreo Cookie Balls any way you like!
Oreo flavors: Use whichever Oreo flavor you love, but keep in mind that lighter Oreos show off a white candy coating best. Of course, chocolate Oreos paired with rich milk or dark chocolate coatings are a winning choice too.
Sprinkles: In a rush or skipping the colored melted chocolate? No problem! Just add sprinkles right after dipping while the coating is still wet, and you’ll get an instant festive pop. Colored sanding sugar or your favorite Easter sprinkle mix works beautifully here.
Storage and Freezing Tips
Since these Oreo cookie balls have a creamy cream cheese center, store them in an airtight container in the fridge. They’ll stay fresh and delicious for up to a week.
Want to freeze them? Place the cookie balls on a baking sheet in a single layer and freeze until solid. Then transfer them to an airtight container or freezer bag, putting parchment paper between layers so they don’t stick together. Frozen cookie balls keep nicely for 2 to 3 months. When you’re ready to enjoy them, thaw overnight in the fridge.
After chilling or thawing, let your cookie balls sit out at room temperature for 10 to 20 minutes before serving. This helps soften the coating just enough so they taste amazing. Avoid microwaving to reheat—they can melt unevenly and get messy. If you really need to warm them up, do it in very short bursts on low power and watch closely.

Answers to Common Questions
- Can I use regular chocolate Oreos instead of Golden Oreos? Absolutely! Chocolate Oreos work great, but their darker crumbs can sometimes peek through lighter coatings. If you choose chocolate Oreos, try coating the eggs in milk or dark chocolate melts to match the color.
- What can I use instead of cream cheese? You can swap in Neufchâtel cheese (a lower-fat option) or mascarpone for similar texture and flavor. Keep in mind cream cheese is best for binding the crumbs and delivering that classic Oreo truffle feel.
- Why did my coating crack after dipping? Coating cracks usually happen because the centers are too cold compared to the coating, or the candy layer is applied too thickly and cools too fast. Keep your eggs chilled, but not frozen, and try to keep steady temperatures when dipping and letting them set.
- How do I fix the hole left by the toothpick? Easy fix! Fill the hole with a little melted candy coating and smooth it out with the back of a spoon or wait for it to set and cover it with a drizzle or sprinkles.
- Can I color candy melts with regular water-based food coloring? No, water-based colors can make the candy melts seize and get grainy. Use gel or oil-based colors made especially for chocolate and candy melts instead.
- What if my melted candy is too thick to dip? Slowly thin it by stirring in a tiny bit of vegetable shortening or neutral oil until it’s smooth and easy to dip. You might need to gently warm it again and stir before dipping.

No-bake Easter Egg Oreo Cookie Balls made with crushed Golden Oreos and cream cheese, coated in white candy melts and decorated with tinted drizzles or sprinkles. A festive and kid-friendly treat perfect for Easter.
- Prep Time: 20 minutes
- Cook Time: 0 minutes
- Total Time: 1 hour 20 minutes
- Yield: Approximately 24 cookie balls 1x
- Category: Dessert
- Cuisine: American
Ingredients
- 1 (14.3 oz) package Golden Oreos
- 8 oz cream cheese, softened to room temperature
- 10 oz white candy coating (e.g., Wilton candy melts, almond bark, Candiquick)
- Gel icing colors for tinting candy coating into pastel shades
Instructions
- Crush Golden Oreos into fine crumbs using a food processor or by sealing in a plastic bag and crushing with a rolling pin.
- Mix softened cream cheese into the cookie crumbs until a dough-like consistency forms.
- Scoop about 1 1/2 tablespoons of the mixture and shape each piece into a small Easter egg shape.
- Place shaped eggs on a tray and chill in the refrigerator for about 1 hour until firm.
- Gently melt the white candy coating in short bursts (15-30 seconds) in the microwave, stirring frequently until smooth. If too thick for dipping, thin with a small amount of vegetable shortening or neutral oil.
- Insert a toothpick into the bottom of each chilled egg, dip into melted candy coating, twist to remove, shake off excess, and place on parchment paper to dry.
- Fill the hole left by the toothpick with a bit of melted coating and smooth it over.
- Melt small amounts of white coating and add gel icing colors to create desired pastel shades.
- Put colored coatings into piping bags or zip-top bags with a tiny corner cut off, and drizzle decoratively over each coated egg.
- While the coating is still wet, press sprinkles or sanding sugar onto the eggs if desired.
- Allow coatings and drizzles to set completely before handling or storage.
Notes
Use room temperature cream cheese to ensure smooth mixing without lumps., Finely crush cookies for the best texture; if no food processor, use a rolling pin with sealed bag., Chill shaped eggs for at least 1 hour to help them hold shape and prevent coating cracks., Heat candy melts gently and stir often; avoid moisture to prevent grainy texture., Use a toothpick for dipping to create a neat coating and easy hole filling., For neat drizzles, use piping bags with small openings., Add sprinkles immediately after dipping while coating is wet for best adhesion., Try variations with different Oreo flavors, binders, flavorings, coatings, shapes, or toppings for customization., Store finished cookie balls in an airtight container in the refrigerator for up to 1 week., Freeze cookie balls on a single layer, then transfer to airtight container with parchment between layers; keep frozen up to 2-3 months and thaw overnight in refrigerator before serving.
Nutrition
- Serving Size: 1 cookie ball
- Calories: Approximately 90-110 calories per cookie ball
- Fat: 6g per serving
- Carbohydrates: 10g per serving
- Protein: 1g per serving
More in biscuits