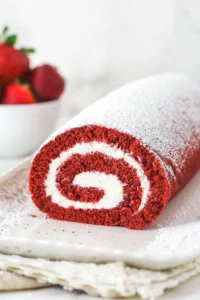
Red Velvet Cake Roll
This red velvet cake roll is light, tender, and packed with that classic red velvet tang plus just a hint of chocolate. It’s filled with a fluffy cream cheese whipped cream and topped simply with a dusting of powdered sugar. This cake roll shines for Valentine’s Day, Christmas, or really any special occasion!

I have to admit, I’m a big fan of cake rolls. They’re so easy and pretty but often get overlooked because folks think they’re tricky. The truth is, they’re way simpler than they get credit for! Most people immediately think of pumpkin roll, but there’s a whole world of possibilities. I’ve shared recipes like my chocolate Swiss roll and raspberry chocolate roll, and today, I’m all about combining a moist red velvet sponge with that unbeatable cream cheese flavor. To give it a lighter twist, I mixed cream cheese with whipped cream for the filling — so it’s fluffy and dreamy.
This Red Velvet Dessert Is Always A Hit
Whether you’re making this red velvet cake roll for the holidays or Valentine’s Day, it’s sure to impress every single time. Honestly, it’s become a favorite anytime I pull it out. If you’re craving another festive roll, try my Raspberry Chocolate Cake Roll. Here’s why it wins hearts every time.
- That classic red velvet flavor. Red velvet isn’t just “red chocolate” like many think. It has a unique tang from buttermilk and vinegar, along with gentle chocolate undertones. I keep the cocoa low here so it doesn’t overpower those lovely tangy notes.
- Super moist cake. The red velvet sponge for this roll is wonderfully moist and tender with a dense yet light crumb. Using oil keeps it extra moist, and folding in whipped egg whites gives the cake the perfect lift and softness.
- The filling! Cream cheese and red velvet are a match made in heaven, but for this roll, plain cream cheese frosting felt too heavy. (If you prefer a richer cheesecake-style swirl, check out my Red Velvet Cheesecake Swirl Bundt Cake.) So I whipped cream cheese with heavy cream to create a light, fluffy, and tangy whipped cream filling that takes the cake—literally!

Recipe Ingredients
For this recipe, we use all the familiar red velvet ingredients, plus a few extras for that fluffy cream cheese whipped cream filling. Scroll down to the recipe card below for exact quantities and a printable version.
Red Velvet Cake
- All-purpose flour – This recipe calls for 1 cup minus 1 tablespoon. Trust me, that tablespoon makes a noticeable difference in texture! A kitchen scale is your best friend here.
- Natural unsweetened cocoa powder – Three tablespoons adds just the right subtle chocolate flavor without turning the cake too dark or chocolate-heavy.
- Baking powder – Just enough to give your cake a gentle rise.
- Salt – Balances the flavors perfectly.
- Eggs – Separate the yolks and whites. Beating the egg whites until stiff peaks helps keep the cake light and airy.
- Granulated sugar – Sweetens the batter nicely.
- Buttermilk – This is key for that signature tang and moisture in red velvet. Don’t swap it out for anything else.
- White vinegar – Adds a gentle tang and reacts with the baking soda to make the cake tender.
- Vegetable oil – Keeps your cake super moist and tender.
- Vanilla extract – A little magic for deeper flavor.
- Red food coloring – This gives your cake that bright, cheerful red. I use regular liquid food coloring, but gel works perfectly well too.
Cream Cheese Whipped Cream Filling
- Heavy whipping cream – Very cold is essential here for whipping up fluffy peaks.
- Powdered sugar – Sweetens and stabilizes the whipped cream so it stays stiff longer.
- Vanilla extract – Adds a delicate hint of flavor.
- Cream cheese – Bring it to room temperature so it blends smoothly and you avoid any lumps.
How To Make Red Velvet Cake Roll
This cake roll is straightforward but calls for some attention when it comes time to cool and roll the cake. Always plan for plenty of cooling time before filling and serving. Check out the full printable instructions in the recipe card below.
Make the Cake
- Prep. Start by heating your oven to 350°F. Line your jelly roll pan with parchment paper, leaving about an inch hanging over the edges—this helps you lift the cake out easily later to roll it.
- Make the batter. Whisk together all dry ingredients first. In a different bowl, beat the egg yolks with sugar and buttermilk until smooth. Stir in vinegar, oil, vanilla, and the red food coloring. Then gently mix in the dry ingredients until just combined.

Whisk the wet ingredients until smooth and vibrant red.

Carefully fold in the dry ingredients until just combined.
- Add the egg whites. In a clean bowl, beat egg whites on high until stiff peaks form. Gently fold one-third into the cake batter to lighten it. Then fold in the rest, being careful not to deflate those fluffy whites.

Whip the egg whites until stiff but still soft peaks.

Fold the egg whites carefully into the batter.
- Bake. Spread the batter evenly in the prepared pan. Bake for 10-12 minutes, or until the surface springs back lightly when you press it and a toothpick inserted in the center comes out clean.
- Roll the cake. As soon as it comes out of the oven, lift it out using the parchment paper and place it on the counter. Carefully roll it up from the shorter side, using the parchment to help. I like to unroll and re-roll the cake a few times in the next hour to keep it elastic and prevent cracks later on. Let it cool completely before unrolling to add the filling.

Bake until just springy to the touch.

Roll it gently with the parchment to help it keep its shape.

Let the cake cool rolled up like this before unrolling.
Make the Whipped Cream Filling and Assemble
- Make the whipped cream. Beat the cold heavy cream with powdered sugar and vanilla on high speed until it just starts to thicken. Meanwhile, stir the room temperature cream cheese in a separate bowl until smooth. Gently combine the cream cheese with the whipping cream and whip on low until you get nice, stiff peaks.
- Unroll the cake. Carefully unroll the cooled cake, peeling away any stuck parchment paper with a spatula to keep the cake intact.
- Add the filling. Spread the cream cheese whipped cream onto the cake, leaving a little border around the edges – about 1/2 to 1 inch.

Unroll the cake carefully so it stays intact.

Spread the filling evenly, but don’t overfill to avoid spillage.
- Roll the cake. Now roll it back up without the parchment. Some of the whipped cream filling might squeeze out — just scoop it off with a spatula, no worries.
- Chill. Wrap the roll tightly in plastic wrap with the seam underneath and pop it in the fridge for at least an hour for the filling to set. If you want, you can refrigerate overnight too — it holds great!
- Serve. When ready, unwrap, place your pretty roll on a serving plate, dust with powdered sugar, slice, and enjoy every bite with your family.

The Key To Preventing Cracks in the Cake
The secret to a smooth, crack-free cake roll is in the rolling and re-rolling as it cools. Right after baking, I roll it up while it’s warm, then unroll and reroll it every few minutes over the next hour. This helps the cake stay bendy and elastic so it doesn’t snap or crack when you fill it later on.
My routine is to roll it right out of the oven, then unroll after 5 minutes, again after 5 more minutes, then again around 10 minutes later. I usually repeat 2-3 more times in 10-15 minute intervals, letting the cake cool fully in between. It usually takes about an hour to an hour and a half depending on how warm your kitchen is.
Do I Have To Roll My Cake in Parchment?
You don’t absolutely have to. Many recipes suggest using a clean tea towel dusted with sugar, and you can totally go that route if you prefer. For me, parchment paper works best. It’s less messy and easier to handle for lifting and rolling. Plus, parchment lets the cake absorb some of the steam and moisture released while it cools rolled up, making it tender and soft. The downside is that the cake can feel a bit sticky, but I actually like the moistness it adds. Totally your call, whichever feels better in your kitchen!

Tips for the Perfect Cake Roll
- Don’t over mix the egg whites. Fold gently so the air stays trapped and your cake stays light and fluffy.
- Watch your bake time. This cake is thin and quick to bake. Keep it to 10-12 minutes max. When you press the surface, it should bounce back right away, and a toothpick should come out clean.
- Roll immediately. Take the cake out of the pan with the parchment while it’s still warm and roll it right away on the counter. Waiting makes rolling tricky and causes cracks.
- Unroll and re-roll. Don’t skip this step — it really is the number one trick to keep your roll smooth and crack-free.
- Fill right after cooling. Once your cake has fully cooled, add your filling right away. Don’t put the cake in the fridge to wait, or it might stiffen up and crack when you unroll it.
- Leave space at the edges. When spreading your filling, keep about half an inch to an inch clear around the edges. The filling will spread as you roll, and this helps manage any overflow. No worries if some squeezes out — just wipe it away with your spatula.

Proper Storage
- In the fridge. Keep your red velvet cake roll wrapped tightly in plastic or stored in an airtight container. It stays delicious for 3-4 days, but trust me, it rarely lasts that long!
- Freeze for longer. If you want to save some for later, wrap the chilled cake roll well in plastic wrap and freeze for up to 3 months. Thaw overnight in the fridge before slicing. These freezing tips also work for other roulade-style desserts like our Chocolate Swiss Roll.
Did you make this recipe?
Don’t forget to snap a pic and tag us — we love seeing your delicious creations!
More in Cupcakes

Raspberry Chocolate Cupcakes
Red Velvet Cake Roll
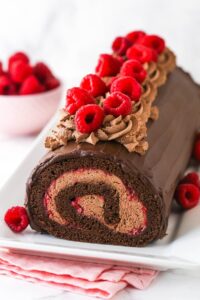
Raspberry Chocolate Cake Roll

