No-Bake Mini Biscoff Cheesecake Recipe
These mini cheesecakes are total crowd-pleasers! Packed with a creamy, dreamy Biscoff cheesecake filling, then topped with warm, gooey Biscoff spread and a sprinkle of crunchy biscuit crumbs, they look gorgeous and taste absolutely divine. Whenever I serve these charming little mini Biscoff cheesecakes, there’s always a buzz of smiles around the table it’s such a happy moment to share!

Why you’ll fall head over heels for these mini Biscoff cheesecakes
- They’re the perfect bite-sized treat for any occasion whether you’re celebrating Valentine’s Day, Mother’s Day, Easter, or Christmas, these little desserts fit right in.
- This no-bake cheesecake recipe keeps life simple and stress-free, which is exactly what busy moms like us need!
- Just the right size not too big to feel guilty but enough to satisfy every sweet craving.
- Totally vegetarian, making them a great option for most guests at your table.
So what exactly is Biscoff?
Most folks recognize Biscoff from those famous little biscuits in red wrappers.
These crunchy Belgian cookies have a caramelized flavor that’s super addictive and full of character.
Even better, Biscoff spread is basically cookie butter in a jar silky, sweet, and perfect for elevating desserts like these cheesecakes.
If you haven’t had a chance to try Biscoff yet, trust me, you’re in for a treat that will wow your taste buds!
How to melt Biscoff spread without fuss
Melting Biscoff spread yum! is super easy. Just place it in a microwave-safe bowl and heat it in short bursts of 15 to 25 seconds, giving it a good stir halfway through.
If you’re a fan of old-school methods, melting it gently over a bain-marie (that’s a double boiler) on the stove works like a charm. It keeps the spread smooth and prevents it from burning.
What tools you’ll want for these mini cheesecakes
Gather these goodies: a food processor to crush your Biscoff biscuits into fine crumbs (makes life way easier), and a muffin tin that has removable bottoms. This nifty feature lets you pop out your mini cheesecakes easily no mess, no broken edges.
Decorate your mini cheesecakes your way!
We topped ours with a spread of melted Biscoff, then added a sprinkle of biscuit crumbs and finished with a cute little Biscoff biscuit right on top.
If you’re a whipped cream fan, a dollop or a swirl of lightly sweetened whipped cream makes them extra special. Just remember that adds a bit more sweetness, so taste as you go.
Feeling creative? Fill a piping bag with melted Biscoff spread and drizzle fun zig-zag patterns on top for a fancy finish that will wow your guests.

How to store your mini Biscoff cheesecakes
Keep your cheesecakes fresh and tasty by storing them covered in the fridge for up to 3 days. If you want to make extras ahead, these freeze beautifully. Just freeze them for up to 3 months, then thaw overnight in the fridge before serving you’ll have your mini treats ready whenever the craving strikes.
Tips and little secrets to perfect mini Biscoff cheesecakes every time
- Get consistent results easily.
Weighing out your biscuit crumbs into six equal portions makes sure all your cheesecakes come out uniform and beautiful. - Always go full-fat.
Using full-fat cream cheese is key for a creamy, thick filling. Skimping on this can lead to a runnier result, which we want to avoid. - Don’t have a food processor? No worries!
Just put your Biscoff biscuits in a sealed sandwich bag and crush them with a rolling pin or heavy spoon until you have fine crumbs. - Keep your cheesecakes fresh.
Store them in the fridge for up to 3 days or freeze for up to 3 months to enjoy later without any fuss.

If these mini cheesecakes are hitting the spot, why not try some other favorites? Think rich Oreo cheesecake, fun Malteser cheesecake, the classic large Biscoff cheesecake, festive Mini egg cheesecake, or silky smooth creme brulee cheesecake.
Feeling adventurous? Whip up some keto blueberry muffins, light and fluffy Carbquik pancakes, sweet cinnamon-spiced apple pie cinnamon rolls, or fudgy instant pot brownies. Planning a party? Try a dairy-free birthday cake or some buttery puff pastry pinwheels simply swap in your favorite vegan ingredients and enjoy.
Step-by-step on how to make mini Biscoff cheesecakes
Ready to make these little beauties? Just follow these easy steps, and you’ll have a batch of mini Biscoff cheesecakes that wow everyone every time.
The full printable recipe with both US and metric measurements is waiting for you in the recipe card below.
Making the mini Biscoff cheesecake bases
Start by popping your Biscoff biscuits into the food processor. Pulse them until they turn into fine, sandy crumbs that are perfect for the base.
Transfer the crumbs to a bowl, then add the melted butter. Stir everything together until the crumbs are evenly coated and start to hold together.
Divide the crumb mixture evenly into your muffin tin cups, then press down firmly to create a compact base that will hold your creamy filling really well.
Pop the tray in the fridge to chill while you mix up the filling. This step helps the base set nice and firm.
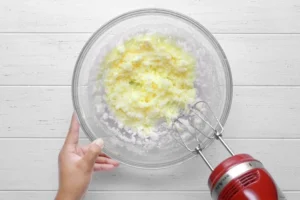
Making the cheesecake filling
While your bases are chilling, it’s time to whip up the filling.
Into a large bowl, combine the cream cheese, double cream, icing sugar, vanilla extract, and that dreamy Biscoff spread. Using an electric mixer, start whisking on low speed. Take your time this slow start gets the best creamy texture without splattering.
Whip until you see soft peaks form your filling should be light, fluffy, and smooth, just like a cloud of Biscoff goodness!
Spoon the filling evenly over the chilled biscuit bases in your muffin tin, smoothing out the tops with a spatula for a pretty, even finish.
Back in the fridge they go set your cheesecakes for at least 5 hours, though overnight is even better. This gives them that firm, perfect texture we all love.
When you’re ready to serve, go wild with topping ideas! We drizzled extra melted Biscoff on top, letting it drip down the sides, sprinkled more biscuit crumbs over, and added half a Biscoff biscuit to each cheesecake.
Seriously, dig in and enjoy every sweet, creamy bite of these mini Biscoff cheesecakes they’re pure joy.

I really hope you love making and sharing these mini Biscoff cheesecakes as much as my family and I do. They’re such a fun and tasty treat for any occasion!
Please drop a comment below and tell me how they turned out for you! If you have any questions or get stuck, ask away I’m here to help you every step of the way.
Storage Tips
Want to keep these tasty cheesecakes fresh? Store them covered in your fridge for up to three days. If you make extras, pop them in an airtight container or wrap them individually and freeze for up to three months. When you’re ready to enjoy, just thaw overnight in the fridge. This way, you can always have a sweet mini treat ready with zero stress.
Make-Ahead Tips
These mini Biscoff cheesecakes are perfect for making ahead. Prepare the bases and filling, then chill them overnight so they firm up nicely. Leave the decorating until just before serving to keep them looking their best. It’s a total lifesaver for busy days and parties when you want to impress without the last-minute hustle.
Variations
If you want to mix things up a bit, try these fun twists:
- Swirl some melted chocolate on top for a rich layer of flavor.
- Swap the Biscoff spread with peanut butter to add a nutty twist.
- Add fresh berries or a fruity berry compote on top to balance out the sweetness.
- For a grown-up version, fold in a splash of Kahlua or Baileys into the filling.
- Make a vegan version by using plant-based cream cheese and cream alternatives!
Serving Suggestions
Serve these mini cheesecakes as a sweet finale to family dinners, on party trays, or as afternoon treats. They taste wonderful with a hot cup of tea or coffee. Want to elevate them? Add a drizzle of caramel sauce or a scoop of vanilla ice cream on the side. Invite friends over and watch these little delights vanish fast!
Recipe FAQs
- Can I use a regular muffin tin?
Yes! But using a muffin tin with removable bottoms helps you lift the cheesecakes out easily without damaging them. - Does it have to be Biscoff spread?
Biscoff spread gives the signature caramel cookie flavor, but you can substitute with cookie butter or even peanut butter if needed. - Can I make these gluten-free?
Absolutely. Just use gluten-free cookies for the base and check for gluten-free Biscoff-style spread if available. - What if I don’t have double cream?
Heavy whipping cream works perfectly. Just whip it to soft peaks before folding it into the cream cheese. - How long should they chill?
At least five hours to set properly, but overnight chilling gives you the best firmness and flavor.
More in Cakes