Lime Chiffon Pie
Let me be honest right from the start: this recipe idea hit me while I was chilling on the couch watching TV with my girls. And honestly, it’s not the first time I’ve taken a beloved childhood show and turned it into something tasty for the blog (remember that lemon meringue strawberry shortcake?).
So now I’m wondering—should I try mixing a lime chiffon with strawberry shortcake next? That combo actually sounds pretty amazing, don’t you think?
This recipe is inspired by a stunning photo I spotted online—it reminded me of a giant, fluffy green marshmallow slice of pie! But I wanted to make it truly my own way: no gelatin involved, whipped cream made from scratch, and packed with tons of bright lime juice for a refreshing zing. I added cream cheese to give the filling a firmer, tangy cheesecake feel we all crave. The final dessert feels like a cross between a no-bake cheesecake and lime chiffon pie—honestly, it’s just perfect. It’s one of those treats that instantly wakes up your taste buds and has everyone asking for seconds.

That quiet evening with my daughters sparked the idea for this lime chiffon pie—sometimes great recipes come from just hanging out and catching a moment of inspiration. If you’ve been around here before, you know I love bringing new life to nostalgic treats (like that lemon meringue strawberry shortcake). This pie felt like a natural follow-up: zesty, bright lime mixed with a creamy filling that slices just right.
Here’s the lowdown: this dessert is a blend between a no-bake cheesecake and a chiffon pie. It’s creamy, tangy, and has a sturdy texture, thanks to full-fat cream cheese and whipped cream whipped right in the food processor. Unlike some recipes, you won’t find gelatin or that fake Cool Whip here. Instead, you get bold lime flavor—lots of juice and zest—a baked cookie crust that slices beautifully, and a filling that comes together in a snap.
Stick with me and I’ll take you through the full process: simple ingredients (cookies, cream cheese, heavy cream, limes, sugar, vanilla), an easy food processor method to whip up a stable, luscious cream, plus topping ideas, swaps, troubleshooting hints, and smart make-ahead and storage tips. Get ready to spend about 20 minutes hands-on, but the magic happens as the pie chills for at least 4 hours (overnight if you can), so it firms up perfectly for those clean slices.
- Prep time: about 20 minutes of active work
- Crust: bake 10 minutes to get those perfect slice edges
- Chill time: at least 4 hours, best if left overnight
- Makes: one 8” pie
Ingredients and Crust Choices

- 250g or 2 cups cookies (digestives, graham crackers, or golden Oreos with cream removed)
- 80g or 6 tablespoons or ⅓ cup unsalted or salted butter, melted
- 226g or 1 brick full-fat cream cheese
- Zest of 4-5 limes
- 100g or ½ cup granulated sugar
- 35g or ¼ cup powdered sugar
- 60g or ¼ cup lime juice (add more if you want it brighter and tangier)
- 480g or 2 cups heavy cream
- 1 tsp pure vanilla extract
- ¼ tsp fine sea salt
- Green food coloring (optional, if you want that fun hue)
Make the Crust and Filling
- Preheat your oven to 350°F. Grease an 8-inch round cake pan and line it with parchment paper (or line an 8–9-inch square pan with overlapping parchment sheets).
-
In a food processor, pulse the cookies until you get fine crumbs.

- Add the melted butter to the crumbs and pulse again until the mixture looks like wet sand and all crumbs are coated.
-
Press this crumb mixture firmly into the bottom (and slightly up the sides) of your prepared pan. If using a square pan, just press into the bottom.

- Bake the crust for about 10 minutes, then let it cool completely on the counter.
-
Wipe out the food processor bowl and blades thoroughly so the filling will be smooth.
- Zest your limes first, then juice them. This keeps the flavors fresh and prevents losing zest in the juice.
-
Put the cream cheese, lime zest, and granulated sugar into the food processor and blitz until it’s smooth and lump-free, scraping down the sides as needed.
- Pour in lime juice, powdered sugar, vanilla, and sea salt. Process for about a minute until everything’s combined well—don’t forget to scrape down the bowl again.
-
Make sure your heavy cream is nice and chilled before using.
- Add the cold heavy cream to the food processor and pulse on high. Keep going until the mixture thickens to a whipped cream texture—this usually takes between 3 and 7 minutes. Feeling fancy? Toss in a drop of green food coloring for a fun pop of color while whipping.
-
Pour that gorgeous filling right into your cooled cookie crust.
-
Cover the pie and pop it into the fridge for at least 4 hours—overnight is even better—to let it firm up perfectly before slicing.
Toppings, Swaps and Extras
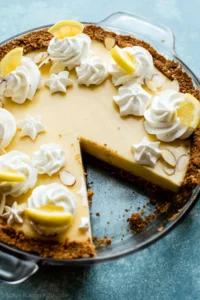
Lime Curd: I couldn’t resist adding about ½ cup of homemade lime curd on top after chilling. I loved the extra zing it gave, though a few family members found it a bit too limey. If you’re a big citrus fan like me, you’ll be thrilled by this!
Extra Lime Zest: I like to sprinkle a little more zest on top before serving to add a fresh burst of color—and to make sure no one mistakes it for mint chocolate pie! ;p
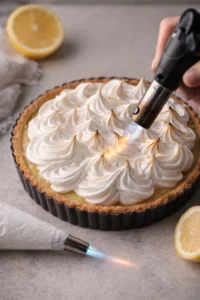
Extra Whipped Cream? I’ve seen pictures with whipped cream swirls on top, but honestly, this pie already has plenty of creamy goodness. I think adding more whipped cream might be overdoing it.
Simply Beautiful: I believe this pie shines best when served exactly as is, with those lovely lime-green swirls peeking through.
Strawberries: Here’s a fun idea—top with macerated strawberries! Just slice 1 pound of fresh strawberries, toss with 1 tablespoon sugar, squeeze over half a lemon, and let them sit about an hour to release their natural juices. Fresh and sweet, they balance the tart lime perfectly.

Answers to Common Questions
What kind of pan should I use to make this pie?
I usually grab an 8-inch cake pan, grease it well, and line it with parchment paper. This method is my go-to because 1) it prevents any butter leaks during baking, and 2) you can lift the pie out easily when it’s chilled, making serving a breeze.
A springform pan works just as great if that’s what you have on hand.
Want to make mini pies? Use a muffin pan lined with cupcake liners—you could get at least a dozen bites of lime delight that way!
What if I want to make lime chiffon bars instead?
Super simple—just swap the pan! Use an 8 or 9-inch square pan lined with two overlapping parchment sheets arranged like a “+” so all sides are covered. Press the crumbs only into the bottom (no need to go up the sides). Then proceed with the filling and chilling as usual.
Can I make this pie without a food processor?
Yes, absolutely! For the crust, toss the cookies into a big ziplock bag and gently crush with a rolling pin until you have fine crumbs. Break up any stubborn chunks with your fingers. Mix the crumbs and melted butter in a bowl by hand.
For the filling, use a stand mixer or hand mixer. Whip the cream cheese first until smooth, then add heavy cream and whip until it thickens. Just note, when made this way, the pie might start to separate a bit if stored for more than a couple of days.

Recipe for Lime Chiffon Pie
Why This Pie Works
This lime chiffon pie strikes the perfect balance between bright and creamy—it’s like a no-bake cheesecake met a chiffon pie in the best possible way. The mix of full-fat cream cheese and stable whipped cream whipped up in a food processor makes the filling silky, tangy, and sturdy enough to slice beautifully. The baked cookie crust locks it all together so every slice holds its shape nicely. Plus, it’s versatile: bake it in an 8-inch round pan, a square pan for bars, or even in muffin tins for mini pies. For a little extra flair, top with homemade lime curd or juicy macerated strawberries—that fresh snap will wow your taste buds.
Baker’s Tips for Success
- Cookie crumbs: aim for a wet sand texture when mixing crumbs with butter. If it’s too wet, the crust can shrink or leak while baking. If you’re using sandwich cookies, be sure to remove the cream or cut back on butter so your crust stays firm.
- Powdered sugar: sift before adding. Tapioca-based powdered sugar works better since it’s smoother and less chalky than cornstarch types.
- Cream cheese and cream: use always full-fat cream cheese and heavy cream—lighter creams won’t thicken properly. Chill the cream well before whipping for best results.
- Food processor method: whipping cream this way makes the filling more stable and long-lasting, but watch closely—stop as soon as it’s thick and creamy to avoid overwhipping and separation.
- Wipe down the food processor bowl thoroughly after the crumbs step, before making the filling. This keeps the texture silky and smooth.
- Zest limes before juicing to maximize flavor and keep zest from washing away in the juice.
- Invest in good vanilla—vanilla bean paste or fresh bean seeds add the best flavor and pretty specks in your filling.
- If you want, add a drop of green food coloring for that vibrant look. For a fruity twist, toss sliced berries with sugar and lemon, and let sit for an hour before topping.
- Press crumbs well up the sides of your pan if possible, and bake crust 10 minutes to keep slices tall and clean.
- No food processor? No worries! Crush crumbs in a sealable bag and mix with butter by hand. Whip filling with a mixer, but expect it’ll soften faster in the fridge.
Storage and Make-Ahead Tips
Keep this pie covered and chilled in the fridge until you’re ready to eat, always serving it cold to enjoy that fresh creaminess. It needs at least 4 hours of chilling to set up nicely, but overnight is even better. You can store it for 3–4 days before the whipped cream starts to lose its creaminess.
If you’re topping with lime curd or fresh fruit, keep those separate and add them right before serving for the best look and flavor.
Freezing the whole pie isn’t ideal because the whipped cream and crust textures can change after thawing. However, if necessary, you can freeze the baked crust (wrapped tightly) for up to a month. You can also freeze the assembled pie wrapped well for up to a month and thaw overnight in the fridge—just expect some texture changes. If the topping flattens after thawing, a quick whip of fresh cream brings it back beautifully.
PrintTangy, ultra creamy Lime Chiffon Pie with a baked cookie crust and no gelatin. A cross between no-bake cheesecake and chiffon pie, it features full-fat cream cheese, whipped heavy cream, lime juice, and zest for a bright, fresh flavor.
- Prep Time: 20 minutes
- Cook Time: 10 minutes
- Total Time: 4 hours 30 minutes (including chilling)
- Yield: 1 8-inch pie 1x
- Category: Dessert
- Cuisine: American
Ingredients
- 250g or 2 cups cookies (digestives, graham crackers, or golden Oreos with cream removed)
- 80g or 6 tablespoons or 1/3 cup unsalted or salted butter, melted
- 226g or 1 brick full fat cream cheese
- Zest of 4–5 limes
- 100g or 1/2 cup granulated sugar
- 35g or 1/4 cup powdered sugar (preferably tapioca starch-based, sifted)
- 60g or 1/4 cup lime juice (add more for stronger taste)
- 480g or 2 cups heavy cream (chilled)
- 1 tsp pure vanilla extract (vanilla bean paste or scraped vanilla bean recommended)
- 1/4 tsp fine sea salt
- Green food coloring (optional)
Instructions
- Preheat oven to 350°F (175°C). Grease an 8-inch round cake pan and line with parchment paper, secure with clips. Optional: Use 8 or 9-inch square pan with overlapping parchment sheets.
- In a food processor, grind cookies into fine crumbs. Add melted butter and pulse until mixture resembles wet sand, with crumbs coated.
- Press crumb mixture firmly onto the bottom and slightly up the sides of the prepared pan. For square pan, press only on the bottom in an even layer.
- Bake crust for about 10 minutes. Let cool completely at room temperature.
- Wipe out food processor bowl and blades clean.
- Add cream cheese, lime zest, and granulated sugar to the food processor. Process for 2 minutes until smooth and lump-free, scraping sides if needed.
- Add lime juice, powdered sugar, vanilla extract, and sea salt. Process about 1 minute until well mixed, scraping sides as needed.
- Add chilled heavy cream and pulse on high speed until mixture thickens to whipped cream consistency, about 3 to 7 minutes. Add green food coloring, if desired, while whipping.
- Pour filling into cooled crust. Refrigerate at least 4 hours or preferably overnight to set firmly.
- Serve chilled. Store leftovers tightly wrapped in the refrigerator.
Notes
Use digestive cookies or graham crackers with no cinnamon; if using sandwich cookies, remove cream filling and reduce butter to avoid sogginess., Full-fat cream cheese and heavy cream are essential for firmness and texture; dairy-free alternatives should be firm and not runny., Powdered sugar made with tapioca starch is preferred for smooth mouthfeel; sift before use., Whip heavy cream in a food processor for a more stable filling that holds shape longer., Zest limes before juicing to avoid washing away zest flavor., Use real vanilla bean paste or scraped beans for best flavor and visual appeal., Optional toppings: homemade lime curd (about 1/2 cup) or macerated strawberries (1 lb strawberries sliced, tossed with 1 tbsp sugar and juice of 1/2 lemon, rested 1 hour)., Alternative pans: springform pan works well; use muffin pans with liners for individual servings., Storage: keep chilled and covered; best within 3-4 days to maintain whipped cream texture., Avoid freezing assembled pie as whipped texture and crust can degrade; freeze crust separately up to one month if desired.
Nutrition
- Serving Size: 1 slice (assuming 8 slices)
- Calories: Approximately 350-400 calories per slice
- Fat: 28g per serving
- Carbohydrates: 30g per serving
- Protein: 5g per serving
More in Pies