Fluffy & Moist Coconut Cake – Sally’s Baking
This coconut cake recipe is an absolute winner when it comes to homemade cakes. It turns out super moist, with a light and airy crumb, bursting with rich coconut flavor. To get it just right every single time, make sure you use cake flour, egg whites, sour cream, and canned coconut milk like I’ve laid out here.

So many of you have been asking me for my favorite coconut cake recipe, and here it is! This homemade coconut cake is made with lots of love for all you coconut fans out there. Think of it as a flavor-packed delight with a tender crumb that’s soft, moist, and just right. It pairs beautifully with a smooth, dreamy coconut cream cheese buttercream that will make your taste buds dance. Seriously, it’s a total showstopper.
I tested this cake over and over — I’m pretty sure I practically became a walking coconut during the process! Shredded coconut found its way into every nook and cranny of my kitchen, no doubt. But hey, that’s proof the love is real!

This coconut cake really sets the bar high for homemade cakes. It’s just plain gorgeous, making it a fantastic pick for spring celebrations or that Easter brunch spreading you’re planning. Trust me, it’ll steal the spotlight every time!

Hello there! If you’re all about coconut, you’re in the right spot. This recipe yields a moist and fluffy layer cake packed with bold coconut flavor, topped with a luscious coconut cream cheese frosting. The photos and video above show you exactly how your cake should look, but stick around — I’ll walk you through every detail on baking, stacking, and decorating this beauty yourself at home.
What really makes this cake stand out — and what I’ll guide you through step-by-step — are a handful of key ingredients and techniques: cake flour for that soft, tender crumb; egg whites to keep it light and airy; sour cream for incredible moisture; plus canned coconut milk, sweetened shredded coconut, and coconut extract for that standout coconut punch. I started from my favorite white cake recipe and tweaked it constantly until the texture and flavor were just perfect.
Here’s what you’ll find in this recipe post:
- Easy-to-understand ingredient details so you know exactly why each part is there — plus swap ideas if you need them.
- Clear, step-by-step instructions for baking, cooling, and assembling three 8-inch layers, with tips if you want to make a 2-layer cake, Bundt cake, cupcakes, or a 9×13 sheet cake instead.
- A thorough frosting and decorating guide (with photos and video!) and pro tips to help you stack your layers like a pro.
- Helpful storage, make-ahead, and freezing advice so you can keep this cake fresh and tasty longer.
- Fun variations and alternative frosting ideas so you can mix things up and make it your own.
Stick with me and I’ll share all the little insider tips (think: room-temperature ingredients, working with shredded coconut, leveling layers) that make this coconut cake a winner every single time. Ready to get started? Let’s bake!
What Makes It Special
- Super Moist: Nobody likes a dry cake. This one stays tender and moist thanks to the magic of sour cream and coconut milk.
- Packed with Coconut Flavor: With canned coconut milk, shredded coconut, and coconut extract, the coconut flavor shines bright and unmistakable. If you’re craving even more coconut, you’ll also love this classic coconut cream pie.
- Soft and Fluffy: Using cake flour and egg whites keeps the crumb light, silky, and perfect.
- Flexible Uses: This mix is super versatile — great for Bundt cakes, cupcakes, 2- or 3-layer cakes, or even a sheet cake for easy serving.
- Customizable Frosting: Stick to the coconut cream cheese frosting here or switch it up with strawberry, lemon, brown butter cream cheese, champagne, or chocolate buttercream. You can even add raspberry filling or a salted caramel drizzle. It’s always a hit, especially around Easter dessert time—right alongside classics like carrot cake.
How to Bake and Assemble
- Set your eggs, sour cream, butter, cream cheese, and canned coconut milk out to come to room temperature for best mixing.
-
Preheat your oven to 350°F (177°C). Grease three 8-inch cake pans, line them with parchment circles, and grease the parchment too.

- Grab two bowls: one for mixing dry ingredients, one for wet.
-
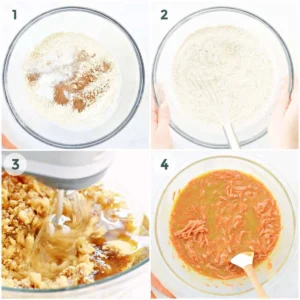
In your dry bowl, whisk together cake flour, baking powder, baking soda, and salt; set aside.

- Using a mixer, beat your softened butter with the granulated sugar on medium-high speed until light and creamy—about 2 minutes—scraping the bowl down as needed.
-
Add the egg whites and beat until well combined. Then mix in sour cream, vanilla extract, and coconut extract, scraping the bowl again.

- Turn mixer to low speed and add dry ingredients in batches, alternating with the canned coconut milk, mixing just until combined each time.
-
Gently fold in the sweetened shredded coconut by hand. If your coconut strands are long, give them a quick pulse in a food processor first to chop them smaller.

- Divide your batter evenly into the prepared cake pans. For perfectly even layers, weigh the pans on a kitchen scale if you want to be precise.
-
Bake for 21–24 minutes, until a toothpick poked into the center comes out clean.

- Let the cakes cool in their pans on a wire rack for about an hour. Then carefully take them out of the pans and let them cool completely on the rack. Make sure they’re fully cool before frosting.
-
In a clean bowl, beat softened butter and cream cheese on medium speed until smooth, about 2 minutes.

- On low speed, gradually add confectioners’ sugar, 2 tablespoons canned coconut milk, vanilla extract, coconut extract, and salt. Then crank the mixer to high and beat for 3 minutes. Adjust the consistency by adding more powdered sugar if it’s too thin or a splash more coconut milk if it’s too thick.
-
Trim the rounded tops off each cake layer with a serrated knife to get a nice flat surface.

- Place the first cake layer on your cake stand and spread about 1 heaping cup (around 250–300 grams) of frosting evenly over the top.
-
Add the second layer and spread another heaping cup of frosting. Then place the third layer on top.

- Use the remaining frosting to cover the top and sides of the cake. Use an offset spatula to smooth the top and a bench scraper for the sides.
-
Sprinkle or gently press sweetened shredded coconut all over the cake, covering both top and sides.

-
Pop the assembled cake into the fridge for at least 20 minutes to let the frosting firm up before slicing.

Flavor Variations and Frosting Ideas
Are you a vanilla buttercream fan? It’s smooth, creamy, and just the right amount of sweet with that classic buttery flavor everyone loves.
Or do you prefer cream cheese frosting? It delivers that tangy, silky richness that’s hard to resist.
The coconut cream cheese frosting here blends the best of both worlds with the addition of coconut milk and coconut extract. It’s extra creamy and has a subtle tropical note that elevates the whole cake. Plus, it spreads like a dream, which is a total win when you’re decorating a layered cake. (If you want to get fancy, check out the video tutorial above!)

If cream cheese isn’t your thing, no worries. Just try my vanilla buttercream recipe but swap out the milk for canned coconut milk and add half a teaspoon of coconut extract stirred in. You’ll still get plenty of coconut magic!

If layering feels like too much, go for a coconut sheet cake instead. It’s just one layer, so the frosting part is quicker and easier. See my notes above for adjusting bake times and sizes.

Pro Tips for Best Results
Big shoutout to my friend Stephanie who totally crushed it making “3D” buttercream roses on her very first attempt! She piped these gorgeous roses at my place and then I froze them until it was time to decorate the cake. (You can find the tutorial video linked above—it’s a great watch.)
TIP: The cream cheese buttercream used here is a bit too soft for detailed roses. If you want to make intricate flowers, use my vanilla buttercream recipe instead and add an extra cup of powdered sugar to make it nice and firm. You’ll also want a few handy tools:
- Wilton Petal Tip 104
- Flower Nail
- Reusable or disposable piping bags
Once piped, keep the roses loosely covered and freeze or chill them for up to a week. No need to thaw before decorating — just peel off the parchment paper and gently place the rose on your cake. If you’re taking the cake somewhere, a tiny dab of cream cheese frosting underneath will keep the roses snug in place.
Looking for a simpler decorating trick? Use a Wilton 1M tip to pipe simple two-tone buttercream roses that still look stunning but without all the fuss.

Storing, Chilling, and Freezing
Since this frosting has cream cheese, it’s best to keep your finished cake covered and refrigerated. Use an airtight cake carrier or wrap your cake tightly with plastic wrap to keep it from drying out or absorbing fridge smells. Properly stored, it will stay fresh and delicious for up to 5 days.
Make-ahead tips: Bake and cool the cake layers, then wrap them well and keep at room temperature overnight. If you want to store longer, freeze the wrapped layers for up to 2–3 months (the same method we use for our Caramel Apple Layer Cake). You can also make the frosting ahead of time and refrigerate it. When you’re ready to frost, bring it to room temperature and beat it again to refresh that creamy texture.
Thawing & serving: Defrost frozen layers or unfrosted cakes overnight in the fridge. Before serving, let the whole cake or slices sit at room temperature for 30 to 60 minutes to get the best texture. Want warm slices? Pop them in the microwave for 10–20 seconds (check carefully), or wrap them in foil and heat in a 300°F (150°C) oven for 10–15 minutes.
Frosting care: Cream cheese frosting firms up when chilled. Let it soften at room temperature for 15–30 minutes, then give it a quick beat with your mixer to make it smooth and easy to spread again. If the frosting is too thin, add a bit more powdered sugar gradually. If it’s too thick, stir in a touch more coconut milk.
Common Questions Answered
- Can I use refrigerated carton coconut milk instead of canned?
I don’t recommend it. Use unsweetened canned coconut milk (the thick kind meant for cooking). The carton coconut milk you find in the fridge is thinner and will change both the texture and flavor of your cake. - Why use just egg whites here?
Egg whites lighten the cake’s crumb and keep it fluffy—think of the delicately airy texture of Angel Food Cake (Light & Fluffy). Using whole eggs would produce a denser, heavier cake—more like a pound cake. If you want a denser texture, look for recipes designed for whole eggs. - What if I don’t have cake flour?
You can make a decent substitute by removing 2 tablespoons of all-purpose flour per cup and replacing that with 2 tablespoons of cornstarch, then sift it together. It won’t be quite as tender but it works fine in a pinch. - Can I make cupcakes, a 2-layer cake, or a Bundt cake instead?
Absolutely! Bake cupcakes for 19–21 minutes at 350°F, 2-layer cakes for roughly 24–26 minutes, and a 10-cup Bundt cake around 60 minutes. Use a toothpick to test doneness as always. - How do I avoid stringy shredded coconut in the cake?
Use sweetened shredded or flaked coconut. If your coconut strands seem long, give them a quick pulse in a food processor to chop them smaller before folding into the batter. - My frosting feels too thin or too sweet. What can I do?
If the frosting is too thin, add powdered sugar a little at a time or chill briefly, then whip again. If it’s too sweet, add a pinch of salt or a bit more cream cheese or butter and beat well to balance the flavor. - Can I freeze frosted cakes or buttercream decorations?
Yes! You can freeze both frosted and unfrosted cakes for 2–3 months. Buttercream roses can also be frozen or refrigerated up to a week and decorated right from the freezer — just peel off the parchment and secure them with a little frosting if you need to transport.
A moist and fluffy homemade coconut layer cake loaded with coconut flavor, topped with a silky coconut cream cheese buttercream. Perfect for spring or Easter celebrations.
- Prep Time: 20 minutes
- Cook Time: 21 to 24 minutes
- Total Time: 1 hour 15 minutes (including cooling)
- Yield: 3 (8-inch) cake layers 1x
- Category: Dessert
- Cuisine: American
Ingredients
- 2 and 1/2 cups (285g) cake flour (spooned & leveled)
- 2 teaspoons baking powder
- 1/2 teaspoon baking soda
- 1 teaspoon salt
- 3/4 cup (170g; 12 Tbsp) unsalted butter, softened to room temperature
- 1 and 2/3 cups (330g) granulated sugar
- 5 large egg whites, at room temperature
- 1/2 cup (120g) sour cream, at room temperature
- 2 teaspoons pure vanilla extract
- 1 teaspoon coconut extract
- 1 cup (226g/240ml) unsweetened canned coconut milk, at room temperature
- 1 cup (80g) sweetened shredded coconut
- 1 cup (226g; 16 Tbsp) unsalted butter, softened to room temperature (for frosting)
- 8 ounces (226g) full-fat brick cream cheese, softened to room temperature (for frosting)
- 5 cups (600g) confectioners’ sugar (for frosting)
- 2 Tablespoons (30ml) canned coconut milk (for frosting)
- 1/2 teaspoon pure vanilla extract (for frosting)
- 1/2 teaspoon coconut extract (for frosting)
- 1/8 teaspoon salt (for frosting)
- 2 cups (160g) sweetened shredded coconut (for decorating)
Instructions
- Bring eggs, sour cream, butter, cream cheese, and canned coconut milk to room temperature.
- Preheat oven to 350°F (177°C); grease three 8-inch cake pans, line with parchment rounds, and grease the parchment.
- Prepare two bowls: one for dry ingredients, one for wet ingredients.
- Whisk together cake flour, baking powder, baking soda, and salt; set aside.
- Beat softened butter and granulated sugar on medium-high speed until light and creamy, about 2 minutes, scraping the bowl as needed.
- Add egg whites and beat until combined, then mix in sour cream, vanilla extract, and coconut extract; scrape the bowl.
- On low speed, add the dry ingredients to the wet mixture in batches, alternating with the canned coconut milk, mixing until just combined.
- Gently fold in sweetened shredded coconut by hand (pulse briefly in a food processor first if strands are long).
- Divide batter evenly among the prepared pans (weigh pans for even layers if desired).
- Bake 21–24 minutes or until a toothpick inserted into centers comes out clean.
- Cool cakes in pans on wire rack for 1 hour, then remove and cool completely on rack; ensure fully cool before frosting.
- For frosting: Beat softened butter and cream cheese on medium speed until smooth, about 2 minutes.
- With mixer on low, gradually add confectioners’ sugar, 2 tablespoons canned coconut milk, vanilla extract, coconut extract, and salt; then beat on high for 3 minutes. Adjust consistency with more powdered sugar or coconut milk as needed.
- Trim domed tops from each cake layer with a serrated knife to level layers.
- Place first cake layer on a cake stand and spread about 1 heaping cup (250–300 g) of frosting evenly over the top.
- Add second layer and spread another heaping cup of frosting, then add the third layer.
- Frost top and sides with remaining frosting using an offset spatula and smooth sides with a bench scraper.
- Press or sprinkle sweetened shredded coconut all over top and sides to coat.
- Chill assembled cake in refrigerator for at least 20 minutes to firm frosting before slicing.
Notes
Use only unsweetened canned coconut milk (not refrigerated carton coconut milk) for best texture and flavor., Using only egg whites keeps the cake light and fluffy., If you don’t have cake flour, make a substitute by removing 2 tablespoons of all-purpose flour per cup and replacing with 2 tablespoons cornstarch; sift together., Baking variations: cupcakes bake 19–21 minutes, 2-layer cake 24–26 minutes, 10-cup Bundt cake about 60 minutes; use toothpick to check doneness., To avoid stringy shredded coconut, use sweetened shredded or flaked coconut, and pulse in a food processor if strands are long., If frosting is too thin, add more confectioners’ sugar or chill and rewhip; if too sweet, add a pinch of salt or extra cream cheese or butter., Frosted cakes and buttercream decorations can be frozen for 2–3 months; buttercream roses can be frozen or refrigerated up to a week and decorated directly from the freezer., Store cake covered and refrigerated up to 5 days to keep fresh., Make-ahead tips: bake and cool layers then wrap and store at room temp overnight or freeze up to 2–3 months; make frosting ahead and refrigerate, then bring to room temp and beat before frosting., Before serving, let cake or slices sit at room temperature 30–60 minutes for best texture or warm briefly.
Nutrition
- Serving Size: 1 slice
- Calories: Approximately 450-500 calories per serving (varies by slice size)
- Fat: Approximately 25g fat per serving
- Carbohydrates: Approximately 55g carbohydrates per serving
- Protein: Approximately 4g protein per serving
More in Cakes