Easy Christmas Tree Sugar Cookies Recipe
Looking for a festive Christmas treat that’ll impress everyone at your holiday gathering? You’ve just found it with this fantastic Christmas Tree Sugar Cookie recipe! These cheerful sugar cookies are perfect for holiday parties or cozy nights with the family. They’re simple to whip up, and I promise you’ll have delicious, holiday-shaped cookies ready in no time!

There’s something super special about homemade sugar cookies; we’ve enjoyed making our Christmas tree decoration cookies before, but this time, we’re all about going big with Christmas tree shapes!
Honestly, what says Christmas more than a perfectly shaped little tree? I don’t think anything does! I can’t wait for you to try this Christmas sugar cookie recipe it’s truly a holiday celebration you can taste.
Why You’ll Love These Christmas Tree Cookies
- Festive Flair: These cookies are shaped like tiny Christmas trees, bringing instant holiday cheer to any dessert table.
- Customizable Fun: Decorating these cookies is half the fun! Pull out your colored sprinkles, edible glitter, and candies to make them as bright and joyful as you like.
- Shareable Joy: They make perfect little gifts wrap them up to surprise neighbors, teachers, or friends with some sweet holiday love.
- Easy to Make: You don’t have to stress about fancy cookie cutters to get these charming shapes. These cookies are straightforward and stress-free!
- Memory Maker: Baking and decorating these cookies together is a wonderful way to start or keep alive a family holiday tradition.
- Kitchen Aromatherapy: There’s nothing like the smell of sugar cookies in the oven. Your home will smell like Christmas, even better than any candle!
- All Ages: Whether it’s a kids’ playdate or a grown-up gathering, these festive treats bring out everyone’s holiday spirit.
Ingredients You’ll Need
Before you get started, make sure you have all the ingredients shown in the photo below. Having everything ready always makes baking smoother.
There’s nothing quite like the look on your family and friends’ faces when you hand them these cookies and they say, ‘Wait – you MADE these?’ That moment feels so special and totally worth it.
How to Make Christmas Tree Sugar Cookies With Step-By-Step Instructions
You’ll find a full printable recipe with precise measurements in both US customary and metric units in the recipe card down below.
To make the cookies
Making these Christmas tree sugar cookies is super easy when you follow these straightforward steps.
First, set your oven to preheat at 350°F (175°C).
Grab a 9-inch cake pan or springform pan and line the bottom with parchment paper. Next, spread a bit of butter on the parchment paper that’s your secret to keeping the cookie from sticking.
Lightly dust the pan with flour, then tap out any extra so you don’t get clumps.

Whisk together your flour, salt, and baking soda in a bowl, then set it aside for now.

Cream the butter and sugar together until fluffy, then beat in the egg, vanilla extract, and the green food gel color.
In a separate medium bowl, whisk the flour, salt, and baking soda once more, then put it aside.
Use a stand mixer with a paddle attachment or a hand mixer to blend butter and sugar until it’s smooth and silky.
Next, add the egg and beat again, then mix in the vanilla extract. Fold your flour mixture in gently, then stir in the green food gel a little at a time until you get your favorite shade of green. Don’t forget to scrape down the sides to ensure everything blends perfectly.
Keep in mind, your frosting will be a richer, darker green, so no need to go too dark with the dough color.

Transfer your cookie dough into the prepared pan and smooth out the top evenly with a spatula.

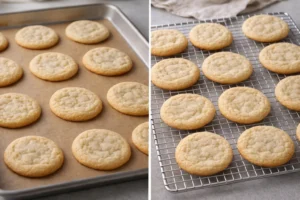
Bake the dough for about 14 to 16 minutes, then let it cool completely before you touch it.
After mixing, scrape any leftover dough from the bowl into your buttered and floured pan.
Spread the dough flat and even in the pan, then bake it at 350°F for 14 to 15 minutes.
When baked, pull the pan out of the oven. If the edges are puffed higher than the center, gently press them down with the bottom of a glass while the dough is still warm and soft.

Now let’s mix the powdered sugar, milk, and butter for the frosting.

Add vanilla extract and green food gel to get that perfect Christmas tree green color for your frosting.

Once the cookie cools just enough to stay warm and flexible, cut it into eight triangles, trimming the rounded edges to shape them like Christmas trees.
Cutting while the cookie is warm helps get those clean, crisp shapes without any cracking.
Place the pan on a wire rack so the cookie cools down completely.
When fully cooled, run a sharp knife around the pan’s edge to loosen the cookie. If you’re using a springform pan, just release the ring.
Cut the cookie into eight triangles and carefully trim the rounded edges for the perfect Christmas tree points.
Gently press a pretzel stick into the base of each triangle to create the tree trunks.
To Make the Sugar Frosting
Using a stand mixer or a hand mixer, blend together powdered sugar, milk, butter, vanilla extract, and green food coloring until the frosting is smooth and easy to spread. Aim for a greener, darker shade than your cookie dough to make your trees pop.
Fill a piping bag with a small tip if you don’t have one handy, use a freezer bag and just snip a tiny corner off (but be careful not to cut too big or the frosting will gush out!).
![]()
Stick the pretzel trunk firmly at the base of each Christmas tree cookie.

Now comes the best part pipe fun zig-zag lines of frosting across each tree to look like festive garlands.

Sprinkle your favorite Christmas toppings on the icing for extra sparkle and holiday cheer.
Be quick when decorating so your sprinkles stick before the frosting sets.
Go wild with sprinkles big stars, tiny pearls, colorful confetti, or even gold balls whatever makes your heart happy!
Then, sit back, grab a cup of hot cocoa, and admire your beautiful Christmas tree sugar cookies. Wishing you a joyful holiday season!

Recipe Notes and Expert Tips
- Measure Accurately: Baking is a science, so weighing your ingredients with a kitchen scale is the best way to get consistently spot-on dough every time.
- Quality Extracts: Trust me, using good vanilla or almond extract seriously boosts the cookie flavor. Don’t skip this it makes a difference!
- Frosting Options: We love sugar frosting here because it’s soft and creamy, but if you want a firmer finish, royal icing works great too.
- Cool Before Decorating: Always let your cookies cool completely on a wire rack before decorating. Frosting won’t slide off or melt this way.
- Experiment: Don’t hesitate to mix it up! Change flavors, try different colors, or add fun sprinkles to make your Christmas sugar cookies uniquely yours.
- Storage Smarts: Planning ahead? Store your cookies in an airtight container with parchment paper layers to stop them sticking and keep their shapes perfect.
How to Store Leftover Cookies
Keep your cookies fresh and soft by storing them at room temperature in an airtight container for up to a week.
If you want to keep them longer, freeze your cookies for up to three months. Just remember to remove the pretzel trunks before freezing; this way, they won’t get soggy once thawed.

More in Cookies