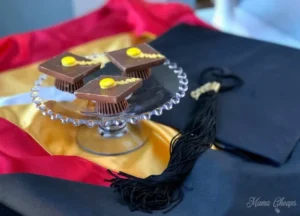
DIY Chocolate Candy Graduation Cap Treats

May and June are prime months for graduation parties! These super cute and easy DIY Chocolate Candy Graduation Cap Treats will absolutely steal the spotlight on your dessert table at any graduation celebration!
Every year when spring turns into warmer days, you start to see colorful balloons popping up on neighbors’ mailboxes all over town. And those balloons? They’re your telltale signs that graduation season is here! From mid-May right through late June, schools everywhere send off their seniors, and families come together to celebrate this big milestone. Trust me, graduation is a huge moment worth throwing a party for!
I love thinking back to my own graduation parties—both high school and college. I remember my high school party was a big deal, with friends from school everywhere. The food was a fun mix of some local catering and my mom’s famous slow cooker dishes that everyone raved about.
So, if you’re planning a graduation bash or heading to one and want to bring a fun dessert, give these adorable, simple-to-make DIY Chocolate Candy Graduation Cap Treats a try. They’re bound to be a crowd pleaser!
Bonus: You can whip them up a day or two in advance to take the stress off on party day.
May and June bring graduation vibes everywhere — balloons on porches, families gathering, and dessert tables looking extra festive. If you want a treat that’s both cute and easy with zero baking, these Chocolate Candy Graduation Cap Treats fit perfectly. They’re quick to make and super fun-looking!
Here’s a snapshot of what you’ll need: Reese’s peanut butter cups, chocolate squares, M&Ms, and candy melts. The best part? You just melt the candy to ‘glue’ the pieces together, pipe on some tassels in your colors, and voila! These little caps come together fast. Plus, they’re perfect for kids to help with and easily customizable by using school colors to match the celebration.
Keep scrolling for step-by-step photos, smart tips on melting and assembling (like working in small batches and using a plastic bag as a piping bag), and fun ways to tweak the design for your party’s style and timeline.
Why These Are Party-Perfect
These DIY Chocolate Candy Graduation Cap Treats are a lifesaver when you want something cute but fuss-free. No baking, barely any prep, and straight from the store ingredients make them perfect for busy party hosts. They’re versatile—you can swap colors to fit any school’s theme, they’re easy for kids to join in making, and they look like you put tons of effort into them. Since they don’t bake, you can make them last minute or a day early without a sweat! For a cohesive grad dessert table, pair them with this Graduation Diploma Dessert.
Ingredients and Color Picks

- Reese’s Peanut Butter Cups
- Ghirardelli Chocolate Squares
- M&Ms (pick school colors to match your theme!)
- Candy Melts (choose colors to coordinate with your party)
Assembling the Candy Cap Treats
- Unwrap peanut butter cups and place them upside down in a single layer on parchment paper or a silicone mat.
- Unwrap a chocolate square for each peanut butter cup.
- Melt a few tablespoons of candy melts (about 5–10) at a time until smooth, heating in 15–20 second microwave bursts and stirring between bursts or using a double boiler.
-
Drop a small dab of melted candy on top of each upside-down peanut butter cup.

- Quickly press a chocolate square onto each dab of melted candy and hold for a few seconds to set.
- Let the assembled caps sit until the melted candy hardens.
- If a chocolate square won’t sit flat, warm it for a couple of seconds in the microwave to soften before pressing.
-
Melt small amounts of candy melts in each tassel color, keeping them runny for piping.
- Spoon melted tassel candy into a plastic sandwich bag and snip a tiny corner to create a piping bag.
- Pipe a small swirl or squiggle of melted candy on the center of each chocolate square.
- Place an M&M or other small candy in the center of each piped tassel.
-
Repeat the decorating process until all graduation cap treats are finished.

Pro Tips for Smooth Assembly
- Heat candy melts in short bursts of 15–20 seconds in the microwave, stirring well in between so the chocolate melts evenly without burning. A double boiler works great too if you prefer.
- Only melt a few tablespoons at a time to keep the candy smooth and liquid enough to act like glue without hardening too fast.
- Set your peanut butter cups upside down on parchment paper or a silicone mat to stop them from sticking and to make cleanup a breeze.
- For neat, precise tassels, use a small piping bag (the piping techniques used in our Spooky Halloween Cookies apply here) or simply snip a tiny corner off a plastic sandwich bag. Start with a small hole and go bigger if you need more coverage.
- If a chocolate square is being stubborn and won’t sit flat on the cup, give it a quick heat in the microwave just for a couple of seconds (on a plate). It will soften enough to press down gently and stick better with your melted candy glue.
- Avoid popping your finished treats in the fridge right after decorating. That sudden cold can cause a white film called bloom. If chilling is necessary, let the treats come back to room temperature before serving to keep them looking perfect.
Flavor and Decoration Swaps

- Swap out Reese’s peanut butter cups for Rolos, mini Twix bars, or even mini chocolate sandwich cookies if you want a nut-free option everyone can enjoy.
- Change up the taste by using different chocolate squares like Hershey’s milk chocolate, dark chocolate, or white chocolate for a different look and flavor contrast.
- Try tassels made from candy melts in metallic or pastel colors, or get creative with thin licorice strands to give a non-melted, textured tassel effect.
- Instead of using an M&M for the tassel center, add colorful edible sprinkles, sanding sugar, or a small candy star for a festive twist.
- Turn these treats into personalized place cards by taping a tiny name tag under each one with a fun ribbon or washi tape—it’s a charming touch for your party table!
Storing and Make-Ahead Advice
Keep your finished graduation caps fresh by storing them in a single layer inside an airtight container. Room temperature is best, around 60–70°F, away from sunlight and heat. That way, they’ll taste great for 1 to 2 days, perfect timing for a weekend celebration.
If you want to hold onto them longer, you can refrigerate for up to a week. If you’d prefer a make-ahead dessert that actually benefits from chilling, try this No-Bake Strawberry Cheesecake, which is designed to set in the fridge. Just remember, when you take them out, moisture can make the chocolate look dull or ‘bloom’, so keep them sealed and let them warm up fully inside the container before opening. Freezing isn’t a great option here because it changes the texture and can leave a white coating on the chocolate.

Quick FAQs for the Treats
Q: How long ahead can I make these treats?
A: You can put them together and decorate them a day or two before your event. Store them in an airtight container at cool room temperature. If you refrigerate, let them come back to room temp before serving to avoid any moisture issues. For another make-ahead chocolate dessert that keeps well at room temperature, try our Chewy and Gooey Chocolate Crinkle Cookies.
Q: Can I make a nut-free version?
A: Absolutely! Just swap the peanut butter cups for Rolos, mini chocolate sandwich cookies, or simple chocolate discs to keep everyone happy and safe.
Q: My candy melts thickened while I was piping, what now?
A: No worries! Warm them gently with short microwave bursts and stir until smooth. It’s best to melt small amounts at a time so the candy stays runny and easy to work with.
Q: How do I stop the caps from sliding apart?
A: Make sure you use a good-sized dot of melted candy ‘glue’ and press the chocolate square immediately onto the peanut butter cup, holding for a few seconds to set. Let them harden on a flat surface to stay put.
Q: Will the chocolate get that white ‘bloom’ if stored in the fridge?
A: Chocolate can develop a whitish film if chilled and then exposed to warm, humid air. To avoid this, keep your treats at cool room temperature if possible. If refrigeration is necessary, store in a sealed container and allow them to warm to room temperature before opening.

DIY Chocolate Candy Graduation Cap Treats – no bake, easy-to-make graduation party dessert featuring Reese’s Peanut Butter Cups, chocolate squares, M&Ms, and candy melts decorated as graduation caps with tassels.
- Prep Time: 15 minutes
- Cook Time: 0 minutes (no baking)
- Total Time: 15 minutes
- Yield: About 12 treats (based on standard package sizes)
- Category: Dessert
- Cuisine: American
Ingredients
- Reese’s Peanut Butter Cups (quantity as desired)
- Ghirardelli Chocolate Squares (equal amount to peanut butter cups)
- M&Ms (choose school colors, quantity equal to peanut butter cups)
- Candy Melts (various colors to coordinate with party, approx. 5–10 tablespoons)
Instructions
- Unwrap peanut butter cups and place them upside down in a single layer on parchment paper or a silicone mat.
- Unwrap a chocolate square for each peanut butter cup.
- Melt a few tablespoons of candy melts at a time (about 5–10 tablespoons) until smooth by heating in 15–20 second microwave bursts and stirring between bursts or using a double boiler.
- Drop a small dab of melted candy on top of each upside-down peanut butter cup.
- Quickly press a chocolate square onto each dab of melted candy and hold for a few seconds to set.
- Let the assembled caps sit until the melted candy hardens.
- If a chocolate square won’t sit flat, warm it for a couple of seconds in the microwave to soften before pressing.
- Melt small amounts of candy melts in each tassel color, keeping them runny for piping.
- Spoon melted tassel candy into a plastic sandwich bag and snip a tiny corner to create a piping bag.
- Pipe a small swirl or squiggle of melted candy on the center of each chocolate square.
- Place an M&M or other small candy in the center of each piped tassel.
- Repeat the decorating process until all graduation cap treats are finished.
Notes
Heat candy melts in short bursts of 15–20 seconds in the microwave, stirring well between for even melting. A double boiler works as well., Only melt a few tablespoons at a time to keep the candy smooth and liquid enough to act as glue, avoiding hardening too fast., Set peanut butter cups upside down on parchment paper or silicone mat to prevent sticking and ease cleanup., Use a small piping bag or plastic sandwich bag with a snipped corner for neat tassels., If a chocolate square is difficult to sit flat, warm briefly in microwave before pressing down gently., Avoid refrigerating immediately after decorating to prevent white chocolate bloom; if chilling is needed, allow treats to come to room temperature before serving., Variations include using Rolos, mini Twix, or chocolate sandwich cookies for nut-free options, changing chocolate square types for different flavors or appearances, and using different decorations for tassels and centers., Store in airtight container at room temperature (60–70°F) away from heat and sunlight for 1–2 days, or refrigerate up to 1 week with caution to prevent moisture issues and bloom., Do not freeze as it alters texture and causes white coating on chocolate.
Nutrition
- Serving Size: 1 treat
- Calories: Approximately 150-200 calories per treat (estimate based on typical candy ingredients)
- Fat: 12g per serving (approximate)
- Carbohydrates: 20g per serving (approximate)
- Protein: 3g per serving (approximate)
More in Cookies