Strawberry Cheesecake Cups Recipe

Looking for a dessert that feels special but won’t stress you out? These strawberry cheesecake cups are your new go-to. There’s no baking involved — just layers of buttery graham cracker crust, smooth cream cheese filling, and fresh, juicy strawberries all tucked into cute individual cups.
They’re super simple to whip up, even if you’re just starting out in the kitchen. Plus, you can make them ahead for parties or just whenever a sweet craving hits. With just a few easy steps and minimal mess, you’ll have a show-stopping dessert everyone will rave about.
Why These Strawberry Cheesecake Cups Are Such a Winner
Imagine a dessert that skips the oven but still looks like it belongs in a fancy bakery window. That’s exactly what makes these strawberry cheesecake cups so amazing. No baking, no sweat — just simple layering and chilling, perfect for hot days or when you just want an easy win.
The real magic is their flexibility. They fit right in whether you’re at a backyard BBQ or a bridal shower. The clear cups let those beautiful layers shine, and since they’re portioned individually, serving is a breeze. Kids and grown-ups alike can’t get enough, and you get that delicious, restaurant-quality flavor without the headaches.
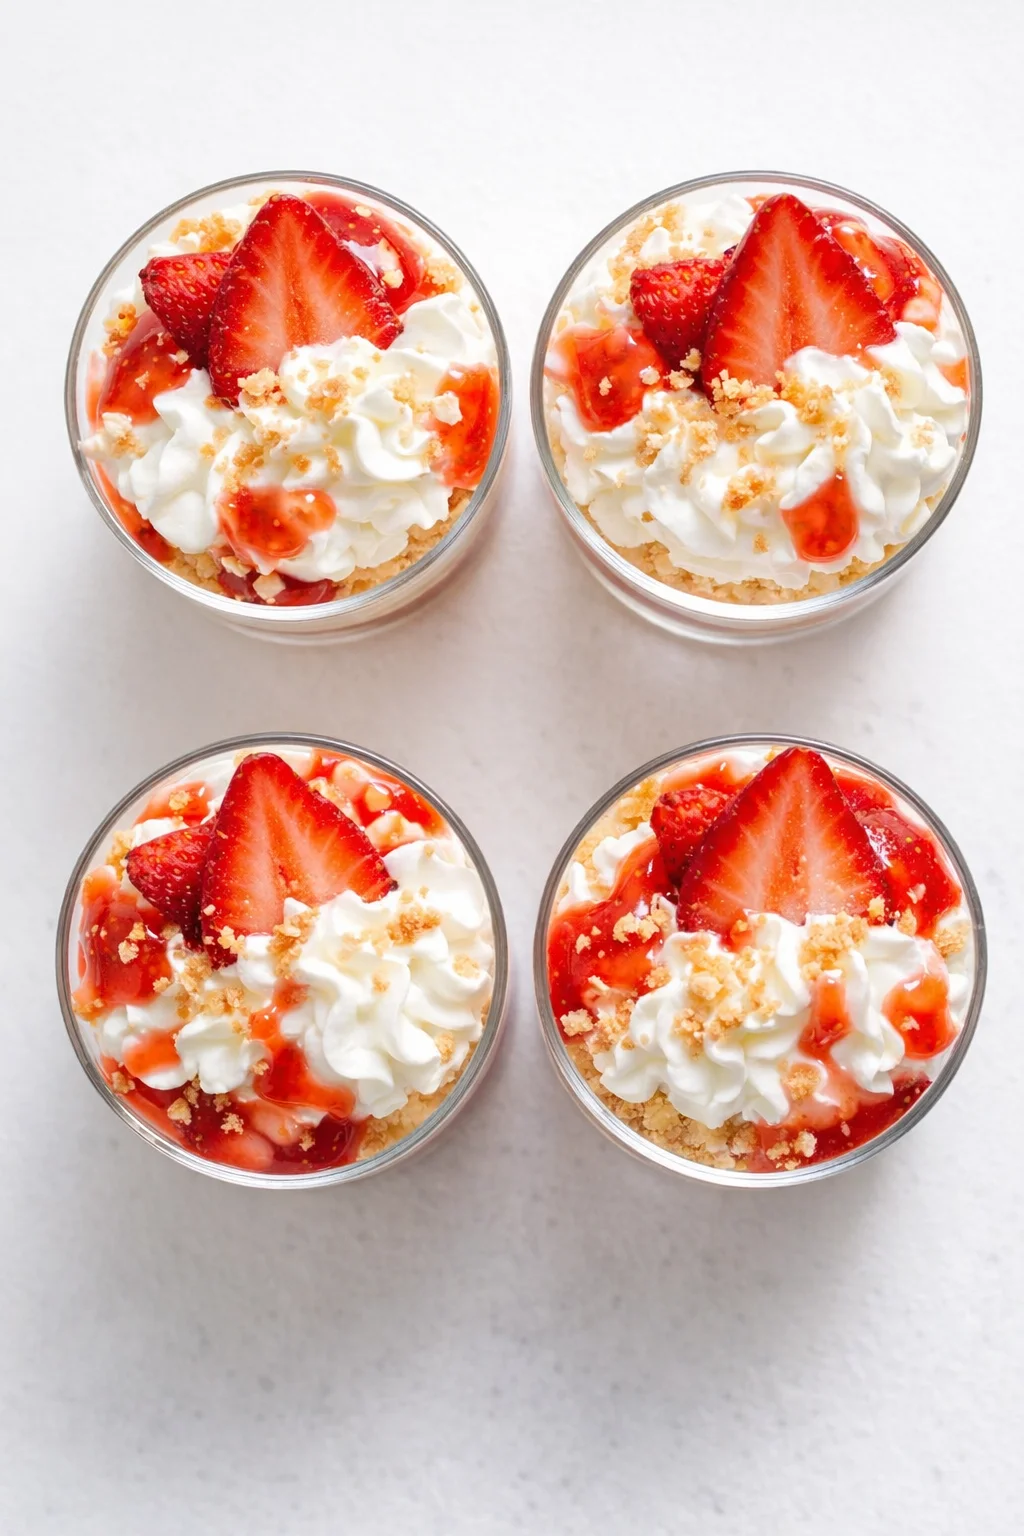
Delicious no-bake strawberry cheesecake cups featuring a buttery graham crust, creamy filling, and fresh strawberries. A quick and elegant dessert perfect for any occasion.
Course: Dessert
Cuisine: American
Prep Time: 20 minutes minutes
Cook Time: 0 minutes minutes
Chill Time: 2 hours hours
Total Time: 2 hours hours 20 minutes minutes
Servings: 6 cups
Calories: 340kcal
Cost: $13
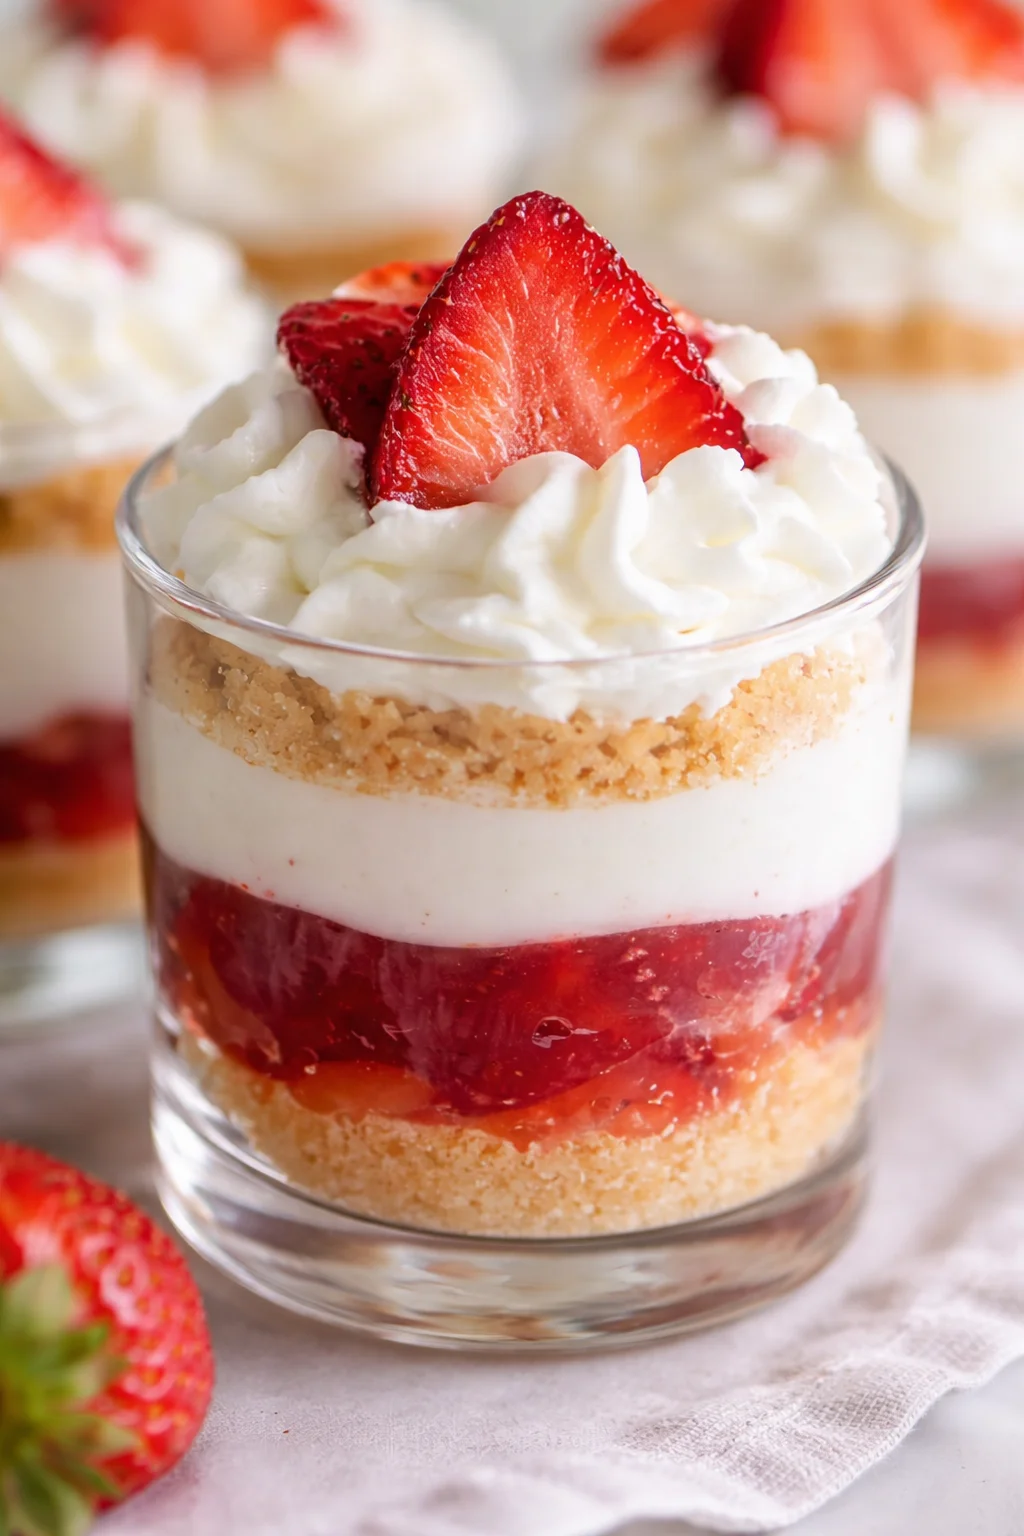
Craving a dessert that looks elegant but takes very little effort? These no-bake strawberry cheesecake cups deliver just that: a crispy, buttery graham cracker crust, a light and fluffy cream cheese filling, and perfectly fresh strawberries, all layered into pretty individual servings—no oven needed.
This recipe lays out everything you need to make six gorgeous cups with about 20 minutes of active prep time (plus a couple hours chilling). You’ll get simple instructions, smart equipment ideas, tips for smooth and airy filling, plus easy swaps for allergies or creative twists on flavor.
- Skill level: Super beginner-friendly — no fancy steps, and I’ll share tricks to keep your filling smooth and lump-free.
- Timing: Around 20 minutes to prepare, plus chilling for at least 2 hours (overnight chilling makes them even better).
- Servings: Makes 6 individual cups—perfect for parties, picnics, or prepping ahead.
- What you’ll end up with: a gorgeous, fuss-free treat that tastes like it belongs in a bakery but was made right at home.
No-bake strawberry cheesecake cups with a buttery graham crust, creamy filling, and juicy fresh strawberries. A quick, elegant dessert perfect for any occasion.
Course: Dessert
Cuisine: American
Prep Time: 20 minutes minutes
Cook Time: 0 minutes minutes
Chill Time: 2 hours hours
Total Time: 2 hours hours 20 minutes minutes
Servings: 6 cups
Calories: 340kcal
Cost: $13
Why You’ll Love These Cups
These strawberry cheesecake cups show that you don’t need complicated recipes to wow your family and friends. A handful of simple ingredients, no oven, and you’re set with a creamy, crunchy, fresh dessert that hits the spot every time. The buttery graham cracker crust paired with luscious, airy cream cheese and sweet strawberries makes an unbeatable combo that keeps everyone asking for seconds.
Plus, they’re super versatile! Serve them at a fancy dinner, pack them for a picnic, or enjoy a casual dessert after a weeknight dinner. Once you get comfortable with the basics, you’ll want to make these strawberry cheesecake cups again and again, mixing up berries, crusts, or toppings to keep things fresh.
Sweet, simple, and seriously delicious—that’s our kind of cheesecake! 🍓
No-Bake Strawberry Cheesecake Cups
No-bake strawberry cheesecake cups with a buttery graham crust, creamy filling, and juicy fresh strawberries. A quick, elegant dessert perfect for any occasion.
Course: Dessert
Cuisine: American
Prep Time: 20 minutes minutes
Cook Time: 0 minutes minutes
Chill Time: 2 hours hours
Total Time: 2 hours hours 20 minutes minutes
Servings: 6 cups
Calories: 340kcal
Cost: $13
Equipment
- 1 Electric mixer or hand mixer
- Mixing bowls
- 1 Rubber spatula
- Measuring Cups & Spoons
- 1 Clear dessert cups or mason jars
- 1 Spoon or cookie scoop
- 1 Piping bag (optional)
Ingredients
Graham Cracker Crust
- 1 ½ cups Graham cracker crumbs About 10–12 crackers
- 3 tablespoon Granulated sugar
- 5 tablespoon Butter, melted Unsalted
Cream Cheese Filling
- 16 oz Cream cheese, softened 2 packages
- ¾ cup Powdered sugar
- 1 teaspoon Vanilla extract
- 1 cup Heavy whipping cream Cold
Strawberry Layer
- 2 cups Strawberries, diced Fresh and ripe
- 2 tablespoon Granulated sugar Optional
- 1 teaspoon Lemon juice Prevents browning
Topping
- Whipped cream For garnish
- Strawberries, sliced For garnish
- Graham cracker crumbs Optional crunch
Instructions
- Combine your graham cracker crumbs, sugar, and melted butter in a bowl until it looks like damp sand.
- Spoon 2-3 tablespoons of the crust mix into each clear dessert cup or jar.
- Press the crumbs firmly down with the back of a spoon or small glass to make a solid, even base.
- Pop the cups in the fridge while you mix the filling so the crust can set up well.
Pro tip: Use melted butter that’s warm but not hot — room temperature butter helps the crumbs bind perfectly without making them mushy.
Step 2: Whip Up Your Cream Cheese Filling
- In a large bowl, beat softened cream cheese with an electric mixer until it’s completely smooth and fluffy, about 2 minutes.
- Add powdered sugar and vanilla extract, and mix again for another minute until everything is blended.
- In a separate bowl, whip the cold heavy cream until you get stiff peaks; this usually takes 3-4 minutes on high speed.
- Carefully fold the whipped cream into the cream cheese mixture using a spatula, folding gently so you keep all the light and airy texture.
Pro tip: Make sure your cream cheese is nicely softened before you start — cold cream cheese will give you lumps that are tough to fix later.
Step 3: Let’s Assemble Those Pretty Cups
- Take the cups out of the fridge and spoon about a quarter cup of the cream cheese filling on top of the graham cracker base.
- Add 2-3 tablespoons of diced strawberries as your next layer.
- Spoon another layer of cream cheese filling over the strawberries and smooth it out with a spoon.
- Top each cup with a final layer of strawberries, arranging them nicely for that picture-perfect look.
Pro tip: Want to get fancy? Use a piping bag with a star tip to add your cream cheese filling—it makes elegant swirls like you just bought it from a bakery.
Step 4: Time to Chill
- Cover each cup tightly with plastic wrap or a lid.
- Chill in the fridge for at least 2 hours, though overnight chilling really amps up the flavor and texture.
- Right before serving, dollop on some whipped cream and add a strawberry slice on top.
- Sprinkle with a few extra graham cracker crumbs for a little crunch and a pretty finish, if you like.
My Top Tips for Success
Cream Cheese Tips
- Always bring your cream cheese to room temperature before mixing to avoid lumps.
- If you’re in a hurry, zap it in the microwave for 10 seconds, but be careful not to melt it.
- Beat the cream cheese alone first until smooth—it sets a great base for your filling.
Whipped Cream Tips
- Use heavy cream straight from the fridge and chill your mixing bowl and beaters if you can.
- Stop whipping once you reach stiff peaks to avoid turning it into butter.
Strawberry Tips
- Dice strawberries evenly for neat layers.
- Toss them with sugar and a little lemon juice to bring out their sweetness and keep them bright.
- Pat the strawberries dry before layering to keep the filling from getting soggy.
- Save the prettiest strawberries for the topping—they make all the difference.
Assembly Tips
- Pick clear cups or small mason jars to show off all those beautiful layers.
- Use a cookie scoop or spoon to portion evenly for a neat look.
- Leave a bit of room at the top for garnishes.
- Wipe the rims with a damp towel before chilling for a clean, professional finish.
Tools and Texture Tips
Using the right tools makes a big difference when you’re putting together these no-bake strawberry cheesecake cups. Not only does it save time, but it also gives you that smooth, airy filling and clean presentation.
- Clear dessert cups or small mason jars (8-10 oz size) are perfect for showing off your layers and making the cups look extra fancy.
- Electric hand mixer or stand mixer is your best friend for mixing cream cheese smooth and whipping cream to soft peaks quickly and easily.
- Rubber spatula lets you fold whipped cream in without knocking out all the air, keeping your filling light and fluffy.
- Medium-sized mixing bowls — you’ll want one for the crust and a separate one for the filling.
- Accurate measuring cups and spoons help get your textures just right, especially for the crust.
- Food processor (optional) makes quick work of crushing graham crackers uniformly if you want to save time.
- Piping bag with star tip (optional) professionalizes your presentation and is great if you love that polished, bakery look.
Budget-friendly swaps:
- Use clear disposable plastic cups if you don’t have fancy dessert glasses handy.
- If you don’t have a food processor, a rolling pin and zip-top bag works well for crushing graham crackers.
- A whisk and some good old elbow grease can replace an electric mixer, but be prepared for a bit more work.
Curious what really makes the filling so wonderfully light and creamy? It’s all about the folding technique. When you mix your whipped cream into the cream cheese base, go slow and gentle—fold, don’t stir or beat. Start by adding about a third of the whipped cream to lighten the mix, then carefully fold in the rest. This keeps those tiny air bubbles intact, creating that mousse-like texture everyone loves.
And here’s a secret I learned from experience: if you can, let the cups chill overnight. This gives the crust time to soften slightly, making bites meld together perfectly, and the filling firms up just right. The flavors also deepen, and the strawberries seem even brighter. Sure, they’re ready after a couple of hours, but the overnight rest makes your strawberry cheesecake cups truly unforgettable.
Flavor Swaps and Fun Add-Ins

This recipe is a perfect base for mixing things up depending on what you have on hand or what you’re craving.
Flavor Variations:
- Chocolate Strawberry Cheesecake Cups: Stir in ¼ cup cocoa powder to your cream cheese filling and use chocolate graham crackers for the crust. The combo of chocolate and strawberries is simply irresistible.
- Mixed Berry Cups: Swap out the strawberries for a mix of fresh blueberries, raspberries, and blackberries for a fresh berry medley in every bite.
- Lemon Strawberry Cups: Add 2 tablespoons of fresh lemon juice and a teaspoon of lemon zest into the filling for a zesty citrus boost that pairs beautifully with the strawberries.
Diet-Friendly Options:
- Low-Sugar Version: Swap powdered sugar for a no-calorie sweetener like Swerve or monk fruit to keep sweetness without the guilt.
- Dairy-Free Alternative: Use dairy-free cream cheese and coconut-based whipping cream for a very close texture and flavor.
- Gluten-Free Crust: Pick gluten-free graham crackers or substitute crushed gluten-free cookies to keep it safe for gluten-sensitive eaters.
- Lighter Version: Go for reduced-fat cream cheese and mix half your heavy cream with Greek yogurt for a lighter yet creamy filling.
Other Crust Ideas:
- Oreo cookie crumbs for a fun cookies-and-cream twist.
- Vanilla wafer crumbs for a sweeter, subtler base.
- Gingersnap crumbs add a warm, spicy kick.
- Crushed pretzels mix in a tasty sweet-and-salty combo.
Storing and Make-Ahead Tips
In the Refrigerator
- Store your assembled strawberry cheesecake cups covered in the fridge for up to 3 days.
- The filling stays creamy, though the crust will soften a little as it chills.
- Add fresh strawberries and whipped cream just before serving for the best texture and look.
- Use airtight containers or cover cups well to keep other fridge smells away.
Freezing
- You can freeze them for up to 1 month if you skip the whipped cream topping.
- Wrap tightly and place in a freezer-safe container to prevent freezer burn.
- Thaw overnight in the fridge before serving.
- Add whipped cream and strawberry garnish after thawing for freshness.
Meal Prep Hacks
- Make the crust and filling separately up to 2 days in advance.
- Keep the crust at room temperature and store the filling in the fridge.
- Give the filling a gentle stir before assembling your cups.
- For freshest results, put the cups together the morning of your event.
The Secret to That Dreamy, Cloud-Like Creaminess
Want your strawberry cheesecake cups to be so light and fluffy they practically float? It’s all about the folding, my friend. When you add whipped cream to your cream cheese mix, don’t stir or beat it. Instead, gently fold it in with a spatula. Start by mixing in about one-third of the whipped cream to loosen things up, then carefully fold in the rest. That way, you keep all those tiny air bubbles intact, giving you a luscious mousse-like texture that’s light but still stable.
And here’s a little bonus tip: if possible, let your strawberry cheesecake cups chill overnight. This extra time softens the crust a bit so every bite melts together perfectly. The filling firms up just enough, and the flavors blend into something truly special. Of course, they’re ready after two hours, but you’ll notice the difference patience makes!
Answers to Popular Questions
What’s the strawberry cheesecake drink at Sonic?
Sonic’s strawberry cheesecake drink is a milkshake blending ice cream, cheesecake chunks, and strawberry syrup. Our strawberry cheesecake cups are a no-bake dessert layered with fresh strawberries and real cream cheese — a totally different, fuss-free way to enjoy that classic flavor.
What do Jello strawberry cheesecake cups contain?
Jello’s version usually has cheesecake-flavored pudding, strawberry topping, and graham cracker crumbs. Our recipe uses real cream cheese, fresh strawberries, and actual graham crackers for that authentic homemade taste and texture.
Is it better to bake or not bake cheesecake?
Both have their charms! No-bake strawberry cheesecake cups are lighter, quicker, and perfect for when you don’t want to turn on your oven. They’re also great for individual servings and easy cleanup.
What’s the trick to a creamy, no-bake filling?
Start with cream cheese that’s soft at room temperature and gently fold in whipped heavy cream instead of mixing aggressively. This keeps your filling fluffy, light, and perfectly stable for delicious, fuss-free strawberry cheesecake cups.
What You’ll Need

- 1 ½ cups graham cracker crumbs (about 10–12 crackers)
- 3 tablespoons granulated sugar
- 5 tablespoons unsalted butter, melted
- 16 oz cream cheese, softened (2 packages)
- ¾ cup powdered sugar
- 1 teaspoon vanilla extract
- 1 cup heavy whipping cream, cold
- 2 cups strawberries, diced (fresh and ripe)
- 2 tablespoons granulated sugar (optional)
- 1 teaspoon lemon juice (prevents browning)
- Whipped cream, for garnish
- Strawberries, sliced, for garnish
- Extra graham cracker crumbs (optional crunch)
How to Make the Cups
- Combine graham cracker crumbs, granulated sugar, and melted butter in a bowl until the mixture resembles damp sand.
- Spoon 2–3 tablespoons of the crust mixture into each clear dessert cup or jar.
- Press the crumbs firmly with the back of a spoon or small glass to form an even base.
-
Refrigerate the cups while you prepare the filling so the crust can set.

- Beat softened cream cheese with an electric mixer until completely smooth and fluffy (about 2 minutes).
- Add powdered sugar and vanilla extract to the cream cheese and mix until combined.
- In a separate chilled bowl, whip cold heavy cream to stiff peaks (about 3–4 minutes on high speed).
-
Fold about one-third of the whipped cream into the cream cheese mixture to lighten it, then gently fold in the remaining whipped cream until fully combined.
- Toss diced strawberries with the optional granulated sugar and lemon juice, then pat them dry to avoid soggy layers.
- Spoon about 1/4 cup of the cream cheese filling over the graham cracker base in each cup.
- Add 2–3 tablespoons of diced strawberries on top of the filling.
-
Spoon another layer of cream cheese filling over the strawberries and smooth it out.

- Top each cup with a final layer of strawberries, arranging them as desired.
- Cover each cup tightly with plastic wrap or a lid.
- Chill the assembled cups in the refrigerator for at least 2 hours (or overnight for best texture).
-
Just before serving, top each cup with a dollop of whipped cream, a strawberry slice, and an optional sprinkle of extra graham cracker crumbs.

Tips for Perfect Texture
Using the right tools makes a big difference when you’re putting together these no-bake strawberry cheesecake cups. Not only does it save time, but it also gives you that smooth, airy filling and clean presentation.
- Clear dessert cups or small mason jars (8-10 oz size) are perfect for showing off your layers and making the cups look extra fancy.
- Electric hand mixer or stand mixer is your best friend for mixing cream cheese smooth and whipping cream to soft peaks quickly and easily.
- Rubber spatula lets you fold whipped cream in without knocking out all the air, keeping your filling light and fluffy.
- Medium-sized mixing bowls — you’ll want one for the crust and a separate one for the filling.
- Accurate measuring cups and spoons help get your textures just right, especially for the crust.
- Food processor (optional) makes quick work of crushing graham crackers uniformly if you want to save time.
- Piping bag with star tip (optional) professionalizes your presentation and is great if you love that polished, bakery look.
Budget-friendly swaps:
- Use clear disposable plastic cups if you don’t have fancy dessert glasses handy.
- If you don’t have a food processor, a rolling pin and zip-top bag works well for crushing graham crackers.
- A whisk and some good old elbow grease can replace an electric mixer, but be prepared for a bit more work.
Curious what really makes the filling so wonderfully light and creamy? It’s all about the folding technique. When you mix your whipped cream into the cream cheese base, go slow and gentle—fold, don’t stir or beat. Start by adding about a third of the whipped cream to lighten the mix, then carefully fold in the rest. This keeps those tiny air bubbles intact, creating that mousse-like texture everyone loves.
And here’s a secret I learned from experience: if you can, let the cups chill overnight. This gives the crust time to soften slightly, making bites meld together perfectly, and the filling firms up just right. The flavors also deepen, and the strawberries seem even brighter. Sure, they’re ready after a couple of hours, but the overnight rest makes your strawberry cheesecake cups truly unforgettable.
Want your strawberry cheesecake cups to be so light and fluffy they practically float? It’s all about the folding, my friend. When you add whipped cream to your cream cheese mix, don’t stir or beat it. Instead, gently fold it in with a spatula. Start by mixing in about one-third of the whipped cream to loosen things up, then carefully fold in the rest. That way, you keep all those tiny air bubbles intact, giving you a luscious mousse-like texture that’s light but still stable.
And here’s a little bonus tip: if possible, let your strawberry cheesecake cups chill overnight. This extra time softens the crust a bit so every bite melts together perfectly. The filling firms up just enough, and the flavors blend into something truly special. Of course, they’re ready after two hours, but you’ll notice the difference patience makes!
Flavor Swaps and Add-Ins
This recipe is a perfect base for mixing things up depending on what you have on hand or what you’re craving.
Flavor Variations:
- Chocolate Strawberry Cheesecake Cups: Stir in ¼ cup cocoa powder to your cream cheese filling and use chocolate graham crackers for the crust. The combo of chocolate and strawberries is simply irresistible.
- Mixed Berry Cups: Swap out the strawberries for a mix of fresh blueberries, raspberries, and blackberries for a fresh berry medley in every bite.
- Lemon Strawberry Cups: Add 2 tablespoons of fresh lemon juice and a teaspoon of lemon zest into the filling for a zesty citrus boost that pairs beautifully with the strawberries.
Diet-Friendly Options:
- Low-Sugar Version: Swap powdered sugar for a no-calorie sweetener like Swerve or monk fruit to keep sweetness without the guilt.
- Dairy-Free Alternative: Use dairy-free cream cheese and coconut-based whipping cream for a very close texture and flavor.
- Gluten-Free Crust: Pick gluten-free graham crackers or substitute crushed gluten-free cookies to keep it safe for gluten-sensitive eaters.
- Lighter Version: Go for reduced-fat cream cheese and mix half your heavy cream with Greek yogurt for a lighter yet creamy filling.
Other Crust Ideas:
- Oreo cookie crumbs for a fun cookies-and-cream twist.
- Vanilla wafer crumbs for a sweeter, subtler base.
- Gingersnap crumbs add a warm, spicy kick.
- Crushed pretzels mix in a tasty sweet-and-salty combo.
Storage and Make-Ahead
In the Refrigerator
- Store your assembled strawberry cheesecake cups covered in the fridge for up to 3 days.
- The filling stays creamy, though the crust will soften a little as it chills.
- Add fresh strawberries and whipped cream just before serving for the best texture and look.
- Use airtight containers or cover cups well to keep other fridge smells away.
Freezing
- You can freeze them for up to 1 month if you skip the whipped cream topping.
- Wrap tightly and place in a freezer-safe container to prevent freezer burn.
- Thaw overnight in the fridge before serving.
- Add whipped cream and strawberry garnish after thawing for freshness.
Meal Prep Hacks
- Make the crust and filling separately up to 2 days in advance.
- Keep the crust at room temperature and store the filling in the fridge.
- Give the filling a gentle stir before assembling your cups.
- For freshest results, put the cups together the morning of your event.
The Secret to That Dreamy, Cloud-Like Creaminess
Want your strawberry cheesecake cups to be so light and fluffy they practically float? It’s all about the folding, my friend. When you add whipped cream to your cream cheese mix, don’t stir or beat it. Instead, gently fold it in with a spatula. Start by mixing in about one-third of the whipped cream to loosen things up, then carefully fold in the rest. That way, you keep all those tiny air bubbles intact, giving you a luscious mousse-like texture that’s light but still stable.
And here’s a little bonus tip: if possible, let your strawberry cheesecake cups chill overnight. This extra time softens the crust a bit so every bite melts together perfectly. The filling firms up just enough, and the flavors blend into something truly special. Of course, they’re ready after two hours, but you’ll notice the difference patience makes!
Frequently Asked Questions
What’s the strawberry cheesecake drink at Sonic?
Sonic’s strawberry cheesecake drink is a milkshake blending ice cream, cheesecake chunks, and strawberry syrup. Our strawberry cheesecake cups are a no-bake dessert layered with fresh strawberries and real cream cheese — a totally different, fuss-free way to enjoy that classic flavor.
What do Jello strawberry cheesecake cups contain?
Jello’s version usually has cheesecake-flavored pudding, strawberry topping, and graham cracker crumbs. Our recipe uses real cream cheese, fresh strawberries, and actual graham crackers for that authentic homemade taste and texture.
Is it better to bake or not bake cheesecake?
Both have their charms! No-bake strawberry cheesecake cups are lighter, quicker, and perfect for when you don’t want to turn on your oven. They’re also great for individual servings and easy cleanup.
What’s the trick to a creamy, no-bake filling?
Start with cream cheese that’s soft at room temperature and gently fold in whipped heavy cream instead of mixing aggressively. This keeps your filling fluffy, light, and perfectly stable for delicious, fuss-free strawberry cheesecake cups.
No-bake strawberry cheesecake cups with a buttery graham cracker crust, creamy cream cheese filling, and juicy fresh strawberries, assembled in individual cups for an elegant, fuss-free dessert.
- Prep Time: 20 minutes
- Cook Time: 0 minutes
- Total Time: 2 hours 20 minutes
- Yield: 6 cups 1x
- Category: Dessert
- Cuisine: American
Ingredients
- 1 ½ cups graham cracker crumbs (about 10–12 crackers)
- 3 tablespoons granulated sugar
- 5 tablespoons unsalted butter, melted
- 16 oz cream cheese, softened (2 packages)
- ¾ cup powdered sugar
- 1 teaspoon vanilla extract
- 1 cup heavy whipping cream, cold
- 2 cups strawberries, diced (fresh and ripe)
- 2 tablespoons granulated sugar (optional)
- 1 teaspoon lemon juice (prevents browning)
- Whipped cream, for garnish
- Strawberries, sliced, for garnish
- Extra graham cracker crumbs (optional)
Instructions
- Combine graham cracker crumbs, granulated sugar, and melted butter in a bowl until the mixture resembles damp sand.
- Spoon 2–3 tablespoons of the crust mixture into each clear dessert cup or jar and press firmly with the back of a spoon or small glass to form an even base.
- Refrigerate the cups while preparing the filling so the crust sets.
- Beat softened cream cheese with an electric mixer until smooth and fluffy, about 2 minutes.
- Add powdered sugar and vanilla extract to the cream cheese and mix until combined.
- In a separate chilled bowl, whip cold heavy cream to stiff peaks (3–4 minutes on high speed).
- Gently fold about one-third of the whipped cream into the cream cheese mixture to lighten it, then fold in the remainder to keep the filling airy and mousse-like.
- Toss diced strawberries with optional granulated sugar and lemon juice, then pat dry to avoid soggy layers.
- Assemble the cups: spoon about a quarter cup of cream cheese filling over each crust, add 2–3 tablespoons diced strawberries, add another layer of filling, and finish with a final layer of strawberries arranged nicely.
- Cover each cup tightly with plastic wrap or a lid and chill in the refrigerator for at least 2 hours, preferably overnight for best texture and flavor melding.
- Just before serving, top each cup with a dollop of whipped cream, a strawberry slice, and a sprinkle of extra graham cracker crumbs if desired.
Notes
Ensure cream cheese is fully softened before beating to avoid lumps., Use a rubber spatula to fold in whipped cream gently to maintain light texture., Using a piping bag for the filling can give a neat, bakery-style finish., Clear dessert cups or mason jars (8–10 oz) are best to showcase layers., Leftover cups can be stored in the fridge for up to 3 days; add garnishes just before serving., These cups can be frozen for up to 1 month if whipped cream topping is skipped., For dairy-free or gluten-free options, substitute ingredients as described in recipe variations.
Nutrition
- Serving Size: 1 cup cup
- Calories: 340 kcal
- Fat: 22 g
- Carbohydrates: 30 g
- Protein: 5 g
More in Uncategorized

Crock Pot Chicken and Rice Recipe

Crock-Pot Chicken Noodle Soup

Slow Cooker Hearty Chicken Soup.