Strawberry Cheesecake Cup
Ready to treat yourself to a dessert that blends creamy cheesecake goodness with sweet, fresh strawberries? Say hello to the Strawberry Cheesecake Cup! This little dessert not only looks stunning but is super simple to whip up. Whether it’s for a family dinner or you just want a sweet pick-me-up, these individual cups will wow anyone lucky enough to dig in.
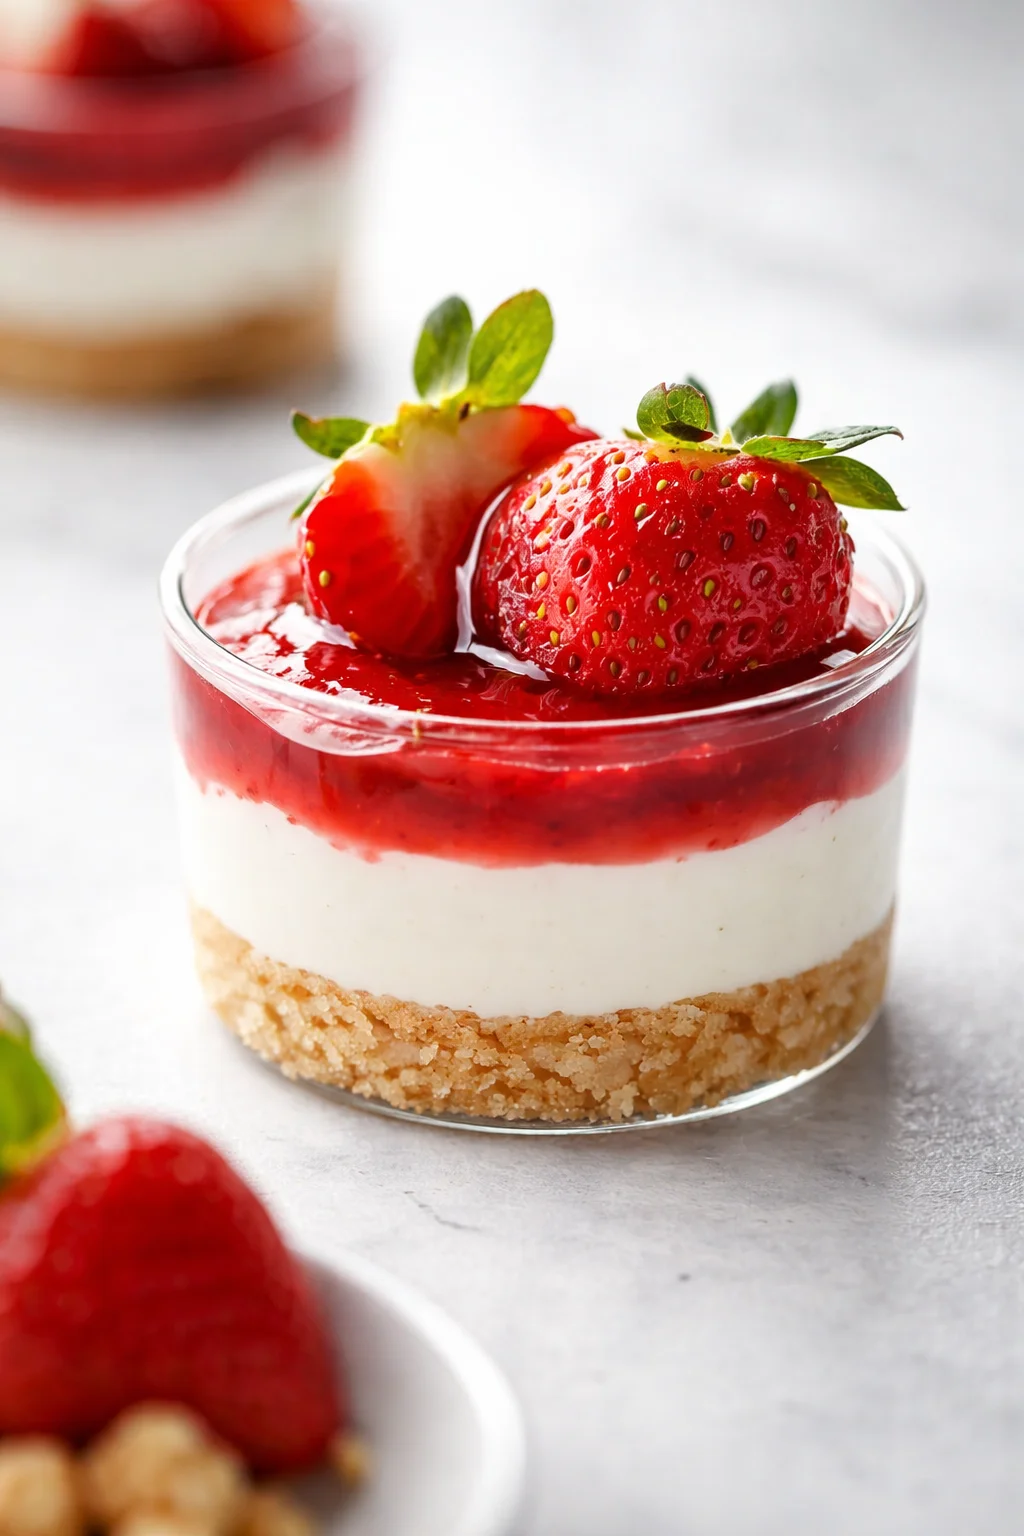
This dessert features smooth cream cheese mixed with fluffy whipped cream nestled on a crunchy graham cracker crust. Fresh, juicy strawberries crowned on top, plus a drizzle of berry sauce, make every bite a delicious combo of creamy, crunchy, and fruity. What’s great about Strawberry Cheesecake Cups is how flexible they are; you can get them ready ahead of time for special events or enjoy one as a delightful everyday treat.
In this guide, I’ll walk you through the key ingredients you’ll need, step-by-step instructions, and handy tips for serving and storing these tasty cups so they always stay fresh. Let’s jump into this fantastic recipe that’s sure to be a crowd-pleaser at your next get-together!
Welcome! You’re about to make a dessert that looks fancy but is totally easy: Strawberry Cheesecake Cups. Picture a crispy graham cracker crust topped with a luscious cream cheese filling and bright, fresh strawberries. These single-serve cups are perfect for parties or a simple weeknight dessert. They deliver all that classic cheesecake flavor without any tricky baking (only the crust needs a little time in the oven).
Ahead, you’ll find everything broken down for you: a clear list of ingredients like cream cheese, whipped cream, and graham cracker crumbs, simple step-by-step instructions, timing advice (about 20 active minutes plus a few hours to chill), and some great serving and storage tips.
- Gather your ingredients: quality tips and notes to make your cups taste amazing.
- How to make them: easy steps for crust prep, whipping the filling, and assembling cups.
- Serving and storing: ideas to present them beautifully and keep them fresh.
- Troubleshooting and fun variations: avoid mistakes and explore flavor swaps.
Keep reading for a straightforward recipe that you can easily customize—stick with the classic strawberries or get creative with some of my variation ideas. These mini cheesecakes are made to be fuss-free and loved by everyone.
Why These Cups Win Every Time
Strawberry Cheesecake Cups are a no-fail dessert everyone will enjoy. They combine a creamy filling, a crunchy graham cracker base, and fresh strawberries in perfect individual servings. They’re quick to put together, look beautiful at parties, and can be made ahead to save you stress. Plus, you don’t need to bake the cheesecake itself—just the crust—so you get all the rich flavor without complicated baking.
- Individual servings mean no slicing or messy plating.
- Quick and easy: about 20 minutes of active prep time.
- Make-ahead friendly—great for holidays or casual get-togethers.
- Flexible—you can swap crusts (try a Homemade Oreo pie crust), toppings, or fillings to suit your taste.
Ingredients and Helpful Notes
- 8 ounces (about 225 grams) cream cheese, softened to room temperature
- One cup (240 ml) heavy whipping cream
- Half a cup (100 grams) granulated sugar
- 1 cup (about 100 grams) graham cracker crumbs
- 4 tablespoons (56 grams) unsalted butter, melted
- About 1 cup (150 grams) fresh strawberries (slice them or leave them whole)
How to Assemble the Cups
- Preheat oven to 350°F (175°C).
- Crush graham crackers into fine crumbs.
- Mix graham cracker crumbs with melted unsalted butter until mixture resembles damp sand, adding more butter if needed.
-
Line a muffin pan with cupcake liners or lightly grease the compartments.
- Spoon about two tablespoons of the graham cracker mixture into each cup and press firmly with a flat-bottomed glass or the back of a spoon to form an even crust.
- Bake the crusts 8–10 minutes until the edges are golden brown.
- Remove pan and let the crusts cool completely.
-
Beat softened cream cheese with granulated sugar on medium speed until silky smooth, scraping the bowl sides as needed.
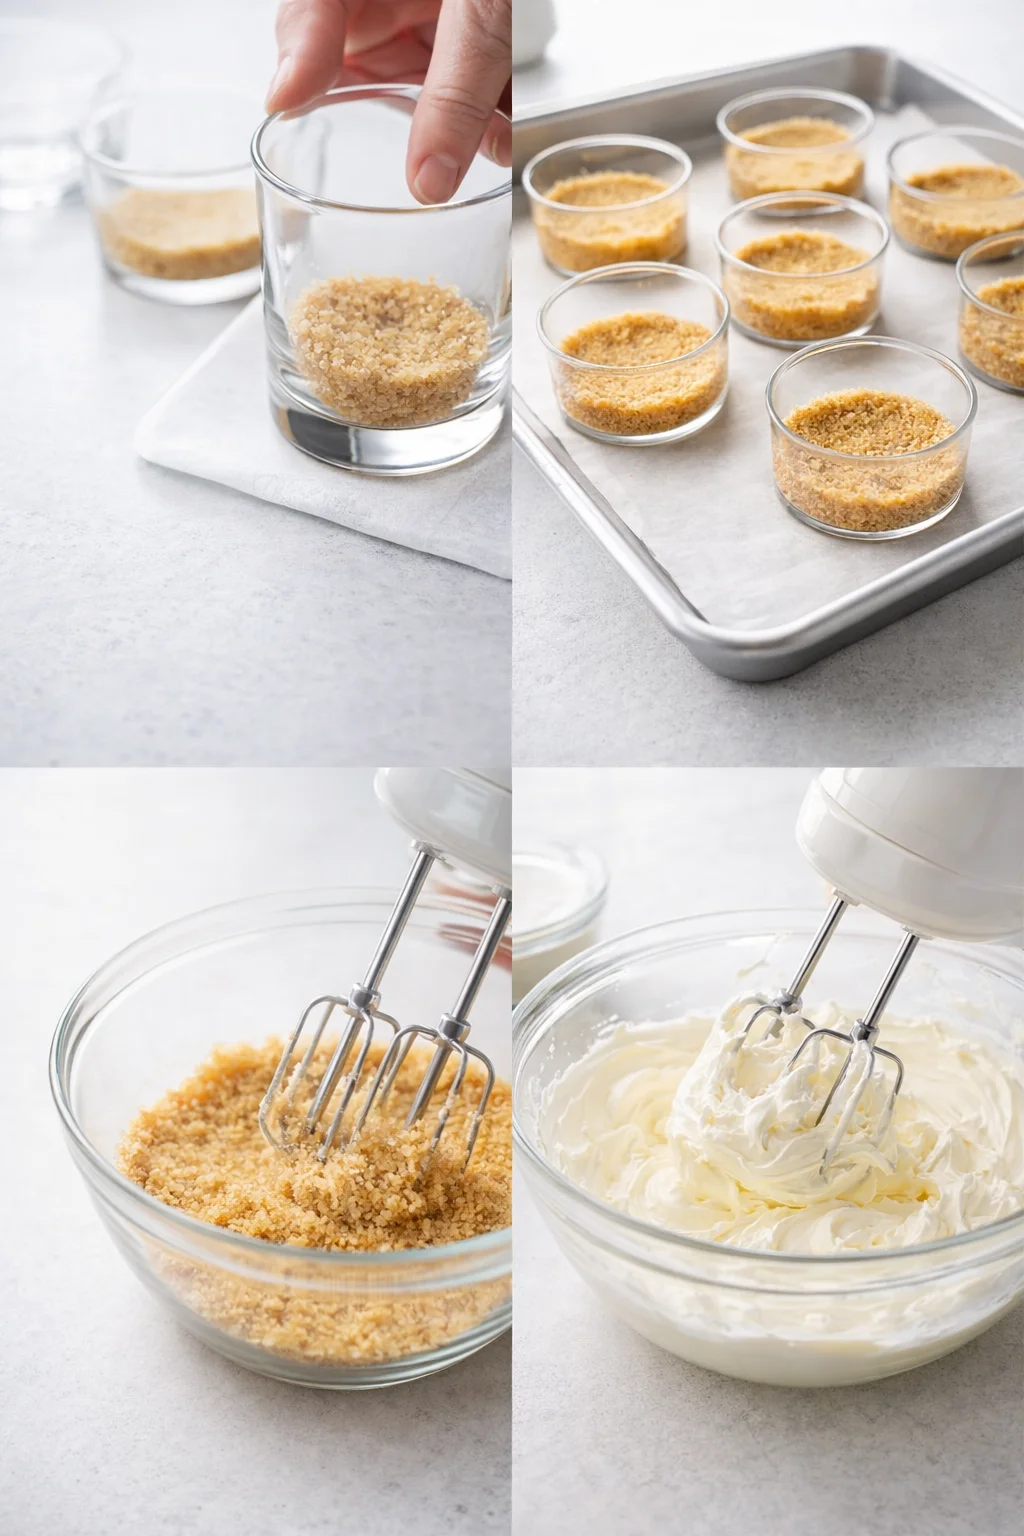
- With the mixer on low, slowly add heavy whipping cream, then increase to medium-high and whip until stiff peaks form.
- Gently fold in vanilla extract or other flavorings with a spatula until smooth.
- Spoon or pipe the cream cheese filling over each cooled crust, filling the cups just shy of the top.
-
Arrange sliced or whole fresh strawberries on top of the filling.
-
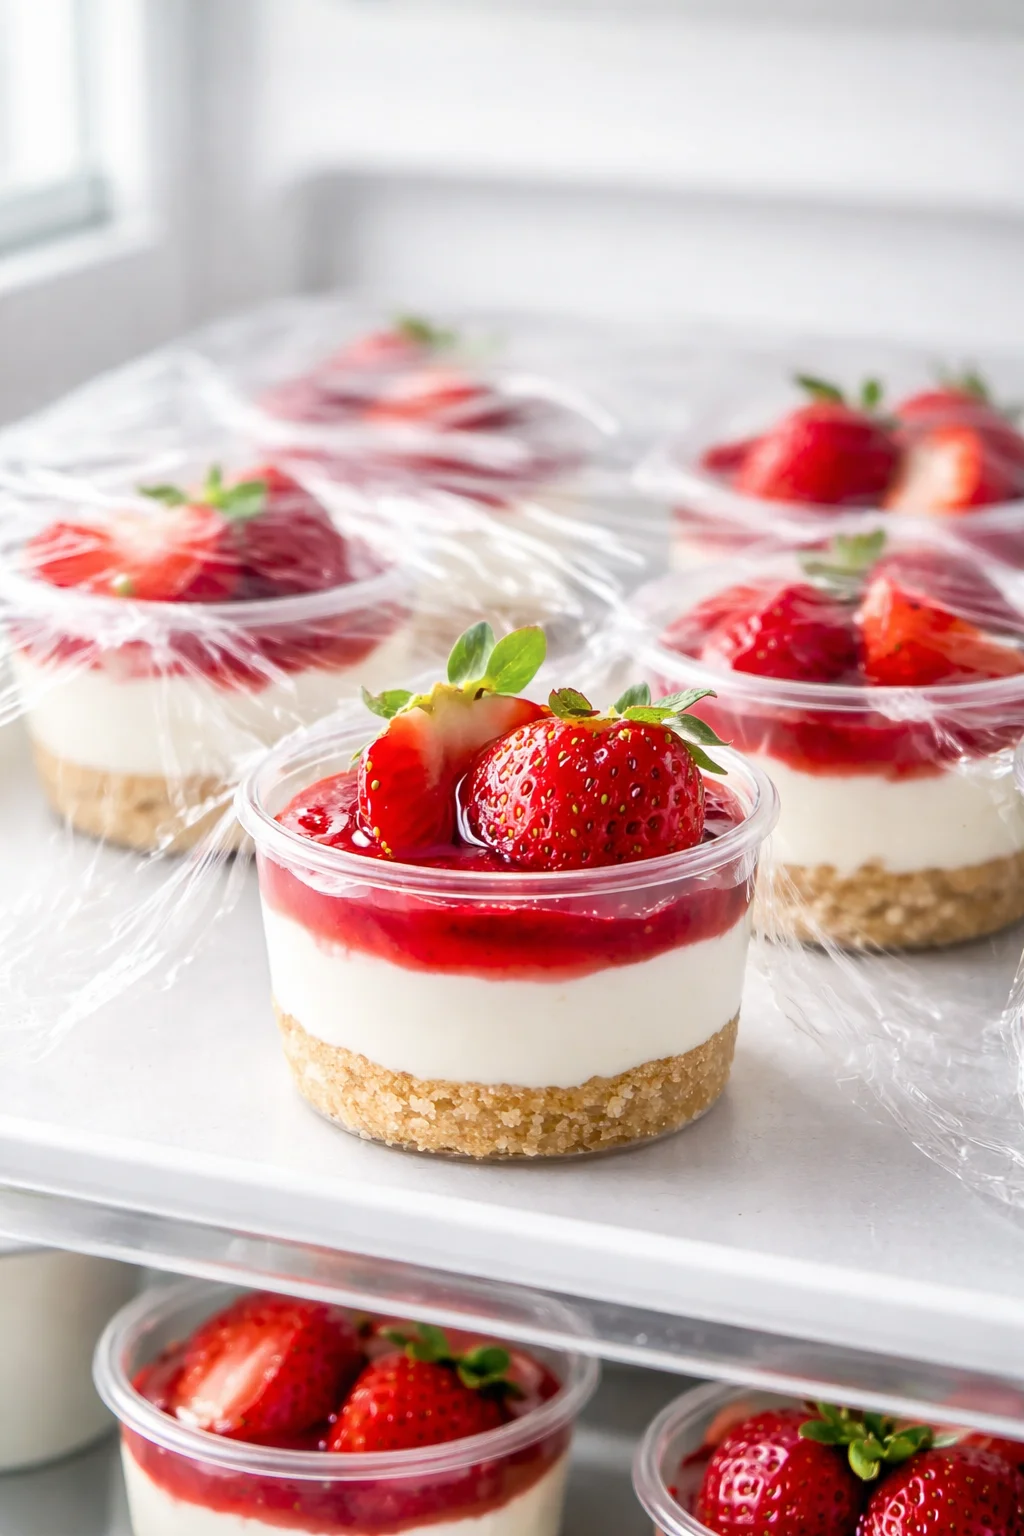
Cover the cups loosely with plastic wrap and chill in the refrigerator at least four hours or overnight.
Serving Ideas and Expert Tips
Serving Suggestions
When it’s time to serve your beautiful Strawberry Cheesecake Cups, add a few finishing touches to make them even more irresistible! Extra fresh strawberries or a sprig of mint on top add a pop of color and freshness. You could also drizzle chocolate or berry sauce just before serving for an elegant touch.
These mini desserts shine as individual servings at dinner parties or casual get-togethers where bite-sized treats are a crowd-pleaser. They also work wonderfully for celebrations like birthdays or holiday meals—just arrange them nicely on a platter so guests can help themselves. For another bite-sized party dessert, try Strawberry Filled Cupcakes.
Pair them well: serve with coffee for a cozy finish or alongside tea to accentuate the fruity flavors. Encourage everyone to take their time and savor each creamy, fruity bite! If you’d prefer a single showpiece dessert with similar flavors, our No-Bake Strawberry Cheesecake Recipe is a crowd-pleasing option.
Storage Guidelines
To keep your Strawberry Cheesecake Cups fresh and tasty after making them, store leftovers in airtight containers in the fridge. They’ll stay good for up to five days like this—and trust me, they rarely last that long!
If you want to save some for later, freeze the cups (without fresh strawberry toppings). Keep them in their muffin tins, cover tightly with plastic wrap, and freeze until firm (overnight is best). Then transfer them to a freezer bag or container. When you want to enjoy, thaw them overnight in the fridge and remove the wrap before serving. Serve chilled, or let them sit at room temp 10–15 minutes to soften up just right.
Using Low-Quality Ingredients
A big mistake is picking low-quality ingredients. Your cheesecake’s taste and texture really depend on fresh strawberries, good cream cheese, and a crisp crust. Always choose ripe but firm strawberries for the best flavor and texture. Go for full-fat cream cheese to get that rich, smooth filling—low-fat versions can give you a gummy, less satisfying result.
Don’t forget the crust! Whether graham crackers or digestive biscuits, make sure they’re fresh. Stale crumbs will dull the taste and texture of your cups. Taking a little extra time to grab good-quality ingredients makes a huge difference in the final dessert.
Neglecting to Chill Properly
Skipping the chill time is another common hiccup. Your cups need at least four hours—overnight is even better—in the fridge to set fully and let all the flavors come together. If you serve them too soon, the filling won’t hold its shape and will be runny instead of that perfect creamy texture.
Patience pays off here! The chill helps firm up the mixture and enhances all those creamy, fruity flavors we love.
Overmixing Ingredients
Overmixing can also cause problems. Mixing cream cheese just until smooth is the goal; go too far and you’ll whip in too much air, which leads to cracks, a grainy texture, or fluffiness instead of creaminess.
When you add the whipped cream, fold it in gently with a spatula rather than mixing on high speed. This keeps the filling light and velvety without losing richness.
Layering Your Ingredients
One key to success with Strawberry Cheesecake Cups is how you layer everything. Press your crust firmly and evenly into the bottom of each cup so it holds together when you eat.
Next, spread a generous layer of the cream cheese filling smooth and even. Finally, arrange your fresh sliced strawberries on top for a vibrant look and balanced textures. This layering makes sure every spoonful features that perfect mix of crunch, creaminess, and juicy fruit.
Experimenting with Flavors
Feel free to tweak the flavors! Strawberries are classic, but try adding other berries like blueberries or raspberries for added color and zest. You can also stir in a teaspoon of lemon zest or a splash of almond extract in your filling for a fresh twist.
Want to get fancy? Mix in mini chocolate chips or drizzle a little melted chocolate on top. The options are endless for making these cups your own while keeping them simple and delicious.
Presentation Matters
How you serve these little treats makes a big difference. Clear glass cups or mason jars show off those beautiful layers and make the dessert feel special. Garnish with a slice of strawberry or a mint leaf on top for extra charm.
A little whipped cream on top adds richness and makes them look even more inviting without overpowering the fresh fruit and creamy filling. Remember, we eat with our eyes first, so make these cups as pretty as they are tasty!
Choosing Seasonal Strawberries
Using seasonal strawberries makes a world of difference. Strawberries taste best from late spring to early summer when they’re freshest and sweetest. Check out your local farmers’ market for the juiciest, ripest berries—fresh, local fruit will always give you better flavor and texture in your cups.
Avoid out-of-season strawberries when possible as they tend to be bland and watery, which won’t do your dessert justice.
Pairing with Complementary Flavors
Boost your cheesecake cups by pairing them with flavors that balance richness and sweetness. Try adding a little lemon zest or juice into the cream cheese filling to brighten it up and cut through the richness.
A drizzle of honey or chocolate sauce just before serving adds an elegant touch and layers of flavor without overwhelming the berries or cream.
Serving Temperature Matters
Serving temperature can make or break your cheesecake cups. They’re best served chilled but not frozen hard. When served too cold or frozen, the flavors get muted and texture gets firm.
Let them sit for about 10-15 minutes after removing from the fridge to soften slightly. This mellow chill lets the creamy filling shine and keeps the crust crisp. Keep this in mind when planning your party timing so they’re enjoyed at their best.
Flavor Swaps and Add-Ins
Here are some fun variations you can try while following the same simple method:
- Swap the graham cracker crust for crushed Oreos or digestive biscuits for a new flavor twist.
- Use mascarpone cheese or a mix of cream cheese and Greek yogurt for a tangier and lighter filling.
- Add a teaspoon of lemon zest or swirl in a couple tablespoons of strawberry puree to the filling for a brighter fruit flavor—for a pretty marbled look, see this strawberry swirl cheesecake.
- Top with different berries like blueberries or raspberries, or even a mixed berry compote instead of fresh strawberries.
- Mix in some chopped toasted nuts such as almonds or pistachios into the crust or sprinkle on top for extra crunch.
- For chocolate lovers, fold in mini chocolate chips or drizzle melted chocolate over the finished cups.
- Make a dairy-free version using vegan cream cheese and chilled coconut cream whipped until fluffy (this vegan Biscoff cheesecake shows the no-bake dairy-free filling technique).
Storage and Freezing Tips
Keep your assembled cups fresh by storing them in airtight containers in the refrigerator. If you cover them properly, they’ll last up to five days. For the best look, add fresh strawberry slices just before serving so they stay bright and firm, as in this French Strawberry Tart (Tarte aux Fraises).
If you want to freeze them for longer storage, don’t add fresh fruit beforehand. Place the unadorned cups back in the muffin tins, cover tightly with plastic wrap, and freeze until solid (several hours or overnight). Once frozen firm, transfer them to a freezer-safe bag or container.
When you’re ready to enjoy, thaw them in the refrigerator overnight and peel off the plastic wrap before serving. They’re best served cold, but you can let them sit out for 10–15 minutes to soften slightly for a perfect creamy texture.
If you want to prep ahead, bake the crusts a day or two before your event and store them sealed at room temperature or in the fridge. Assemble and chill the cups at least four hours or overnight for the best texture and flavor—similar to our No-Bake Strawberry Cheesecake.
Answers to Common Questions
What ingredients do I need for a Strawberry Cheesecake Cup?
To make delicious Strawberry Cheesecake Cups, you’ll need a few basics. Start with cream cheese for that rich, creamy base. Granulated sugar sweetens nicely, and a splash of vanilla extract adds flavor depth. Sour cream gives that perfect hint of tang. For the crust, crushed graham crackers mixed with melted butter create a crunchy base. Lastly, fresh, ripe strawberries top everything off with juicy freshness. Gathering these ingredients sets you up for success in making your own tasty cheesecake cups!
How do I prepare the crust for the Strawberry Cheesecake Cup?
Making the crust is easy. Crush graham crackers finely in a food processor or by placing them in a plastic bag and rolling over with a rolling pin. Mix the crumbs with melted butter until it sticks together when pressed. Spoon this into the bottom of your serving cups or glasses, pressing down firmly to form an even layer. Chill the crust in the fridge for 10-15 minutes before adding your filling so it’s sturdy and holds its shape when you serve.
Can I make Strawberry Cheesecake Cups ahead of time?
Absolutely! These cupcakes are perfect for making in advance. After assembling, cover each cup tightly with plastic wrap or foil and keep in the fridge. They’ll stay fresh and flavorful for a day or two before serving. Just add fresh strawberry topping right before serving so the berries look bright and tasty. This make-ahead trick makes entertaining so much easier and stress-free! If you’re new to no-bake fillings, our easy no-bake cheesecake recipe walks through mixing and chilling so the cups set up beautifully.
What can I substitute for cream cheese in the Strawberry Cheesecake Cup?
If cream cheese isn’t your thing, you have options! Mascarpone cheese is a great alternative—it’s creamy and slightly sweeter. Greek yogurt adds creaminess with a boost of protein and a tangy twist. For a dairy-free choice, silken tofu works well; just blend it smooth for a lovely creamy base. Whatever you choose, just make sure it’s softened or at room temperature before mixing to get the best texture.
How should I store leftover Strawberry Cheesecake Cups?
Leftovers store nicely in the refrigerator covered tightly with plastic wrap or in an airtight container. They keep well for 3-4 days. If you topped your cups with strawberries, add fresh ones again just before eating to keep them crisp and tasty. This way, you can enjoy the flavors without losing that fresh, delicious texture.
Can I customize my Strawberry Cheesecake Cup recipe?
Definitely! Customizing these cheesecake cups is part of the fun. Try swapping strawberries for blueberries or raspberries for variety. You can also switch up flavors by adding almond or lemon extract instead of vanilla. Mix in chocolate chips or swirl in some fruit puree into your filling for a richer dessert. Toppings like chopped nuts or whipped cream add texture and indulgence, making these cups uniquely yours and always delicious! For a playful mix-in idea, see this Mini Egg Cheesecake – Easy No-Bake Recipe that shows how to fold candies into the filling.
Delicious no-bake Strawberry Cheesecake Cups featuring a crunchy graham cracker crust, creamy cream cheese filling whipped with heavy cream and sugar, topped with fresh strawberries, perfect for individual servings and make-ahead dessert.
- Prep Time: 20 minutes
- Cook Time: 8-10 minutes
- Total Time: 4 hours 30 minutes to overnight (includes chilling)
- Yield: 8 servings 1x
- Category: Dessert
- Cuisine: American
Ingredients
- 8 ounces (225 grams) cream cheese, softened to room temperature
- 1 cup (240 ml) heavy whipping cream
- 1/2 cup (100 grams) granulated sugar
- 1 cup (about 100 grams) graham cracker crumbs
- 4 tablespoons (56 grams) unsalted butter, melted
- 1 cup (150 grams) fresh strawberries, sliced or whole
Instructions
- Preheat oven to 350°F (175°C).
- In a medium bowl, mix graham cracker crumbs and melted unsalted butter until mixture resembles damp sand. Add more butter if needed for binding.
- Line a muffin pan with cupcake liners or grease compartments if skipping liners.
- Divide about two tablespoons of graham cracker mixture into each cup and press firmly to create an even crust layer.
- Bake crusts for 8-10 minutes until edges are golden brown. Remove and let cool completely.
- In a clean bowl, beat softened cream cheese and granulated sugar at medium speed until smooth, about 2 minutes. Scrape sides as needed to remove lumps.
- Slowly add heavy whipping cream while mixing on low speed. Increase speed to medium-high and whip for about 3 minutes until stiff peaks form. (Optional: gently fold in 1 teaspoon vanilla extract or other flavors.)
- Spoon or pipe cream cheese filling over cooled crusts, filling cups nearly to the top.
- Top with fresh sliced or whole strawberries for presentation.
- Cover cups loosely with plastic wrap and chill in the refrigerator for at least 4 hours or overnight to set fully.
- Before serving, optionally garnish with extra strawberries, mint leaves, or drizzle berry or chocolate sauce.
Notes
Use full-fat cream cheese for best rich texture; avoid low-fat for gummy results., Press crust firmly for a compact base that holds when eating., Do not overmix cream cheese to avoid grainy texture; fold whipped cream gently., Use seasonal, fresh ripe strawberries for best flavor and texture., Make ahead: bake crusts 1-2 days prior, store sealed; assemble and chill cups at least 4 hours before serving., Store assembled cups in airtight containers in fridge up to 5 days; add fresh strawberries just before serving., Freeze unadorned cups in muffin tins covered tightly; thaw overnight in fridge before serving., Flavor variations: swap crust with Oreos or digestive biscuits; add lemon zest or almond extract to filling; top with other berries; add mini chocolate chips or nuts., Serve chilled but let cups sit 10-15 minutes after fridge to soften slightly for best texture and flavor.
Nutrition
- Serving Size: 1 cup dessert cup
- Calories: Approx. 300 calories per serving
- Fat: 20 grams per serving
- Carbohydrates: 30 grams per serving
- Protein: 5 grams per serving
More in Uncategorized

Crock Pot Chicken and Rice Recipe

Crock-Pot Chicken Noodle Soup

Slow Cooker Hearty Chicken Soup.