Easy Graham Cracker Crust Recipe
This Graham cracker crust recipe is a total winner super simple, utterly delicious, and way better than any store-bought crust you’ve tried! With just a handful of basic ingredients, you’ll get a buttery, golden crust that’s perfect for pies and tarts of all kinds. The cool thing? You can customize it easily! Use whatever graham crackers you love classic, honey-flavored, or even chocolate for a fun twist.

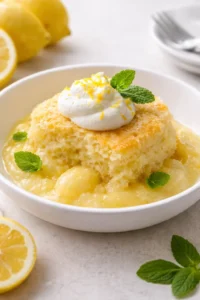
We’re big fans at my house of making our own Graham cracker crust it’s quick, fuss-free, and makes every pie taste extra special, like this bright and tangy lemon pie you see here.
Why you’ll absolutely love this homemade Graham cracker crust
- You can grab any graham crackers on hand; chocolate ones add a little extra fun and flavor.
- This is hands down one of the best crusts you’ll ever bake after you try it, you’ll ditch the store-bought kind for good.
- It’s perfect for all your favorite dessert pies or creamy cheesecakes.
- All the ingredients are vegetarian-friendly, so everyone can enjoy it.
Ingredients you’ll gather for this crust
Just three simple ingredients do the trick: Graham cracker crumbs, granulated sugar, and unsalted butter.
This Graham cracker crust recipe is simple and incredibly tasty you’ll find yourself making it over and over again!
Step-by-step guide to making the Graham cracker crust
Making this crust at home is so doable, I promise. It comes together in a snap.
I’ve included all the measurements for both US and metric in the recipe card below so you can print it or save it easily.
First up, preheat your oven to 350°F (175°C).
Pop your whole Graham crackers in a food processor or blender and pulse until they turn into fine crumbs.
If you want to skip that step, no worries grab a bag of crushed Graham crackers from the store and you’re good to go.

Just blitz those crackers until you get fine crumbs.

Then mix those crumbs with melted butter and sugar in a big bowl.
Once your crumbs are ready, whisk them together with the melted butter and sugar in a bowl.
Keep mixing until everything feels grainy and crumbly, with no big clumps. If you spot some stubborn chunks, gently press them down with the back of a spoon to break them apart.

Mix it all up until it’s crumbly and grainy that’s the texture you want.

Pack it into your pie plate, then bake for a lovely golden crust.
Next, pour the crumb mixture into a 9-inch pie plate. Use your hands or the back of a spoon to press the crumbs evenly along the base and sides. No need to press super hard just firm enough so it sticks together without falling apart. Take time to press the edges neatly for a finished look.
Pop it into the oven to bake for 10 minutes. Once it’s done, take it out and let it cool completely before adding your filling.
And just like that, you’ve got a perfect crust ready to be filled with your favorite pie filling. Yum!
Helpful notes and pro tips
- Vegan Graham cracker crust
Be sure to check your graham crackers for honey, which some varieties include. Swap the butter for a plant-based option to keep the crust vegan-friendly. - Flavor variations
Try switching up your graham crackers chocolate or cinnamon flavors add a delicious new spin to your crust. - Out of Graham crackers?
No worries digestive biscuits are a great stand-in, especially if you’re outside the US. - Storage tips
Store your baked crust in the fridge for up to three days, or freeze it for up to three months for easy make-ahead dessert prep.

How to store your Graham cracker crust
This crust is super easy to make ahead! Keep it wrapped tight in the fridge for up to 3 days. Need to prep even earlier? Freeze it for up to 3 months, then thaw completely before filling and serving.
Tips to keep your Graham cracker crust from falling apart
The secret’s in the butter this binds those crumbly bits together like glue. Also, baking the crust helps it firm up and hold its shape, so don’t skip that step!
Why might my Graham cracker crust turn out too hard?
There are a couple common culprits to watch out for.
First, adding too much butter can cause the crust to get overly firm and hard when chilled. So, be sure to measure your butter carefully!
Second, pressing the crust down too firmly can make it dense and tough. Press gently and evenly, just enough so it sticks together but isn’t rock solid.


Easy Graham Cracker Crust Recipe
This easy graham cracker crust is perfect for anyone wanting a tasty, no-fuss dessert base. It comes together in minutes and pairs beautifully with any pie filling you love. Plus, it makes one 9-inch crust that’s always a hit!
Prep Time: 5 minutes minutes
Cook Time: 10 minutes minutes
Total Time: 15 minutes minutes
Course: Dessert
Cuisine: American
Servings: 8
Calories: 167kcal
Author: Mandy Applegate | Splash of Taste
Equipment
- 9 inch pie pan
Ingredients
- 1½ cups Graham cracker crumbs
- ¼ cup Granulated sugar
- 6 tbsp Unsalted butter
Metric – US Customary
Instructions
For the Graham cracker crust
- Start by getting your oven nice and hot at 350°F (175°C).
-
Next, blitz up your Graham crackers in a food processor or blender until you have fine crumbs. Toss those crumbs in a bowl, then stir in the sugar and finally the melted butter. You want a crumbly, grainy texture, so if any bigger chunks stick around, just break them up gently.
1½ cups Graham cracker crumbs, ¼ cup Granulated sugar, 6 tbsp Unsalted butter
- Pour your crumbly mix into a 9-inch pie pan and press down gently with your hands to cover the base and sides evenly. Don’t press down too hard just firm enough so it holds together. Use the back of a spoon to smooth out the edges and make them look nice and tidy.
- Bake your crust for 10 minutes. Once it’s out of the oven, let it cool completely before you add your yummy filling. Then have fun creating your favorite pie!
Notes
- Vegan Graham cracker crust
Check your graham crackers to make sure they don’t contain honey. Use vegan butter to keep this crust plant-based and just as scrumptious. - Flavor swaps
Change things up by using different flavors of graham crackers chocolate or cinnamon are especially tasty! - No graham crackers on hand?
Digestive biscuits are a great substitute, especially if you’re cooking outside the US. - Storing your crust
Keep any leftover baked crust refrigerated for up to 3 days or freeze it tightly wrapped for up to 3 months.
Nutrition
Calories: 167kcal | Carbohydrates: 18g | Protein: 1g | Fat: 10g | Saturated Fat: 6g | Polyunsaturated Fat: 0.4g | Monounsaturated Fat: 3g | Trans Fat: 0.3 | Cholesterol: 23mg | Sodium: 105mg | Potassium: 31mg | Fiber: 1g | Sugar: 10g | Vitamin A: 266IU | Calcium: 15mg | Iron: 1mg
Tried this recipe?I’d love to hear how it turned out drop a comment and share your experience!
More in Cakes