Perfect Pie Crust Recipe
Looking to master the flakiest pie crust that will elevate every pie you bake? This easy pie crust recipe uses simple pantry staples and comes together quickly. You can even make it ahead or freeze it for later, perfect for those busy holiday baking days.

Introduction — What to expect
Ready to take your pies up a notch with a tender, flaky crust? This recipe walks you through an easy method using ingredients you likely already have on hand, and it works beautifully for both sweet and savory pies.
You’ll find clear step-by-step photos, a handy printable recipe card with US and metric measurements, plus practical tips to keep everything cold, blind bake when needed, and store or freeze your dough for later use.
- Simple ingredients you probably already have in your pantry.
- Clear step-by-step instructions with photos and a printable card.
- Tips for chilling, blind baking, and storing or freezing dough.
- Directions for single- and double-crust pies, with suggested baking times and temperatures.
Why you’ll love this easy homemade pie crust recipe
- Making homemade pie dough is simpler than you might think and tastes way better than store-bought.
- This flaky crust works perfectly with both sweet and savory fillings.
- You can make the crust ahead and freeze it, so you’re always ready when a pie craving hits.
- All the ingredients are common pantry staples, so no last-minute runs to the store.
Ingredients you’ll need
Here are the ingredients you’ll use — all shown in the picture below.

How to make the perfect pie crust with step-by-step instructions
The printable recipe card below gives you exact US customary and metric measurements for your convenience.
Start by combining the flour, salt, and sugar in a large mixing bowl or a food processor. Don’t worry if you don’t have a food processor — a bowl and a pastry cutter or your fingers work just fine.

Add salt and sugar to the flour, then stir it all together.

Toss in cold, cubed butter and work it in until you have coarse crumbs.
Next, cut those cold butter cubes into the flour mix until the mixture looks like coarse crumbs.
Don’t have a food processor? No worries — a pastry cutter or even your fingertips will do the trick just as well.
Then slowly add ice-cold water, a tablespoon at a time, mixing gently as you go. The goal is to bring the dough together without overworking it — be gentle!

Add ice water slowly, mixing gently to form the dough.

Gather the dough into a ball shape.

Wrap the dough snugly in plastic wrap and chill.
Once the dough comes together, shape it into a neat ball with your hands. Then wrap it tightly in plastic wrap and pop it in the fridge to chill for about an hour.
While your dough chills, preheat your oven to 400°F (190°C).
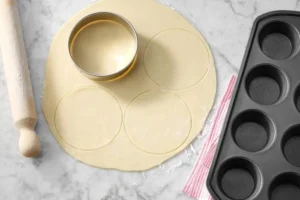
After chilling, place the dough on a lightly floured surface and gently press it down into a fat disc around ¾ inch thick.
Use a rolling pin to roll this out into a 12-inch circle. Then carefully transfer it to a 9-inch pie plate.

Roll out the dough evenly with a rolling pin.

Place the dough in your pie dish and trim the edges.
Trim off any extra dough hanging over the edges, then place a sheet of parchment paper over the crust. Fill it with pie weights, dry beans, rice, or even baking balls to keep the crust from puffing.
Bake this lined crust for 15 minutes.
Carefully remove it from the oven and take off the parchment paper and weights.
If your pie calls for a partially baked crust (blind bake), pop it back in the oven for another 5 minutes or until the bottom looks dry.

Place parchment paper and baking beans on the crust and bake.

Remove baking beans and parchment paper after baking.
If your recipe wants a fully baked crust, bake the crust until it’s golden brown, which usually takes 15 to 20 minutes.
For double-crust pies, repeat these steps for the top crust but don’t blind bake it. Instead, place it over your pie filling and use kitchen scissors to trim the edges to about a 1-inch overhang. Then fold and press this edge into the bottom crust to seal.
Now, all that’s left is to enjoy your homemade pie!

Recipe notes and expert tips
- Keep it cold
Keeping everything nice and cold is key! I like to freeze my butter ahead of time, then move it to the fridge a few hours before baking. This keeps the butter cold enough for that flaky texture. Also, chill the flour, salt, and sugar mixture in the fridge before using. - Hot kitchen? No problem
If your kitchen feels warm while you’re working, just pop your dough back in the fridge to cool it down before continuing. This keeps the fat from melting too soon and ruining the flakiness. - Storage tips
You can prepare the dough ahead of time and stop before rolling it out. Wrap it tightly in plastic wrap and store it in the fridge for up to 3 days or freeze it for up to 3 months for future baking adventures.
Make ahead
One of the best parts about homemade pie crust is you can make it in advance and save time later.
Simply follow the recipe through to forming the ball of dough, then stop before rolling it out. Wrap it tightly with plastic wrap and refrigerate for up to 3 days.
Want to keep it longer? Freeze the dough for up to 3 months. When you’re ready to bake, thaw it overnight in the fridge before rolling out.

Cinnamon Pie.
What makes a pie crust flaky?
Wondering how to get that perfectly flaky pie crust? It comes down to a few important things. First, using a high-fat ingredient like cold butter or shortening is a must.
When baked, these fats melt and create steam pockets that puff the layers, giving you that flaky texture.
Keeping all your ingredients cold is crucial. This helps keep the fat solid longer and stops the dough from developing too much gluten, which makes crusts tough.
Don’t overwork or overmix the dough — that can make it dense. Slowly adding just the right amount of cold liquid also helps develop the right texture.
Finally, chilling the dough before rolling it out relaxes the gluten and firms up the fat, so handling it gently and rolling it out thin leads to those signature flaky layers.
What can I fill my pie crust with?
This flaky crust is so versatile! Use it to make classic sweet pies like apple pie or cherry pie, or take it savory with a delicious quiche or vegetable pot pie.
It’s perfect for pumpkin or sweet potato pie too — its buttery texture and delicate flakiness will really make your pies shine.
Once you try this homemade crust, you’ll never want to go back to store-bought.

Storage Tips
After making your pie crust dough, wrap it tightly in plastic wrap. You can store it refrigerated for up to 3 days, which is great if you want to prepare it ahead. For longer storage, freeze the dough for up to 3 months. When ready to use, thaw in the fridge overnight before rolling out.
Make-Ahead Tips
Making pie crust ahead saves so much stress on baking day! Just follow the recipe through forming the dough ball, then wrap and chill or freeze it. You can also pre-roll the dough into a disc and chill that for easier rolling later. When you’re ready, simply let it come to a slightly cooler room temperature before shaping it.
Variations
- Swap half the all-purpose flour for whole wheat for a heartier crust.
- Add a tablespoon of sugar for a slightly sweeter crust, great for fruit pies.
- For extra flakiness, try using a mix of butter and shortening.
- Incorporate fresh herbs like thyme or rosemary for savory pies.
Serving Suggestions
Serve your pie fresh out of the oven with a scoop of vanilla ice cream or a dollop of whipped cream for classic comfort. For savory pies, pair with a simple green salad or roasted vegetables. Leftover pie crust scraps can be baked into mini tartlets or used to top pot pies.
Recipe FAQs
- Can I use margarine instead of butter?
Butter gives the best flavor and flakiness, but margarine can work in a pinch. Just make sure it’s cold and solid. - How do I know when the dough has enough water?
The dough should just come together and hold when pressed. If it feels dry, add one tablespoon of cold water at a time. - Why shouldn’t I overmix the dough?
Overmixing develops gluten, making the crust tough instead of tender and flaky. - Can I freeze baked pie crust?
You can freeze baked crusts for a couple of weeks, wrapped well. Thaw at room temperature before filling and serving.
An easy homemade flaky pie crust recipe that uses simple pantry ingredients and can be used for sweet or savory pies. Includes instructions for preparation, chilling, rolling, blind baking, and storage.
- Prep Time: 15 minutes
- Cook Time: 15 to 40 minutes (depending on whether blind baking or full baking)
- Total Time: 1 hour 30 minutes (includes chilling)
- Yield: 1 9-inch pie crust or double crust for one 9-inch pie 1x
- Category: Dessert
- Cuisine: American
Ingredients
- 2 1/2 cups all-purpose flour (about 320 grams)
- 1 teaspoon kosher salt
- 1 tablespoon granulated sugar
- 1 cup (2 sticks) cold unsalted butter, cut into small cubes
- 6 to 8 tablespoons ice-cold water
Instructions
- Combine the flour, salt, and sugar in a large mixing bowl or food processor.
- Add the cold, cubed butter to the flour mixture.
- Cut the butter into the flour using a pastry cutter, food processor, or fingertips until the mixture resembles coarse crumbs.
- Slowly add ice-cold water, one tablespoon at a time, mixing gently until the dough just comes together.
- Shape the dough into a ball, wrap tightly in plastic wrap, and refrigerate for about 1 hour.
- Preheat the oven to 400°F (190°C).
- On a lightly floured surface, gently press the dough into a disc about 3/4 inch thick.
- Roll out the dough into a 12-inch circle.
- Carefully transfer the dough to a 9-inch pie plate and trim the edges.
- Place parchment paper over the crust and fill with pie weights, dried beans, rice, or baking balls to prevent puffing.
- Bake the crust for 15 minutes.
- Remove the parchment paper and weights carefully.
- If a partially baked (blind) crust is needed, bake for an additional 5 minutes or until the bottom looks dry.
- For fully baked crust, bake until golden brown, about 15 to 20 minutes.
- For a double-crust pie, repeat rolling for the top crust without blind baking. Place over filling, trim edges to 1 inch, fold and press to seal.
Notes
Keep all ingredients cold to ensure a flaky crust—freeze butter ahead and chill flour mixture., If kitchen is warm, chill dough intermittently to prevent butter from melting., You can store unrolled dough in the fridge for up to 3 days or freeze for up to 3 months., When ready to bake frozen dough, thaw overnight in the fridge., Variations include substituting half the flour with whole wheat, adding sugar for a sweeter crust, mixing butter and shortening for extra flakiness, or adding fresh herbs for savory pies., Serve sweet pies with vanilla ice cream or whipped cream; savory pies go well with salads or roasted vegetables., Leftover crust scraps can be baked into tartlets or used as pot pie toppings.
Nutrition
- Serving Size: 1 slice
- Calories: Approximately 250 calories per serving (depends on portion size)
- Fat: 14 grams
- Carbohydrates: 28 grams
- Protein: 3 grams
More in Pies